Xantia Octopus Repair - Bush Mechanic Notes

addo

Contented Peugeot Driver
1000+ Posts
Fellow Frogger
Joined
Jun 11, 2005
Messages
16,578
Location
Don't remind me!
This doesn't really cross to the billet topic elsewhere.

Xantia octopodes are famous (latterly) for breaking the moulded, non-reinforced thermoplastic tubes.

What makes the repair process an utter, utter, utter bastard - to paraphrase Rik - is firstly that every attempt to join hoses with an insert tube, simply splits the hose further, and secondly that they often break right near the overmoulded plastic junctions.

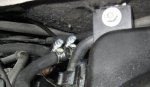
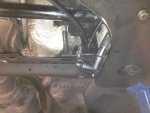
So here we go: You've broken a hose miles from the nearest Citroën specialist, and fluid is leaking all over the place. There is an ordinary car parts place or scrapyard nearby.

Measure the OD of your hose, without the heatshrink sleeving. For a 3/8" OD hose, you need 1/4" fuel line. For a 1/2" OD hose you need 5/16" fuel line.

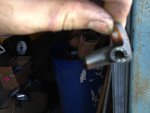
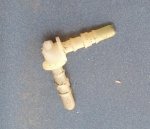
The moulded junctions and elbows can be skinned. Carefully cut the black outer off with a hacksaw blade to reveal the residual hose stubs jammed upon barbed white nylon fittings. In fact, the entire fluid passage through the fitting is one piece of white nylon with a black overmould. You just need the white nylon bit, undamaged.

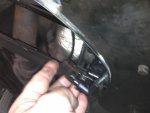
Now it's easy to see where and how the fuel line sections fit. Use clamps or twitch it up with a double loop of tie wire to be a real bush mechanic.

To butt join hoses, you need a short section of 3/8" ID fuel line for the smaller hoses, or a piece of irrigation line (approx 1/2" ID). Again, use clamps or tie wire for security, but the joins will be quite tight - you may need to lube with a bit of LHM to shove them together.

Top up lost fluid with whatever is to hand, and carry on.
 
The real cause of the problem is heat and age. As the original return hoses age, the rubber turns brittle and the inside diameter shrinks. The octopus on the Xantia goes from the LHM reservoir TOWARDS the hot engine, then turns towards the bulkhead and turns again to disappear towards the passengers footwell.

The most likely way to rupture the octopus is every couple of years when you remove the LHM reservoir to clean the filters and change the LHM. Because of the design, the octopus has to be bent to remove the filter unit. The return lines which have lasted for the past two years, undisturbed, now give way due to the extra two years of aging, becoming more brittle.

The easiest rectification is to join the broken return lines where they are visible and easy to get to. That is, between the LHM reservoir and the bulkhead.

The trick is to remember that the inside diameter of the new, flexible rubber fuel line is greater than the old, brittle return lines. The secret is to use brass joiners which have a wider input and narrower output. Pitek P7R Reducing Tube Joiner 06007-0403 1/4" to 3/16" should do the trick. I also use mini hose clamps on each side to complet the join.

Have a look at http://www.aussiefrogs.com/forum/showthread.php?t=86433 [Post #6] for the photo of the reducing joiner, I cannot aqttach it to this thread.

John
 

Attachments

  • Tube Join 2.jpg
    Tube Join 2.jpg
    95.8 KB · Views: 2,551
Last edited:
Thanks guys - good advice. As mine harden, the temptation to extend the LHM filter change interval is strong, especially as I do such small mileages.

I carry a spare clutch cable attaching piece in the glove box, with Alan's old instructions for fitting.

I carry a few of the three-way joiners that fail sometimes at the back near the exhaust (advice from Continentals).

Now I'll have to put a few of those fittings in too.

It's all the glovebox is any use for anyway!
 
The rear threeways require dropping your subframe (ooh-er!) - not exactly a five minute job but quite do-able. If you leave the offside just dangling by a couple of threads at its front corner, the whole deal is easier to pick up and relocate again, starting with nearside rear bolt. It's actually easier/faster this way than the "Braille" approach.

I generally refuse to carry spares and treat breakdowns as a free adventure. Australia is a good place; mostly the weather is amicable and our rate of armed insurgency is low enough to constitute practically nil risk. John's reducing joiners could probably go in more reliably with heat to soften the brittle tubing, rather than crack it.

Choice of materials for the "rubber" octopus is disgraceful; clearly they acted on advice re durability from the maker of BX and 405 dashes.
 
Hoses/Connectors

Hey John,

Going through the same problem with hydraulic pipes and connectors at the moment.
After removing the steering rack and putting it back in I had to re-connect bleed/return lines behind the steering rack passenger side; in doing that I pushed the nylon line too hard into the rubber/nylon housing in return the housing broken into pieces. I tried to move it away and then the main return line back to the reservoir snapped off.
I am going to re design this "manifold" with push connectors and nylon pipe so will post pics of this after the parts arrive from the UK. They are also quite cheap and are avilable on ebay.
These fittings and nylon pipe could be used throughout the entire system to replace brittle pipes and connectors/junctions.
 

Attachments

  • IMG_0390.jpg
    IMG_0390.jpg
    94 KB · Views: 1,362
  • IMG_0392.jpg
    IMG_0392.jpg
    85.4 KB · Views: 1,605
  • IMG_0394.jpg
    IMG_0394.jpg
    85.8 KB · Views: 1,694
Hey John,

Going through the same problem with hydraulic pipes and connectors at the moment.
After removing the steering rack and putting it back in I had to re-connect bleed/return lines behind the steering rack passenger side; in doing that I pushed the nylon line too hard into the rubber/nylon housing in return the housing broken into pieces. I tried to move it away and then the main return line back to the reservoir snapped off.
I am going to re design this "manifold" with push connectors and nylon pipe so will post pics of this after the parts arrive from the UK. They are also quite cheap and are avilable on ebay.
These fittings and nylon pipe could be used throughout the entire system to replace brittle pipes and connectors/junctions.

I'm sure long term we'll be down to re-engineering these return circuits! I have a spare brand new octopus and the other return line system in a dark and cool place. At 79,000 km my Xantia has decades of life in it. Theoretically...

Quite a few of us will be pleased to see your photos when it is done! Have fun and thanks.
 
Yesterday the small hose from the from Hydractive solenoid broke where it joined the larger hole from the accumulator. I started to cut the remaining stub of rubber hose at the plastic T. I then noticed that the rubber broke away leaving a small barbed plastic tube. Cut a new length of rubber fuel line to connect from the T to the solenoid and clamped both ends. (Thanks to Addo and his Bush Mechanics tip).

Since I didn't have enough LHM to fill the reservoir, I took the opportunity to do a filter clean and LHM renewal (after last doing on 3 years ago when I bought the car). Since I spill most of the LHM in removing the reservoir, a half empty one is a better situation. I also syphon as much fluid out of the reservoir before attempting removal.

History repeated itself with me breaking the HP pump to reservoir hose. I really think that the Xantia's reservoir and octopus setup is crap. It is built to look good. It is not built to be easilt serviced. Having owned 2 CXs and 2 BXs, I preferred their reservoir accessibility for filter cleans. It was easy to remove the filter unit (idential to the Xantia). The round aluminium reservoir was easier to remove and easier to clean thoroughly compared to the Xantia. The only real danger was slashing ones wrists on the sharp aluminium hole. Since the octopus on the CX and BX just hung there, there was less bending of the brittle rubber hoses and over a 20 year period I never broke a return hose when cleaning the filters. With the Xantia I have managed to break one return line on each of the two occasions I have done a filter clean. The problem is that the hoses have too many right angled bends too close to the reservoir and there is no give when trying to remove the filter unit. The plastic multi clip on the side which keeps the hoses tidy is more of a hinderance than a help.

One day I will get angry enough to rebuild the whole octopus. Somewhere I expect I would put a manifold with appropriate sized barbed connectors. On the underside the various return hoses would be connected. On the topside, there would be shorter hoses to connect the manifold to the filter unit. These hoses would be long enough to allow easy filter unit removal. They would be easy to replace periodically with flexible new rubber hoses to maintain ease of removal. The manifold would be fixed to the firewall to limit movement of the hoses. Hoses that are not moved can remain viable for very long periods of time, regardless of how brittle they become. Bending brittle hoses is the weakness in the current octopus design.

John
 
When you cut off the black outer, this is what lies beneath. Clearly it can be re-used. One doesn't have to cut it all away, I did this just to be sure there were no obstacles to my recipe. So long as you remove the shrouding to each barb, all is good.

Actual elbow is from the lower junction pictured by CUB.
 

Attachments

  • Joiner_Skinned_1.jpg
    Joiner_Skinned_1.jpg
    42.1 KB · Views: 820
Phoned Contiental Cars today to see if they had the HP pump to reservoir hose. They didn't have any Xantia hoses, nor much Xantia anything. Tried European Auto Imports, again negative. Went to Clark rubber but their fuel hoses were the wrong size. Went to Repco and they had large fuel hose (ID 12mm or 13mm). Bought 3 metres for $33.

The LHM reservoir was still off to allow access. Started at the HP pump end. Detached old hose, attached new hose using a jubilee clip. Repeated this process of removing a bit of the old hose and laying down the new one. Became interesting under the LHM reservoir where the HP pump it attached to the other 12mm hose from the accumulator with a hard plastic joiner about 50mm long. Ended up cutting the old hose from each side of the joiner so that the joiner was now only attached to the accumulator hose. Snaked the new hose under the reservoir and around next to the other hoses and to the filter barb. Again attached using a jubilee clip. I had also bought a 1 metre length of 19mm polypipe from Bunnings. It was just too tight to slip the fuel hose through, so I cut a split for the whole length and clipped that onto the fuel line at appropriate rubbing spots to increase its lifespan (similar to the original sheathing).


Wow! Nearly there. Tilted the cleaned and empty reservoir to angle the filter unit in. Seated the reservoir and screwed it in place. Then I noticed that the next big hose, the one with the 5 inputs had broken. Back to square one.

Tomorrow I will try to bodgy something at the top of the multi hose so I can connect it for the last few inches to the filter unit. This will be temporay whilst I craft a better connector (not quite as fancy as the one at the start of this thread).

Having gotten out of bed at 04:30 this morning to take a friend to the airport, return and take her daughter to school before spending afew hours sourcing hose and bit and pieces, then spending most of the afternoon fixing one problem and causing another bigger problem, I then had to field complaints that I had parked my car in the communal wash bay (which is normally forbidden). I stuck 2 sheets of A4 under the wipers - "Sorry. Broken hydraulic hose. No suspension. No steering. No brakes. Hope to fix tomorrow".

I am off to bed. Plan A didn't work. Plan B didn't work. Plan C did work but created a further problem. Tomorrow is D-Day - Plan D has to work. Thursday last week we sold our daughters car. I wish we still had it as my wife could drive it. She can't drive a 2CV.


John
 
Last edited:
Just scalp the big joiner, as per the little one I pictured. Clamp it in a vice and do one barb at a time. You'll soon get the hang of it.

The main "harness" has been discontinued. 5270.JK, the brake and leakback return harness, is still available as it covers many more variants than the RHD market.

Must be time for someone to go into production with a properly engineered alternative system. Or are there so few of us that there is no market?
 
I think the clever approach would be some tubular fabricated trees (the billet is just exuberant frippery) and a bunch of bespoke silicone hoses with fluoropolymer lining.

Using a non-reinforced hose was plain daft; you go from nothing or a light crack to complete failure in a jiffy. No "get you home" serious dripping - it's either a seep or a stream.
 
Yesterday was D-Day and Plan D did work. I did not skin the top off the black plastic multi tube to get access to the white barb within and connect a new rubber hose to it. Had I stuffed that up, I would be looking at a much bigger job and couldn't afford to have the car off the road for that long. Most of the time was spent at Bunnings occilating between the plumbing department and the irrigation department. I managed to finally get 3 pieces to fit together with only minimal work.

In the photo below, there is a white PVC connector that has an internal 20mm thread at the top and 3 or 4 "n" shaped nodes protruding in a potential 24mm tube at the bottom. Using firstly a 7/8" Speedbore drill in a rechargeable drill set on SLOW, I managed to drill out the nodes. Then I used the 24mm Speedbore drillbit to give a 24mm diameter hole, which ended up being a good sliding fit on the top of the hard black plastic multi tube.

A 20mm to 15mm reducer bush was screwed in hand tight, and into the 15mm inner, a male 15mm thread 13mm barbed elbow was screwed, also hand tight. After cleaning the black plastic multi tube with grease and oil remover, I glued the "cap" onto it, using the blue PVC cement used for PVC pressure pipe (that's the only plastic cement I had handy, so it was a suck it and see approach).

JBN 003A.jpgJBN 004A.jpgJBN 005A.jpg

I also connected a short length of the 1/2" fuel hose between the barb on the LHM reservoir and the barb on the "cap" and sealed the LHM reservoir end with a jubilee clip (remember it was expecting a 12mm hose, not 13mm).

Today I ascertained that the glue had done its job, so I filled the LHM container with new clean LHM, primed the pump hose, loosened and tightened the pressure relief valve and eventually got the hydraulic suspension back. Drove a few kilometres and all seems good. The wife now has the car so if she returns, life will be back to normal. If she doesn't, I am down a Xantia and a wife, but I have my 2CV and now my freedom. Win-win, whichever way the coin drops.

Cost of parts for the "cap" - less than $7 and at this stage, not need to manufacture a multi hose connector at this stage.

John
 
While I was making the quick fix "cap", I also started to think of the longer term solution of replacing the multi tube connector. The photo shows what $3.90 can by in the Bunnings irrigation department. Two poly elbow female 15mm BSP with 13mm barb (each $1.20). The poly irrigation rural 15 X 100mm riser cost $1.49. Spend about half an hour finding a riser with a decent thread that accepts the barbed elbows. With the 200mm risers, the thread is fine. The 150mm amd 100mm risers reflect Chinese precision.
JBN006A.jpg

The riser should be able to be drilled and 2 plastic 4mm barbs plus 1 plastic 6mm barb glued in to accept all the return hoses that currently feed into the multi tube fitting. I would tend to apply an expoxy filler along the riser to be flush with the end elbows (1-2mm thick).

This should provide a good fluid proof seal and add extra strength to the inserted barbs.


John
 
You can't epoxy to polypropylene. Not many substances will stick - better to heat weld.

I've fitted the billet octopus and it works nicely. Find of the day was Tygon fuel line for small motors, 1/8" ID. I used this for the two small returns into the billet jobbie. Black or clear would've been nicer than hi-vis yellow but it was the best compromise.
 
Ok here is the job I completed today on the Xantia.
A cheap and effective way of combating the dreaded LHM leaks and damaged fittings. I admit it's not a glamourous looking arrangement but the main thing is itIMG_0422.jpgIMG_0457.jpg works!
 
That's very tidy. I have used some Tygon fuel hose in various places for the return pipes; it looks like yours is an uncoloured yet similar product.

Although, like John's repairs, they need splitting off into a thread on "workshop/garage fixes". My original idea was to raise awareness of what could be improvised in the event of a field failure, using in that instance scraps of fuel line, a hacksaw blade and tie wire.
 
Thanks Addo. I used the clear nylon tubing so I could make sure this part of the system was working properly as the LHM can be seen easily. Hopefully this might be the end of leaks!
 
Where did you get those fittingd from CUB_075? Looks very professional and neat. There is a lot to be said for clear nylon tubing. That is what Citroen have connecting the rear return hoses to the front of the vehicle. Then they bugger it up by using crappy rubber to complete the journey to the LHM reservoir.

John
 
Top