Well that is another improvement that can be made is the mark out (using a Sharpie) where the to set up the measure tapes. I measured with a 6 inch rule.Ah, now I get it. I should have looked at the link before. Hadn't realised there was a corresponding board on the other side. Repeatable and can work anywhere. One fiddly bit is measuring it where it's meant to be measured. Toe-in/out is really an angle, but mm is more convenient. 4mm at the tread might be 3mm at the rim and 2mm where you measure it in the new gadget.
Thanks for the tip on FWD. Good to know.
Have fun,
Rob.

You are using an out of date browser. It may not display this or other websites correctly.
You should upgrade or use an alternative browser.
You should upgrade or use an alternative browser.
Wheel alignment tools
- Thread starter DoubleChevron
- Start date
that's pretty cool. The only thing I'd change is I'd modify the boards so they rest again the wheel (maybe a pair of bolts each side? ) rather than against the tire wall 
In the interest of science I have made up a Mkii version with some of the suggestions above. It took a lot longer to do these changes than to build the original Mki version.
I screwed some more scrap Melamine on the bottom and weighed it down with a lump of steel to hold it in place. I also made sure that the added piece of Melamine is at 90 deg to the large vertical piece of Melamine.
I added some screws so that measurements can be taken from the wheel rims instead of the tyres.
I adjusted those screws to within 0.1mm difference in distance from screw head to the Melamine.
I have tried to remove as many variables as possible.
I set it up in roughly the same place outside the shed and got the same result of 2 mm total toe out.
Gees Col you work tooo fast.  That is perfect I think if the driveway is not rough. The concept is so easy really for just toe. And that is what wears the tires unevenly and often on the outside edge which you really do need in the wet. (all other things being normally OK)
Jaahn
Rob the tires do not care if you call it an angle or toe or mm or inches really. It just matters that the wheels run close to parrallel, and we can measure it however we choose to get a good result. At the tire shop they use an expensive machine to f**ck it up because they do not know what they are doing. This way you can see the principle and Col used common sense to roll the car to re set the tires etc after adjustments. Where you put the tapes is always an operator judgment and this beats measuring between the treads on a low car I can say with certainty.
Jaahn
Jaahn
Rob the tires do not care if you call it an angle or toe or mm or inches really. It just matters that the wheels run close to parrallel, and we can measure it however we choose to get a good result. At the tire shop they use an expensive machine to f**ck it up because they do not know what they are doing.
Jaahn
Outside my shed is not the smoothest concrete, so needed careful positioning of the Melamine so that it remained vertical. Would be better on a nice smooth garage floor that is for sure. But the system works and is great for DIY wheel alignments.Gees Col you work tooo fast.That is perfect I think if the driveway is not rough. The concept is so easy really for just toe. And that is what wears the tires unevenly and often on the outside edge which you really do need in the wet. (all other things being normally OK)
Jaahn
Rob the tires do not care if you call it an angle or toe or mm or inches really. It just matters that the wheels run close to parrallel, and we can measure it however we choose to get a good result. At the tire shop they use an expensive machine to f**ck it up because they do not know what they are doing.This way you can see the principle and Col used common sense to roll the car to re set the tires etc after adjustments. Where you put the tapes is always an operator judgment and this beats measuring between the treads on a low car I can say with certainty.

Jaahn
I wouldn't run more than 1mm toe out on a FWD road car. I run 4mm toe out on my 205 race car. The increase from 1mm to 4mm makes the car turn in so much better, but the tyre wear increases significantly.
I think a lot of modern FWD cars are running 0 to 1 mm toe out. My Laguna is set to 1 mm toe out.I wouldn't run more than 1mm toe out on a FWD road car. I run 4mm toe out on my 205 race car. The increase from 1mm to 4mm makes the car turn in so much better, but the tyre wear increases significantly.
As I recall from adjusting my R16TS suspension to it's maximum book height before attempting a trip to Darwin fully loaded the local dealer (Bill Lord Milne from Monaco Motors) used a factory steering rack height tool, which on an R16TS kept the wheel alignment straight and level with a two and a half inch or more increment in the suspension height.
I have not read all 3 pages but noticed early mention - near enough toe, is good enough.
Toe being out has detrimental issues with tyre wear, steering & often overlooked braking pull to one side or the other.
1mm out is good for TA's.
Toe being out has detrimental issues with tyre wear, steering & often overlooked braking pull to one side or the other.
1mm out is good for TA's.
Very true, but say you measure toe at the rims and you change from (say) 13" to 18" diameter, you'll want to keep the angle and change the mm.Rob the tires do not care if you call it an angle or toe or mm or inches really. It just matters that the wheels run close to parrallel, and we can measure it however we choose to get a good result.
If he wanted, Col could increase the precision of his setup by projecting the plates forward another couple of feet and measuring there. He'd need to scale the number of mm of course, and would want to be really sure that the extension was straight and parallel with the wheel.
Have fun,
Rob.
[Oops. Duplicate]
So identical. Interesting, I know of lot of tyres I have ... writing etc is cast into the walls (especially 4wd tyres). That's why I was thinking using the wheels would be better.In the interest of science I have made up a Mkii version with some of the suggestions above. It took a lot longer to do these changes than to build the original Mki version.
I screwed some more scrap Melamine on the bottom and weighed it down with a lump of steel to hold it in place. I also made sure that the added piece of Melamine is at 90 deg to the large vertical piece of Melamine.
I added some screws so that measurements can be taken from the wheel rims instead of the tyres.
I adjusted those screws to within 0.1mm difference in distance from screw head to the Melamine.
I have tried to remove as many variables as possible.
I set it up in roughly the same place outside the shed and got the same result of 2 mm total toe out.
View attachment 201259View attachment 201260View attachment 201261View attachment 201262
Hi RobVery true, but say you measure toe at the rims and you change from (say) 13" to 18" diameter, you'll want to keep the angle and change the mm.
If he wanted, Col could increase the precision of his setup by projecting the plates forward another couple of feet and measuring there. He'd need to scale the number of mm of course, and would want to be really sure that the extension was straight and parallel with the wheel.
Have fun,Rob.
I spent 15 years measuring things as precisely as possibly in a research lab, sometimes with expensive equipment, sometimes with "home made gear" that was superior to what could be bought for our particular odd needs.
The first discussion had, what was needed to be measured? how accurate it needed to be? then how it might be achieved? Usually measured in many directions too and with multiple sensors into the data logger.
You should always be careful of over measuring your "thing" and getting empty accuracy. EG making the boards a lot longer than the item, and then measure with a tape measure. Just saying. The classic example of that is measuring the length and width in inches with a tape to get the area and using a calculator to get a result to 8 decimal places.
Cheers Jaahn
Once we made up some extremely sensitive movement gauges using strain gauged bike spokes. We calibrated them ourselves to a higher accuracy than our expensive bought LVDTs.
Last edited:
There is lots of writing around the wall of these tyres (most of it is small). and it all looks to be the same distance from the actual tyre wall, so I figured it would not really matter.So identical. Interesting, I know of lot of tyres I have ... writing etc is cast into the walls (especially 4wd tyres). That's why I was thinking using the wheels would be better.
When It comes to those 4x4 tyres with the large writing on the side wall you make sure the writing is at 3 & 9 o'clock before setting up and taking measurements.
A tape measure can give you better than micron accuracy if you use it to measure from an electron micrograph.... getting empty accuracy. EG making the boards a lot longer than the item, and then measure with a tape measure. Just saying.
The same toe-out of 2mm at a 15" rim will be 4mm if you read at 30" separation. It doubles the accuracy of a tape measure.
I think we agree that, since toe is usually specified in at least a 2mm range and you can read a tape measure to about 1/2mm precision, the shorter boards will be fine. That's why I made it an "if he wanted" point. The extra accuracy would be there if he wanted it.
Yeah, the old CX is 0-4mm toe in (from memory). However that woudl be with 14" wheels ..... So with 16" wheels ... who knows  The toe-in gauge I purchased shows toe in degrees. I did find this with google though:
So 4mm toe in is 38minutes @14" wheels
4mm toe in is 34minutes @16" wheels
So I'll aim for about 2mm toe in .... 19' .... Given I'm measuring angle, wheel size is irrelevant
So 4mm toe in is 38minutes @14" wheels
4mm toe in is 34minutes @16" wheels
So I'll aim for about 2mm toe in .... 19' .... Given I'm measuring angle, wheel size is irrelevant
Some work I did many years ago when life revolved around BXs: You might find it useful.
Tracking a BX with a laser - BX Club Forum
bxclub.co.uk
To do a simple camber check on a friends Triumph TR.
Purchased a spirit level large enough to accommodate the wheel diameter, also two long 6 mm bolts with 4 nuts.
Drill and fit the two bolts, top and bottom. Adjust bolt length to clear hubs. Use one of the buildings posts nearby to adjust bolts for zero bubble.
We must assume here that the builder did a good job ?
Offer up to wheel rim, zero bubble ? Good. We were only after zero camber because of suspected damage. Phew 1
Lots of great ideas presented here in this thread! And Col, what a simple way to manufacture a toe-in gauge that is IMO as accurate as you need.
I've had a few goes at DIY alignments using bubble levels and string, and given time and a bit of thought to carry it out accurately, the result is as good as any computer aligner. What the tyre dealers computer aligners do, is to get a readout of all the measurements in minutes, and give you a good report, usually including centreline alignment which is handy.
About 20 years ago, my son had just graduated as a mech engineer and had started work at Kinetic Suspensions as a suspension design engineer. He had bought a 1986 series IV Mazda RX7 13B Turbo (the Porsche looking Mazda). It had quite bad wear on one rear inner tyre, and they were pretty expensive then being 16" low profile tyres. I saw it as an opportunity to get him to learn the basics of physical alignments. Bob Janes at the time had free wheel align with 2 or more new tyres. Spreading the cost, we bought 2 new tyres and to get a starting point requested the alignment report only, explaining the "training" situation. Unsurprisingly, it showed excessive negative camber on the left rear, toe-ins all over the place and surprisingly, about 4° difference in front caster.
Down at the Kinetic workshops the next weekend, on a 4 post hoist (nice), we found the left front lower ball joint, which was bolted to the lower wishbone on a sort of outrigger arm, was bent back badly, result of a previous impact we could only guess. Enough that we picked it up by about 10mm difference in wheelbase on each side. So new ball joint obtained and fitted, caster being checked with a Moore&Wright protractor spirit level from the M&W combination square. Using the same M&W protractor we set cambers front and rear as accurately as we could, requiring good eyesight to read the protractor as close as possible to the markings.
Then we set up the parallel string lines each side which allowed us to measure individual toe-ins plus the alignment front to rear.
The boy was pretty impressed with the old methods and I'm sure it gave him a good understanding of the practical basics. BTW that was a magic car for alignments, everything adjustable, and it had a sort of built in rear wheel steering by using double jointed bushes, which induced rear toe-out on the loaded outside when cornering.
Anyway, then we got the second 2 tyres and another wheel alignment report, everything was spot on, son very happy.
Long story, but that's the way it is - a good DIY alignment if you know what you are doing, is fine, just takes an inordinate amount of time and is no longer commercially viable in a retail situation.
Fast forward to June 2022, I get 4 new tyres fitted to my 2004 classic WRX, only half worn but now over 10 years old, I've only done about 12000kms since 2013 including the 3500km drive back to Perth from Melbourne. Rear tyres worn on inside edges but they have been rotated a few times in the past. Removed the wheels and took them to tyre dealer for fitment, don't like leaving the WRX with anyone.
Tyres are 215/45/17 and BJs had a special on Conti Max Contact 6 at $139 each, good price, and suitable tyre for the car.
I do have a nice level area just outside my carport (noting Col's comments above, I'm glad I specified this to my paving contractor years ago, for exactly this reason). Checked ground level with spirit level on 6ft steel screed bar, all good. Checked camber using a digital angle level I have had for a couple of years, just against the tyres, avoiding the tyre bulge at the bottom. Cambers all to spec, 0.25° Neg at front, 1.0 to 1.5 Neg at rear. Now how to do the toe-in? Had read this post and thought about Col's melamine solution, but impatience and tool envy saw me down at the local Revolution Racegear to pick up a set of Longacre toe-in plates, the only ones I could source in WA stock. For info there is a shop in Melbourne making these in steel for under $100, look good too.
Also as discussed in previous posts, and pointed out in the Longacre instructions, is to beware of the bulge. These are really made for quick checks at the track, where most cars have low profile tyres with virtually no bulge. Initial use I found them to be quite accurate with the small bulge on these low profile tyres not really affecting the reading. But for my road cars I have modified the Longacre plates simply by cutting out a hole where the bulge is, large enough to cover the Koleos 225/60/18 and anything in between. They work a treat. The Longacre has a nifty addition, small magnets at the tape tip side plate to stop the tape end slipping off, works well.
So IMO, these plates are accurate and super fast - probably less than 5 minutes per axle.
Found the WRX had 0.0mm toe at the rear - that's to spec. Same spec at front, but found 3.0mm toe-out, which I am assuming was causing the inner tyre wear. Because the car was steering straight, and steering wheel straight, I just adjusted each side by the same amount and it drives perfectly well.
So with any type of toe-in plate there are 2 things to watch:
Tyre Bulge - I have overcome that by cutting the plates out in that area.
Bent rim or runout - I have double checked my readings by marking top of wheel and rolling car forward 180 wheel degrees. If there was a difference, take the average. Mine were exactly same.
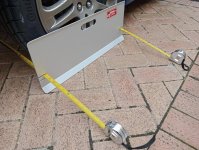
Out of the box.
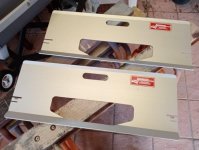
Holes cut for tyre bulge - should be ex-factory.
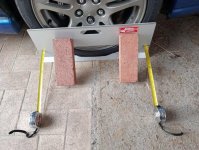
Bricks to hold firmly for one man operation confidence
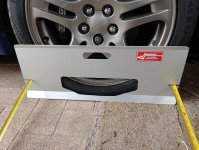
Measuring side.
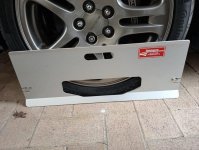
Tape end side, magnets hold tape tip securely.
These things are brilliant.
Cheers.
I've had a few goes at DIY alignments using bubble levels and string, and given time and a bit of thought to carry it out accurately, the result is as good as any computer aligner. What the tyre dealers computer aligners do, is to get a readout of all the measurements in minutes, and give you a good report, usually including centreline alignment which is handy.
About 20 years ago, my son had just graduated as a mech engineer and had started work at Kinetic Suspensions as a suspension design engineer. He had bought a 1986 series IV Mazda RX7 13B Turbo (the Porsche looking Mazda). It had quite bad wear on one rear inner tyre, and they were pretty expensive then being 16" low profile tyres. I saw it as an opportunity to get him to learn the basics of physical alignments. Bob Janes at the time had free wheel align with 2 or more new tyres. Spreading the cost, we bought 2 new tyres and to get a starting point requested the alignment report only, explaining the "training" situation. Unsurprisingly, it showed excessive negative camber on the left rear, toe-ins all over the place and surprisingly, about 4° difference in front caster.
Down at the Kinetic workshops the next weekend, on a 4 post hoist (nice), we found the left front lower ball joint, which was bolted to the lower wishbone on a sort of outrigger arm, was bent back badly, result of a previous impact we could only guess. Enough that we picked it up by about 10mm difference in wheelbase on each side. So new ball joint obtained and fitted, caster being checked with a Moore&Wright protractor spirit level from the M&W combination square. Using the same M&W protractor we set cambers front and rear as accurately as we could, requiring good eyesight to read the protractor as close as possible to the markings.
Then we set up the parallel string lines each side which allowed us to measure individual toe-ins plus the alignment front to rear.
The boy was pretty impressed with the old methods and I'm sure it gave him a good understanding of the practical basics. BTW that was a magic car for alignments, everything adjustable, and it had a sort of built in rear wheel steering by using double jointed bushes, which induced rear toe-out on the loaded outside when cornering.
Anyway, then we got the second 2 tyres and another wheel alignment report, everything was spot on, son very happy.
Long story, but that's the way it is - a good DIY alignment if you know what you are doing, is fine, just takes an inordinate amount of time and is no longer commercially viable in a retail situation.
Fast forward to June 2022, I get 4 new tyres fitted to my 2004 classic WRX, only half worn but now over 10 years old, I've only done about 12000kms since 2013 including the 3500km drive back to Perth from Melbourne. Rear tyres worn on inside edges but they have been rotated a few times in the past. Removed the wheels and took them to tyre dealer for fitment, don't like leaving the WRX with anyone.
Tyres are 215/45/17 and BJs had a special on Conti Max Contact 6 at $139 each, good price, and suitable tyre for the car.
I do have a nice level area just outside my carport (noting Col's comments above, I'm glad I specified this to my paving contractor years ago, for exactly this reason). Checked ground level with spirit level on 6ft steel screed bar, all good. Checked camber using a digital angle level I have had for a couple of years, just against the tyres, avoiding the tyre bulge at the bottom. Cambers all to spec, 0.25° Neg at front, 1.0 to 1.5 Neg at rear. Now how to do the toe-in? Had read this post and thought about Col's melamine solution, but impatience and tool envy saw me down at the local Revolution Racegear to pick up a set of Longacre toe-in plates, the only ones I could source in WA stock. For info there is a shop in Melbourne making these in steel for under $100, look good too.
Also as discussed in previous posts, and pointed out in the Longacre instructions, is to beware of the bulge. These are really made for quick checks at the track, where most cars have low profile tyres with virtually no bulge. Initial use I found them to be quite accurate with the small bulge on these low profile tyres not really affecting the reading. But for my road cars I have modified the Longacre plates simply by cutting out a hole where the bulge is, large enough to cover the Koleos 225/60/18 and anything in between. They work a treat. The Longacre has a nifty addition, small magnets at the tape tip side plate to stop the tape end slipping off, works well.
So IMO, these plates are accurate and super fast - probably less than 5 minutes per axle.
Found the WRX had 0.0mm toe at the rear - that's to spec. Same spec at front, but found 3.0mm toe-out, which I am assuming was causing the inner tyre wear. Because the car was steering straight, and steering wheel straight, I just adjusted each side by the same amount and it drives perfectly well.
So with any type of toe-in plate there are 2 things to watch:
Tyre Bulge - I have overcome that by cutting the plates out in that area.
Bent rim or runout - I have double checked my readings by marking top of wheel and rolling car forward 180 wheel degrees. If there was a difference, take the average. Mine were exactly same.

Out of the box.

Holes cut for tyre bulge - should be ex-factory.

Bricks to hold firmly for one man operation confidence

Measuring side.

Tape end side, magnets hold tape tip securely.
These things are brilliant.
Cheers.
Last edited:
BTW, angular toe-in measurement is simple with this type of gauge. As the distance between tapes is constant, in my case 550mm, I can calculate a simple table of angle vs mm, it will not change with different tyre sizes, because the tapes are same distance apart.
Might end up with a bit of Dymo tape on my plates.
Might end up with a bit of Dymo tape on my plates.