retightening 505 xn1 cylinder head bolts after initial running

45 is probably within tolerance.

And did the engine turn over easily ??

i think so, yes.

2pac,
I think there should be a decimal point between the 4 and 5. ie 4.5nm. Anyone?
I think you knew this?:wink2:

you probably think of kgm.
4.5nm is for the radio surround panel screws :D
 
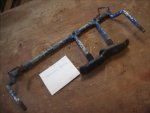
anyone knows how to use this tool?
s-l1600.jpg
 
2pac,
The identical tool is illustrated in my factory manual. [Less the blue paint job]
It is used for compressing the cyl. liners, two at a time for measuring the liner height.
The cranked bolts are screwed into the end head stud holes. The cross bar is held in place by pins. Fit one end then push down on the cross bar, fit the other end pin.
The two legs will compress the cylinders to allow measuring
Personally I would prefer to use the less cumbersome stud and large flat washers. Nothing in the way when measuring.

You can now throw away those bits of wood and concrete blocks you've been using?:joker:

My factory manual has broken the worse engineering principles by using different measuring methods. To add to foot lbs and newton metres they also use mkg !:crazy:

The bearing shell that dropped out on removal suggests a standard bearing fitted to an undersize crank journal.

wildebeest, thanks for that.
that tool is also used for compressing the liner seals of course. should the liners sit tight after the compressing?
i tried to compress them with blocks of wood and long bolts but it didn't do much.

the crank journal isn't likely undersize, the old bearings were std. size, and the guy who checked the crank said it was std.

i would have taken it apart again, i got an hoist, and it's not about the money, but the work... i last time i really couldn't get the engine back into the gearbox. the spigot bush oil seal is like a spring, always pushes the engine back, so i had to remove again the gearbox, then fit the engine and then fit the gearbox.
 
2pac,
The liners can move unless some method is used to hold them down. As I've posted, the studs with large washers will prevent movement. The "Blue" tool is only for measuring.l
The studs/washers can be left in place while the pistons are fitted. The engine can be safely turned also.
Leave them in place right up to the point of refitting the head.

The difficulty in entering the gearbox shaft into the flywheel spigot bush may be because of an excess of grease/oil in the bush.
This creating a hydraulic effect ie the shaft trying to compress the grease.
Another thought. If the clutch hydraulics were still connected the clutch fork and bearing may have put pressure on the clutch?
 
Last edited:
I've done plenty of engines whilst they were in place in the engine bay.

That way, it's not about the work, but you need to have a good back !
 
2pac,
The liners can move unless some method is used to hold them down. As I've posted, the studs with large washers will prevent movement. The "Blue" too is only for measuring.l
The studs/washers can be left in place while the pistons are fitted. The engine can be safely turned also.
Leave them in place right up to the point of refitting the head.

The difficulty in entering the gearbox shaft into the flywheel spigot bush may be because of an excess of grease/oil in the bush.
This creating a hydraulic effect ie the shaft trying to compress the grease.
Another thought. If the clutch hydraulics were still connected the clutch fork and bearing may have put pressure on the clutch?
Well, i thought the tool compresses the liner seal so the liners get stuck in place.
The spigot bush was indeed oiled by me, it wouldn't let in easily even the centering tool.
My clutch is cable operated, like all lhd 505's.
 
Hey, wow ! I've never seen a cable operated clutch on a 505.

My understanding of the liner tool is that it makes them sit down as far as they will go. That way you can measure protrusion, as it is measured in thousandths of an inch. Unless you make them sit down, they may not have seated properly and you will get a false reading.

The tool will not make them stay down.

When you took out your liners, I'm sure they were stuck in place, but that was only because of corrosion and perhaps some gum (oil residue).

There is a very small gap between liners and the block. They are a close fit, but they will move around if, in the future, you take off the head. That is why people recommend using bolts or studs with large washers to hold down the liners. If they move when you have taken off the head, then you have got coolant and grit between the bottoms of the liners and the block. Then the bottoms will not seal properly.

If you want to avoid taking out the engine, just take off the cylinder head, and take off the sump.

Push out the pistons etc from the bottom. You will have to take off the oil pump again, but that's easy. Then lever out the liners (if you are going to take them out) with two large screwdrivers, moving back and forth.

It's all a bit of a strain on your back because you have to lean over the engine for a long time, but I've done it quite a few times.

If you're worried about the main bearings, just take off one or two bearing caps and examine the shells inside, then torque them up again. No problem.


P.S : Did you put in a new O-ring between the oil pump and the block ?
 
Last edited:
the liners are new so this time they came out easily, except for piston number 1 or 2 for which you have to disconnect the steering gear from the crossmember. there's no need to remove the oil pump, unless you want to remove the main bearing caps, and yes- i did put new o ring.
 
Okay.

Well, the way professional mechanics do it is that they always try to put together the story of how the problem happened. They do this by closely examining parts for tell-tale signs of wear, dirt, etc.

Are you anywhere close to understanding what happened ? Because in the past, when I have been unable to do this, when I put things together again, they failed again. * And that's very irritating. When I was younger I did some fat-headed things on cars, I tell you.

So when I/we ask you things like "did you get the big end bearing caps mixed up", please don't be offended. At some stage we all did things that were either silly, or absent-minded due to tiredness.

Perhaps one of the liners got caught on a ridge in the block and just didn't sit down completely ?

You scraped the block well, where they sit down ?

It's difficult to give advice on something you cannot see. Do you have an experienced friend over there who can check your work, or at least look at the engine now it's disassembled, and see if he can spot what went wrong ?

* There is one way out of this, and that is to do every step perfectly.
 
Last edited:
beano- no offended at all :)
i did clean the block with a lots of carby cleaner and wire brush, as much as possible.
i did remove the engine, remove the crank, replace all bearings, clean the oil pump, clean all oil galleries, etc.
 
Ok....what about the cylinder head ? It was secondhand, wasn't it ?

Did anyone check it out ? A machine shop, perhaps ?

Did you have it skimmed to ensure a straight surface ? Or put a straight edge (steel ruler) across it to check for warping ?

And....could you possibly post a photo of the surface ?

BTW, if you used Hylomar, you can clean it off easily with nail polish remover....it's very cheap.
 
the head was indeed bought second hand, i sent it for vavle grinding, but the surface wasn't checked, i'll have it checked this time.
 
You'll probably find that it is warped.


Personally, if the overflow bottle emptied so fast, I'd suspect a leak between inside a liner and the water jacket.

Which usually amounts to cylinder head surface condition/corrosion in where the "ringed" area of the head gasket mates with the head.

But we really need to wait for forensics from 2pac before double guessing.

And in spite of my varied methods of tensioning XN cylinder head, on one occasion without a torque wrench, on the side of the road, tensioning by guesstimate with a ratchet handle with plug spanner over it for more leverage.

I've never had a leak on start up nor when I come to think of, ever.

So I 'd suggest torquing is less important than the condition of the mating surfaces.

A nice spread of hylomar helps I'd think.

Take a REALLY close and critical look at the area of the "ringed" area of the head which sits against the liners. The combustion pressure here is enormous.
 
And always thoroughly check every single part of the head for cleanliness, particularly after any sort of machining is performed.
 
Have just spent an interesting Sat afternoon re-reading my earlier posts.
Have recently become involved in the re-assembly of a 2 litre XN1 engine. This is to go into a 404 'berline'.
The used liners are being fitted by an experienced fitter, with Peugeot engine experience.* That's me off the hook !
I will be fitting the head using the method suggested by the Peugeot manual [not Haynes].
Cleaning out the stud 'oles is on the to do list as advised by AF Members. Also a light smear of Hylomar along the block face on the exhaust side. Previous experience with a 504 had a slight coolant weep from this side.
It had been suggested that the expensive degree angle measuring tool wasn't necessary. True because the 90 degree final torque figure is simply one quarter of a turn!

*At this point I will mention that the 2 litre engine was rescued from a late 504 being found in good condition, bores. bearings etc. The previous owner only wanted the cyl. head.
 
Hey, wow ! I've never seen a cable operated clutch on a 505.

My understanding of the liner tool is that it makes them sit down as far as they will go. That way you can measure protrusion, as it is measured in thousandths of an inch. Unless you make them sit down, they may not have seated properly and you will get a false reading.

The tool will not make them stay down.

When you took out your liners, I'm sure they were stuck in place, but that was only because of corrosion and perhaps some gum (oil residue).

There is a very small gap between liners and the block. They are a close fit, but they will move around if, in the future, you take off the head. That is why people recommend using bolts or studs with large washers to hold down the liners. If they move when you have taken off the head, then you have got coolant and grit between the bottoms of the liners and the block. Then the bottoms will not seal properly.

If you want to avoid taking out the engine, just take off the cylinder head, and take off the sump.

Push out the pistons etc from the bottom. You will have to take off the oil pump again, but that's easy. Then lever out the liners (if you are going to take them out) with two large screwdrivers, moving back and forth.

It's all a bit of a strain on your back because you have to lean over the engine for a long time, but I've done it quite a few times.

If you're worried about the main bearings, just take off one or two bearing caps and examine the shells inside, then torque them up again. No problem.


P.S : Did you put in a new O-ring between the oil pump and the block ?
The cable operated 505 clutches were terrible, very sticky, unlike the 205 ones which are great, very smooth and much more reliable than the hydraulic ones.
.
 
Top