
You are using an out of date browser. It may not display this or other websites correctly.
You should upgrade or use an alternative browser.
You should upgrade or use an alternative browser.
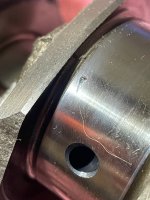
Gouged rod journal
- Thread starter Haakon
- Start date
H'mm.
I am no expert but there is an example that is very much larger to copy from less than 15mm away and that hole seems to not give any trouble.
Providing that there are no high spots, and the ridges are smoothed to a radius and not sharp edges, I would be OK with it. At least the nick is inboard from the radiused fillet on the journal transition to the crank.
Has a bearing been running on it previously (I suspect not) or did the journal succumb to a nick during disassembly?
Lets see what the engine builders think.
Cheers.
During disassembly… Turns out crawling around underneath a car pulling a crank from an engine in the car doesn’t encourage due care… I pushed a piston up out of the way on the first two rods I undid, but compression stopped it going far and I didn’t think to pull the plug… I was cold, it was raining, and short cuts were taken. And I forgot how easily this happens when you turn the crank to access the other two and it goes Clunk! Sigh.
I’ll take it to the machine shop and let them repair it I think. I’m not to be trusted clearly…
I’ll take it to the machine shop and let them repair it I think. I’m not to be trusted clearly…
It'll be fine, it doesn't go to the edge of the bearing, so won't effect anything. It will just fill up with pressurised oil. Remember the bearing runs on a film of oil, not on the crank journal.During disassembly… Turns out crawling around underneath a car pulling a crank from an engine in the car doesn’t encourage due care… I pushed a piston up out of the way on the first two rods I undid, but compression stopped it going far and I didn’t think to pull the plug… I was cold, it was raining, and short cuts were taken. And I forgot how easily this happens when you turn the crank to access the other two and it goes Clunk! Sigh.
I’ll take it to the machine shop and let them repair it I think. I’m not to be trusted clearly…
Just remember to add an extra half a drop of oil when you do an oil change.

I reckon this was the corner of the rod journal…Slide 6" of tube/hose over the rod bolts. The threads can't accidentally smash into the crank and will guide the piston/rod down.
I was serious about it being OK by the way.
Just go over the area lightly with a bit of fine linishing paper to make sure there's no high spots. If you can't find a roll of it just buy a narrow linishing belt and cut it. Throw it round the journal and pull on each end alternately just enough to polish the damaged area.
My dad was an old school mechanic and if I had $1 for every crank journal I saw him linish in this fashion I reckon I could afford a new Tesla.
Here's a video of a guy doing his crankshaft with wet and dry. Hadn't seen the shoelace idea before.
You learn something new every day.
You learn something new every day.
Yeah, I spent 20 minutes when I found it muttering shitshitshit to myself… But as you say once the high spots are off it will be fine. Will try to knock loose the bunched up part I think.I was serious about it being OK by the way.
Just go over the area lightly with a bit of fine linishing paper to make sure there's no high spots. If you can't find a roll of it just buy a narrow linishing belt and cut it. Throw it round the journal and pull on each end alternately just enough to polish the damaged area.
My dad was an old school mechanic and if I had $1 for every crank journal I saw him linish in this fashion I reckon I could afford a new Tesla.
Trick is not doing more damage when i fix it.
I have used 5000 grit wet and dry and a boot lace to linish crank journals. Came up surprisingly well.I was serious about it being OK by the way.
Just go over the area lightly with a bit of fine linishing paper to make sure there's no high spots. If you can't find a roll of it just buy a narrow linishing belt and cut it. Throw it round the journal and pull on each end alternately just enough to polish the damaged area.
My dad was an old school mechanic and if I had $1 for every crank journal I saw him linish in this fashion I reckon I could afford a new Tesla.
Here's a video of a guy doing his crankshaft with wet and dry. Hadn't seen the shoelace idea before.
You learn something new every day.
You just beat me there with that one GreenpeaceI have used 5000 grit wet and dry and a boot lace to linish crank journals. Came up surprisingly well.
I’m not going to touch any part that’s not damaged, just take off the pushed up part I think.Here's a video of a guy doing his crankshaft with wet and dry. Hadn't seen the shoelace idea before.
You learn something new every day.
My comments !
Unfortunate Haakon but not the end of the world. I would remove that raised lump, possibly starting with a bit of careful light hammering with a piece of narrow plate between to see what metal moves back a bit. Then possibly a fine stone to remove the high spot. Or a points file even. More reliable than paper, or fine paper stuck to a flat piece of narrow flat steel plate(or key steel) , just a wisker at a time between looks. I would not use paper much after that.
You could use the old bearing shell with a bit of bearing blue to see how the area looks for surface engagement with the bearing shell.
I do not understand what the guy is doing in that video. How much does he take off . No mention of a mike or what size bearing he is going to use after he removes the grooves ?? Hmm I would be carefully starting down that road myself unless you knew what you were doing. I have done it on old type white metal bearings with shims to remove. The circumferential marks may be not so important and less important than the extra clearance of a shiny surface after sandpapering?? Who knows ?? And how to properly clean the grit out of the crank and passages after !
Jaahn
Last edited:
Yeah, I’m not going anywhere near using emery paper on the journal. It’s a super low kms crank otherwise in perfect condition I’m going to give new standard size shells and send it - not mucking with factory clearances! I don’t even want to polish it…My comments !
Unfortunate Haakon but not the end of the world. I would remove that raised lump, possibly starting with a bit of careful light hammering with a piece of narrow plate between to see what metal moves back a bit. Then possibly a fine stone to remove the high spot. Or a points file even. More reliable than paper, or fine paper stuck to a flat piece of narrow flat steel plate(or key steel) , just a wisker at a time between looks. I would not use paper much after that.
You could use the old bearing shell with a bit of bearing blue to see how the area looks for surface engagement with the bearing shell.
I do not understand what the guy is doing in that video. How much does he take off . No mention of a mike or what size bearing he is going to use after he removes the grooves ?? Hmm I would be carefully starting down that road myself unless you knew what you were doing. I have done it on old type white metal bearings with shims to remove. The circumferential marks may be not so important and less important than the extra clearance of a shiny surface after sandpapering?? Who knows ?? And how to properly clean the grit out of the crank and passages after !
Jaahn
I think the raised lump will break off - it looks not very attached already.
Hi.
I pretty much agree with jaahn, in particular using something flat to provide a flat surface to the strip of emery paper. Paper by itself will slightly deform as it passes over the high spot.
I viewed the youtube above. If it was me I would be using ear plugs in the oil drilling, so as to prevent any grit getting deep into the drilling. You just need to have a fail-safe procedure to make absolutely sure that you have removed any ear plugs prior to fitting big end bearing caps.
I like the idea of using the old bearing shell to check.
Cheers.
If you don't want sandpaper near it don't take it to an engine rebuilders then.
I’m not polishing it thoughIf you don't want sandpaper near it don't take it to an engine rebuilders then.
")
Bugger. I'm with the last of the comments. Careful work with a fine file to get it off. Something flat. I can't see why a tiny flat spot on the crank matters a hoot for the oil film. Mind you, I'm a geologist.Well shit… Am I silly for wondering if this will be fine with the high spots knocked off…?