You are using an out of date browser. It may not display this or other websites correctly.
You should upgrade or use an alternative browser.
You should upgrade or use an alternative browser.
Gerry's CX Restoration--restored pics
- Thread starter gerrypro
- Start date
Nice work...
Wow that is seriously impressive work.....congrats.
Wow that is seriously impressive work.....congrats.
All I can say is that those shots just leave me with my jaw hanging limply and my head shaking from side to side.
Absolutely b****y amazing: well done!
Absolutely b****y amazing: well done!
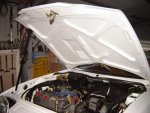
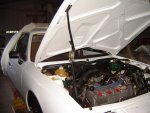
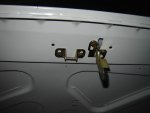
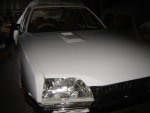
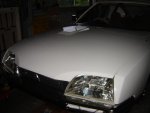
At Long Last the Bonnet goes back on. Now only the radiator/trans cooler/condenser assembly,battery, glass, door trims, rims and tyres, and essential fluids, etc. to go.
Cheers Gerry
Pity about the wide gaps and, Oops! is that a small scratch to touch up on the leading edge?????
Cheers Gerry
Pity about the wide gaps and, Oops! is that a small scratch to touch up on the leading edge?????
Attachments
Amazing ... it won't be long until you fire her up by the looks of it 
seeya,
Shane L.
seeya,
Shane L.
Amazing ... it won't be long until you fire her up by the looks of it
seeya,
Shane L.
Could be a while yet!! Dollars and cents!!!
Cheers Gerry
Probably the best CX-resto I've ever seen. I look forward to the end result! 
Just to repost all of the pictures that went with Shanes original posting in 'Here's a CX Restoration For You'
I will try to post them chronologically as the restoration progressed.
Cheers Gerry
This is the car as purchased in 1995
Many thanks. What a sensational bit of work! Like others, I'm in awe. Useful photos too, showing hydraulic lines in place.
Hope all goes well with the final fill up and run.
Cheers
After languishing for many months work has recommenced on the CX. Time for the rear glass installation. It all looks straight forward----how deceptive!!!!
Problem one --------worn out caulking gun meant control of the bead was precarious. So therefore the first step to disaster commenced.
Problem two---------incorrect cut on the nozzle of the caulking tube. Not enough sealant applied and also applied in the wrong shape.
Result --------rip it all out before it sets bock solid and spend the next few hours cleaning and washing the sealant mess away with rags and mineral turps.
Solution------- found a really good article on steps in glass installation on a BMW tech sheet PDF. Too big to upload ----sorry! If in doubt read the destructions!!!!
Now armed with a new caulking gun and a correctly cut nozzle it is time to try again.
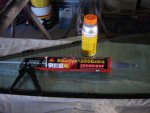
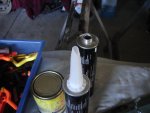
Product used-----Sikaflex 255E and Sika Activator Pro.
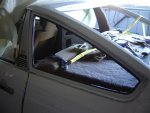
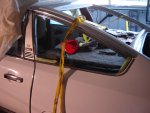
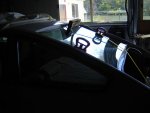
The rest of the story can be read from the pictures! The straps to tension the glass are ratchet straps using only the hook side attached to the seat belt anchors. And of course only Citroen rims are used for the weights.
Note the use of masking tape to keep the trim frames compressed on the brand new plastic clips. The tape comes off after the sealant is cured. In about 16 hours from now. On picture shows the early attempt to secure the frames with tape------no good at all. The installed glass shows the method I found that works. It is much simpler!
Cheers Gerry
Problem one --------worn out caulking gun meant control of the bead was precarious. So therefore the first step to disaster commenced.
Problem two---------incorrect cut on the nozzle of the caulking tube. Not enough sealant applied and also applied in the wrong shape.
Result --------rip it all out before it sets bock solid and spend the next few hours cleaning and washing the sealant mess away with rags and mineral turps.
Solution------- found a really good article on steps in glass installation on a BMW tech sheet PDF. Too big to upload ----sorry! If in doubt read the destructions!!!!
Now armed with a new caulking gun and a correctly cut nozzle it is time to try again.
Product used-----Sikaflex 255E and Sika Activator Pro.
The rest of the story can be read from the pictures! The straps to tension the glass are ratchet straps using only the hook side attached to the seat belt anchors. And of course only Citroen rims are used for the weights.
Note the use of masking tape to keep the trim frames compressed on the brand new plastic clips. The tape comes off after the sealant is cured. In about 16 hours from now. On picture shows the early attempt to secure the frames with tape------no good at all. The installed glass shows the method I found that works. It is much simpler!
Cheers Gerry
Attachments
-
 DSC03691.jpg90 KB · Views: 632
 -
 DSC03692.jpg90.7 KB · Views: 625
 -
 DSC03693.jpg89.4 KB · Views: 587
 -
 DSC03694.jpg89.6 KB · Views: 572
 -
 DSC03695.jpg88.8 KB · Views: 601
 -
 DSC03696.jpg90.8 KB · Views: 627
 -
 DSC03697.jpg85.7 KB · Views: 587
 -
 DSC03699.jpg78.5 KB · Views: 591
 -
 DSC03700.jpg92.3 KB · Views: 634
 -
 DSC03698.jpg86.6 KB · Views: 578
Last edited:
the wagon glasses are even worse for moving while trying to refit too I think next time I'll get someone experianced with fitting modern windscreens to do mine. In theory they should know how to do it without the bloody window moving around smearing sealer/glue everywhere.
You have certainly done a hell of a lot better than I managed
seeya,
Shane L.
I think next time I'll get someone experianced with fitting modern windscreens to do mine. In theory they should know how to do it without the bloody window moving around smearing sealer/glue everywhere.You have certainly done a hell of a lot better than I managed
seeya,
Shane L.
the wagon glasses are even worse for moving while trying to refit too
You have certainly done a hell of a lot better than I managed
seeya,
Shane L.
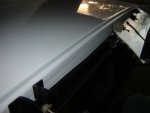
That's only the side glasses. I imagine the rear screen will be a little more tricky due to the size of the thing. I will have to apply the bead of sealant to the frame instead of the glass. It will be far too difficult to place the glass if there is a strip of soft and messy sealant hanging off it. The side glasses can easily carry the sealant as they are placed into position. They are a nice size to handle. I will use two 5mm square strips of balsa to position the rear glass. Its own weight will be all that is necessary to hold it against the frame. No need for ratchet straps and weights.
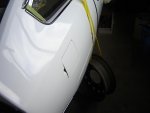
BTW the curvature of the side glass does not exactly match the curvature of the frame in a fore aft line. Therefore the glass sits away a little more at the leading edge than I would like. I intend to add a little more sealant at this point from the inside between the finishing strip and the glass. It should be OK if I mask the glass off first and clean the excess off to the masking line. I can then clean off any rough areas with a sharp Stanley Blade.
Wish Me luck.
Cheers Gerry
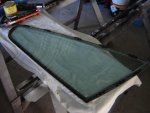
Now the rear glass-----I must admit it was a lot easier than the side glasses..
Some points to note.
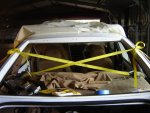
1. Do a dummy fit first. I found that I needed to space the lower glass edge up from the channel edges with two blocks of balsa. I assumed that two pieces of 5mm square would be enough having measured first. Incorrect frames have discrepancies so the left block was changed to 6.5mm square. This ensured that there was equal glass on both sides for the sealant bead as also for the top edge.
2. Rig a weight and strap system as done for the side glasses. This time I hung the strap from the sun visor mount and used the same trusty Light15 rim. Ablock of wood under the strap was necessary to ensure a good fit on the frame on the top right corner.
3. Use a marking pen onto the glass to define the inner edges of the frame while the glass is in position during the dummy fit. Then when back on the work stands place a line of masking tape to the inside of the marker line to delineate a straight and true piping line for the sealant.
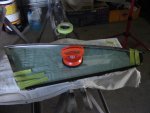
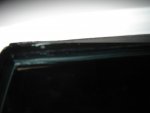
4. Fit handling suction cups as seen in the photo.
5. Apply an even triangular bead of sealant to the outer edge, and then place the glass carefully in position ensuring centralisation and that the lower edge contacts the two balsa blocks. Press down evenly into place and fit the block of wood under the strap to pretension the corner.
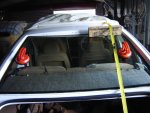
6. I also decided to add a bead of sealant along the top edge of the glass. As the glass curves down to the centre line of the car the gap between the frame and the glass becomes a water collection point, inviting the rust that some times occurs at this point. It was fairly easy to run a strip of masking tape along the frame at a line level with the glass top surface and along the top edge of the glass. A run with the caulking gun and a wipe with a finger dipped in turps, carefully remove the tape whilst still fresh and presto a neat and easy job is complete. Now water running off the roof will just flow down the glass to the lower drain channel around the boot opening and the away to the road.
Cheers Gerry
Some points to note.
1. Do a dummy fit first. I found that I needed to space the lower glass edge up from the channel edges with two blocks of balsa. I assumed that two pieces of 5mm square would be enough having measured first. Incorrect frames have discrepancies so the left block was changed to 6.5mm square. This ensured that there was equal glass on both sides for the sealant bead as also for the top edge.
2. Rig a weight and strap system as done for the side glasses. This time I hung the strap from the sun visor mount and used the same trusty Light15 rim. Ablock of wood under the strap was necessary to ensure a good fit on the frame on the top right corner.
3. Use a marking pen onto the glass to define the inner edges of the frame while the glass is in position during the dummy fit. Then when back on the work stands place a line of masking tape to the inside of the marker line to delineate a straight and true piping line for the sealant.
4. Fit handling suction cups as seen in the photo.
5. Apply an even triangular bead of sealant to the outer edge, and then place the glass carefully in position ensuring centralisation and that the lower edge contacts the two balsa blocks. Press down evenly into place and fit the block of wood under the strap to pretension the corner.
6. I also decided to add a bead of sealant along the top edge of the glass. As the glass curves down to the centre line of the car the gap between the frame and the glass becomes a water collection point, inviting the rust that some times occurs at this point. It was fairly easy to run a strip of masking tape along the frame at a line level with the glass top surface and along the top edge of the glass. A run with the caulking gun and a wipe with a finger dipped in turps, carefully remove the tape whilst still fresh and presto a neat and easy job is complete. Now water running off the roof will just flow down the glass to the lower drain channel around the boot opening and the away to the road.
Cheers Gerry
Attachments

Last edited:
Just a quick reply to let you know how appreciative I am of your posts Gerry, I'm just in awe of your skills, your attention to detail and this whole project - just superb.  :wink2:
Cheers
Chris
:wink2:Cheers
Chris
Fantastic thread!
I'm with Fingers and Chris. Gerry, the safari is now on the road and with my retirement I'm now just starting the 2CV project. The big lesson you are teaching me (and just in time) is patience. I've always tended to compromise job quality by trying to get it finished by lunchtime. This time, however, I will have this thread and the quality of your work very much in the front of my mind and my mantra will be "Never mind the time, just do it right." Thanks.
I'm with Fingers and Chris. Gerry, the safari is now on the road and with my retirement I'm now just starting the 2CV project. The big lesson you are teaching me (and just in time) is patience. I've always tended to compromise job quality by trying to get it finished by lunchtime. This time, however, I will have this thread and the quality of your work very much in the front of my mind and my mantra will be "Never mind the time, just do it right." Thanks.
John, I think that is another way of saying 'I am Slow".
The question of when it will be finished is governed by "If I Finish It Then What Will I Have To Do To keep Occupied?" Ohwell I quess there is always the GS and the 11BL
Cheers Gerry
I am eleated. -----All the glass work has just passed the LEAK TEST with flying colours.
Cheers Gerry
Cheers Gerry
Slow was not what I had in mind.
I know how project cars can go.
I have rushed for a deadline and driven partly finished cars.
I have also a car that has not been worked on for at least six or eight years... only owned it about 35 years.....
Your progress is just fine.
I know how project cars can go.
I have rushed for a deadline and driven partly finished cars.
I have also a car that has not been worked on for at least six or eight years... only owned it about 35 years.....
Your progress is just fine.
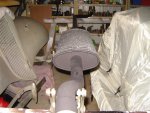
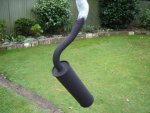
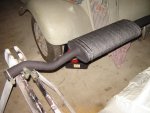
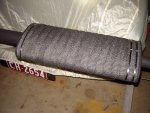
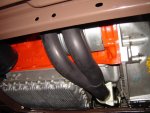
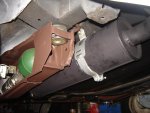
Exhaust System prepared and fitted.
Cheers Gerry
Cheers Gerry