DS Pallas Restoration

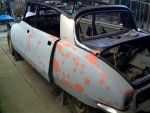
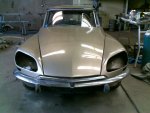
How did you prep behind the patch on the front guard under the headlamps. I'm wondering how you would prevent the two layers of metal causing corrosion in the future :confused:

That's looking really nice... I can't wait to do some bodywork on a DS again :)

seeya,
Shane L.

I plan to simply fill that double skinned area under the headlights with a cavity wax or similar after the painting is finished. It needs a product with creep to be sure of coverage.Does anyone have suggestions of best products for this and also inside doors and box sections?


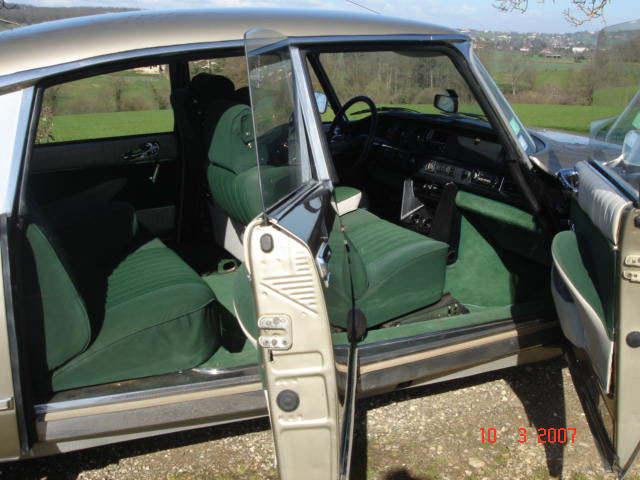
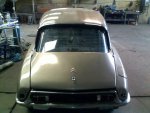
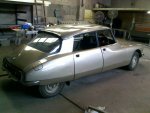
And here is my biggest, and maybe most controversial question! I am looking for suggestions as to the best adhesive/sealer for re-fixing a formerly bonded roof. I think there were some good suggestions on AF before the crash.

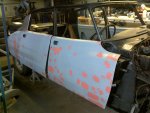
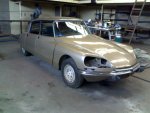
My car was looking like a Galah last week but now the heat and humidity has dropped a little I can get on with some painting.
 

Attachments

  • Galah.jpg
    Galah.jpg
    90.8 KB · Views: 944
  • Galah 2.jpg
    Galah 2.jpg
    66.6 KB · Views: 765

Sikaflex will be great .... If no-one ever intends removing the roof ever agian :roflmao:

Ask JackAfrica about the ribbon mastic he used. That's probably a better option if the roof is ever going to be removed again :)

seeya,
Shane L.
 
Hmm, yes thanks, but there are dozens of different Sikaflex products.

I think it is a matter of finding the right balance of flexibility and adhesion. The ability to remove would be good too.

I am thinking there are many adhesives manufactured for windscreen fitting which have probably the right properties plus the ability to be removed, a definite advantage with windscreens. The only problem is that many of them seem to have very fast cure times which the windscreen fitters demand especially when cars are fitted with airbags.

A little more leeway would be handy when fitting a DS roof.
 
Bolt on roof?

A little more leeway would be handy when fitting a DS roof.

Hi Michael,
I'm not going to be of much help, but I am interested in your outcome. I guess the thermal seal is no longer available? I remember these being used way back, attach a 12v volt power supply for about an hour.

The other option might be to convert to a bolt on roof, seems these are more forgiving?

Have a look at this by Tony Jackson, there is a drawing for manufacture of the required clips, (if you do go down this path a group buy of the clips may help allay some of your costs, I'd put my name in the hat).

http://www.agua.nu/ds-files/tony-jackson/red-cd/Roof/Roof Leaks.pdf

Cheers
Chris
 
... I have decided to go to Beige Tholonet, which was also on the chart for a ‘73 Pallas.
Nice job. and very comprehensive resto.:headbang:

You thinking of going pure mid 70's matching the metalic Beige Tholonet with the caramel interior?

beige%20tholonet%20int%20or%20clair%2073.jpg


or green?


beige%20tholonet%20vert%2073%202.jpg
 
Well I have a set of Green seats and am making some door cards to match.

But I am thinking that ideally I would like one day to combine the Beige Tholonet with Tabac leather.
 
Well, one step forward, though there were a few backward ones to get here.

My roof is now painted and bonded back on the car. It would have been done last week but fo huge problems with the paint. I had originally sanded the roof back to what seemed like a very sound factory applied base coat. 4 or 5 coats of acrylic primer followed by 4 of metallic and three of clear coat looked great, until I put it in the sun. Little soft blisters everywhere seemingly originating in that "sound" base coat. :cry:

Two days sanding back the fresh paint to the gel coat followed by lots of two pack primer and I was back to where I started. The roof is now on the car, bonded with Sikaflex 291.
 

Attachments

  • Roof on.jpg
    Roof on.jpg
    102.9 KB · Views: 8,074
Looking really good Michael, these cars look every bit as good with and witout clothes :clown:

Impressive workshop there too... :approve:

Cheers
Chris
 
Looking really good Michael, these cars look every bit as good with and without clothes :clown:

Impressive workshop there too... :approve:

Cheers
Chris

Hmmm, you ogling my naked Goddess?? :wink2:

Unfortunately the workshop is not mine. It manufactures trailers and I begged a little space in exchange for a modest rent. Unfortunately the business has been sold and I must vacate next week.

I was also lucky to have a deal to use the spray booth next door which is why I have been able to make some progress.
 
I think I have maybe two days full time work aligning all the panels on my DS. Everything is on the car and opens and shuts but the panel gaps are all very wrong :(
 

Attachments

  • Front panels.jpg
    Front panels.jpg
    95.3 KB · Views: 1,766
  • Front qtr panels.jpg
    Front qtr panels.jpg
    95.1 KB · Views: 2,497
  • Rear panels.jpg
    Rear panels.jpg
    95.9 KB · Views: 1,097
  • Rear qtr panels.jpg
    Rear qtr panels.jpg
    93.9 KB · Views: 1,362
I think I have maybe two days full time work aligning all the panels on my DS. Everything is on the car and opens and shuts but the panel gaps are all very wrong :(

Wow Michael, you don't let the grass grow beneath your feet, rapid progress :wink2:
You'll get those panels gaps sorted, I think the program is to start at the front and work back, each panel should be a couple of fag papers behind the panel in front - but you no doubt know that.

I see you have the rear glass in place, you were having trouble, any tips for us following in your footsteps?

Love the colour :approve:

Cheers
Chris

I have been reading 814-1 re panel fit and whilst I agree the order seems to be to start at the front and work back, each panel seems to be set up with reference to the panel behind it... maybe I should start with the boot as that has the least adjustment range!

I was relieved to drive the car out of the shared workshop today. I have taken it home to refit electrical and trim items.

On another matter I put it up on a hoist today to do a few other jobs and an oil and filter change. It has probably not had an oil change for over ten years when it was last registered.The filter plate was not assembled correctly being out by approx 45 degs! The motor ran ok when I bought it and seemed to have reasonable oil pressure and low crankcase pressure so hopefully it has not done any serious damage.
 

Attachments

  • Leaving Silverwood.jpg
    Leaving Silverwood.jpg
    88.7 KB · Views: 1,084
  • Oil Filter.jpg
    Oil Filter.jpg
    95.3 KB · Views: 4,985
attachment.php


I hope the big ends aren't knackered.
These things run about 500 klicks before they give up under this condition.

Any scary stuff in the strainer or filter?
 
I will have to wait and see Daffy! There was not much to be found in the strainer or the filter except a lot of sludge.

The car desperately needs engine mounts so there is a good deal of noise but I can not identify any big end or main bearing noises.
 
The DS is home and now the real work begins. So many parts to rebuild and install.
I had done some work on the headlight buckets and installed a pair of Narva semi sealed beams from Repco. Inevitably the front end wiring was a mess and it took a while to fix the bullet connectors. It seemed best to fit a relay system to supply power for long range and headlights so as to reduce current in the headlight switch and tired old wiring. I was going to build the new harness from scratch but found a kit on Ebay which was a godsend.

Some dry joints in the PCB of the instrument panel took a bit of time to find. The lack of pressure warning light though was due to a faulty switch on the brake pedal assembly which was mentioned in another thread as was the replacement of brake accumulator and steering wheel.
The paint still needs colour sanding and buffing so I have not yet put all the trim back on the car. Still to come is some interior work including roof lining and seatbelts. Hopefully a blue slip in the next few weeks.... the car has been off the road for ten years.
 

Attachments

  • 02042011731.jpg
    02042011731.jpg
    99.9 KB · Views: 1,188
  • 02042011732.jpg
    02042011732.jpg
    96.2 KB · Views: 1,278
Time for an update. :)


I said at the beginning of this thread that I hoped to get the rebuild project completed before my 60th birthday. My birthday is here so it is time to admit defeat though I have made some progress. Work pressures have slowed me over the last few weeks and I find myself tantalizingly close to having the car on the road.


When I bought the car it was partly dismantled and had been off the road for ten years.


Wreck.jpg


The car is now painted in acrylic metallic and clear (Beige Thonolet) but not yet colour sanded except for the roof. I have got the gutter trim and trumpets back on and the car looks almost complete but being a Pallas there is also all the other stainless trim to fit still.


GutterTrimOn.jpg


The headlights are now fitted with Narva semi sealed H4 beams glued into the cut down reflectors of the original lights. All power now runs through three relays mounted on the battery carrier and Techbuy found me a good light switch from his D Special he is wrecking plus a set of sun visors and many other bits and pieces!


Headlight.jpg


I got replacement mirror glass from Retrospec. I chose the convex style for both sides and I think the resulting rear view is good. I have convex mirrors on my other modern cars so I have got used to them. Probably need a new Bee Sting antenna but it will do for now. I know that it will be many years before I get all the details right. Anyone got any Pallas wheel trims??


Mirror.jpg


Roof.jpg


The engine compartment is much better with many parts cleaned and repainted. Richo rebuilt the brake sphere and I rebuilt the high pressure pump myself on the garden table.... i got it right on the second attempt with a little advice and assistance from David S, some parts from Fento and a set of seals from Roger Parker ! I still need to replace the engine mounts, that is a job for this weekend. The engine sounds sweet and I will fit a second hand stainless steel exhaust when I have finished the mounts.


EngineBay.jpg


EngineBay2.jpg


The dashboard is a mess with holes hacked for a red led digital clock and the radio but one day I will fit a new panel. For now it is reasonably tidy. I sewed a leather cover over a weathered steering wheel and there is a lovely new brake lever aperture rubber (Thanks Loudel !)


DSFront3.jpg


I was very lucky to get the leather interior from a now dismantled DS which I think looks fantastic. (Thanks Steve!) The combination of Beige and Tabac is, I think, classy. I just could not have lived with the Verte Argent/Green interior combination the car was built with. The windows I tinted with a 30% film to protect the interior. I tinted the side windows myself but the rear window had me beat so it is currently with an expert.


DSFront1.jpg


DSRear.jpg


Reardoortrim.jpg


Frontdoortrim.jpg


I still need the aforementioned engine mounts, a set of tyres and rego. This week I had the wheels sand blasted and tonight I sprayed them with the first coat of Rust Guard paint thinned 20% with turps. Two coats of that and plenty of time to harden before they go back to the tyre fitters.


SandBlasted.jpg


PaintedWheel.jpg


I am pleased I did almost all the work on this car myself from grinding and welding through painting and trim work. Admittedly it is not all 100% professional but I have really enjoyed the process. Far from being older than when I started it has had a rejuvenating effect and I have many new friends. I am sure I am going to enjoy many years of driving enjoyment. The car is sound and rust free, that has to be a good start.


Dashandwheel.jpg


Many thanks to all the great people on Aussie Frogs and at CCCNSW for parts, encouragement and advice. Some time soon I will have the car on the road gladly pointing out my failures but happy with the result all the same.
 
Michael ,

Glad that i sold it to you

Pat on the back there , Happy to see you actually done her up as it deserved it , Hope she drives as she looks.

Cheers

Philippe
 
Top