Daphne: 1974 D Spécial purchased October 2016

Daphne,
You are doing a great job!!. These cars require TLC

The small trapezoidal (I think that is the correct description) top vent does not "pop out". It can be removed only with the dashboard out. If you want I can send you photos

But you can paint it in-situ as I suspect you will do

Any green leaks (LHM) need fixing quickly ... red fluid is the hydraulic fluid from earlier cars You wont have any

Dirty black/brown leaks not so urgent. Probably engine/gearbox oil. Just check your oil level (engine and gearbox) and if you are using 1 litre per 2000 km you probably should do something. But also check under car to find location of leak ... it might come from the notorious 6-bolt cover on the sump under which is the oil filter and oil pump. If the metal plate (annulus) with 6 holes in it is not flat then it will leak. Your mechanic could probably make a thicker one that wont bend (I have never got around to it). BE CAREFUL. ALWAYS USE AXLE STANDS WHEN GOING UNDERNEATH CAR

You will be surprised by how quickly you knock off these problems

Leaks in roof can also be fixed (mostly it seems to occur around top of windscreen). Use black butyl rubber. I think it is better than silicon and it wont go hard. Use a water hose to locate leaks ... you can find them. Then carefully lift the rubber seal around roof in the areas of leaks and apply the butyl rubber with a caulking gun into the "slot" you have just created. Clean off surplus with petrol after the butyl has set somewhat. If the rubber seal around roof is in bad condition you might have to replace it. Roof must come off. Again, it is not as bad as it sounds but needs two people (I have done it in about 5 hours and I am a crappy mechanic)

If leak is at bottom of wind screen you might need to remove screen. But it can be done with care

Regards
Ian
 
My LHM is green.

Can an you tell me how the big vent pop out as you mentioned
Ah, it is as I thought. Probably.

The vent surround is what I popped out, not the actual vent fins - it unclipped quite easily.
 
Daphne,
You are doing a great job!!. These cars require TLC

The small trapezoidal (I think that is the correct description) top vent does not "pop out". It can be removed only with the dashboard out. If you want I can send you photos

But you can paint it in-situ as I suspect you will do

Any green leaks (LHM) need fixing quickly ... red fluid is the hydraulic fluid from earlier cars You wont have any

Dirty black/brown leaks not so urgent. Probably engine/gearbox oil. Just check your oil level (engine and gearbox) and if you are using 1 litre per 2000 km you probably should do something. But also check under car to find location of leak ... it might come from the notorious 6-bolt cover on the sump under which is the oil filter and oil pump. If the metal plate (annulus) with 6 holes in it is not flat then it will leak. Your mechanic could probably make a thicker one that wont bend (I have never got around to it). BE CAREFUL. ALWAYS USE AXLE STANDS WHEN GOING UNDERNEATH CAR

You will be surprised by how quickly you knock off these problems

Leaks in roof can also be fixed (mostly it seems to occur around top of windscreen). Use black butyl rubber. I think it is better than silicon and it wont go hard. Use a water hose to locate leaks ... you can find them. Then carefully lift the rubber seal around roof in the areas of leaks and apply the butyl rubber with a caulking gun into the "slot" you have just created. Clean off surplus with petrol after the butyl has set somewhat. If the rubber seal around roof is in bad condition you might have to replace it. Roof must come off. Again, it is not as bad as it sounds but needs two people (I have done it in about 5 hours and I am a crappy mechanic)

If leak is at bottom of wind screen you might need to remove screen. But it can be done with care

Regards
Ian
Hi Ian,

Daphne is out in the garage, but I'll pass on your compliment next time I drive her [emoji6]

Thanks for those pointers, we'll take a closer look to see what we can figure out.

I will need to find a way to transfer paint onto a fine brush to manage the upper vents in situ - I'll post more on how that goes, as I don't plan to take the dash out!

The roadworthy inspection was done by a European car specialist, who commented on there being a leak from somewhere uncertain - I'm thinking that they were more familiar with Ds than my local mechanic (who utterly isn't, though he is enthusiastic) and didn't think a bit of leak was very out of place. Nevertheless, good to know what's causing it.

Cheers,
Melanie

I would be a little concerned with your enthusiastic mechanic, You and Paul have a better understanding of Daphne - LHM is green and would be evidence of a hydraulic leak. Without being there it would be difficult to diagnose the source - clean the area where you have evidence and inspect again after running the motor for a short while.

Hard starting/ poor running can have a number of possibilities, carby may be one but may not need a full overhaul. Check the base, these can warp, if not too bad a new thick spacer gasket may help the seal.
Insulating spacer for under carburettor

Ian has pretty well covered your list, nothing there that should have you too despondent - you have a 40+ year old car that has suffered from neglect. They can be very reliable, my own car was a daily driver for 10 years requiring only basic maintenance before I took it off the road for a makeover.

Cheers
Chris
 
Leakage could be the common camshaft oil leak at the distributor mount, which it passes through. Eliminate other causes first though as the cam oil leak is a large job. You might take the breathers off the block and rocker cover and clean them in petrol / carby cleaner to make sure they are not clogged. Too much gas pressure in the engine may cause loss of oil via the gearbox end of the crankshaft.

With the carby, at least take it out and reset the butterflies exactly per the factory manual. The odds are that someone has twiddled every screw visible and fundamentally altered the basic adjustment. The Weber carby is easy to service DIY. Just buy a service kit with the gaskets and float valve and follow the manual. If it's not already been done, you want to replace the pressed in inlet fitting with a screwed in barb to remove the possible fire risk. You also need to look at the pump and filter condition and performance, not forgetting the stack of discs filter inside the fuel tank on non-EFI cars.
 
G'day folks,

Well, it's been a long time since I was last active here, due to having run off to buy my P6B and then get a few things sorted out with her - naturally, they're not yet all sorted (!), but I thought it time to return my interest to Daphne.

She's been out for a couple of runs this year, but we need to look into a slight overheating issue; however, I'm told that the 21 motors do tend to have cooling issues, so I guess I'm not alone!

As you may recall, I had been debating over what action to take with the interior - her shredded seats in particular. On Saturday I was browsing for ideas on the internet, and wouldn't you know it: I found a shabby, rusty DSpecial for sale on Carsales with an ochre (dark gold) interior. As that's the one Citroen interior color scheme I liked, while knowing it wasn't an original match for Bleu Lagune, I enquired immediately. It sounded promising, so we hitched the trailer and drove to inspect and collect it yesterday. It was a 12 hour round-trip.

I'm looking forward to harvesting its seats, door cards, internal C pillar covers, and various other notional items, plus maybe plug the 5 speed (from a DS21) into Daphne. The interior is a bit shabby, as you'd expect of an old car left out in the weather, but it's still better (and a better colour for me) than Daphne's, having the anticipated advantage of not making the rest of her look even more shabby than a brand new interior would! That's the theory - the proof of it will be in the pudding.

I'll post some photos when I figure out how to again!

Cheers,

Melanie
 
Fantastic Melanie. And adding the 5 speed is a great idea.

You may even find more useful parts.

Glad to hear the passion is still there for you.

Kind regards, Syd
 
Thanks Syd @gsowner84.

I've just given her a quick vacuum, Paul wired in a push button start switch (because there's a fault in the ignition switch), and I've had a quick drive around our 2 acres. My first impressions (only getting into second gear) are that it feels much more sprightly in both the motor and gears, groans less, and feels tighter overall than Daphne - I'm quite surprised, as it's appearance didn't lead me to expect great things. It's like a really car in comparison to Daphne's laid-back drive.

One thing I'm curious about is the height adjuster set-up: in Daphne there are 3 height settings between lowest and highest, but the new car has 5. On the centre notch (the largest notch in that set) it sits much higher than Daphne does. Can anyone enlighten me about this?

Sent from my LG-H815 using aussiefrogs mobile app
 
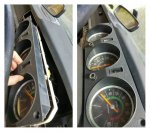
DASHBOARD FASCIA TRANSPLANT

Naturally, I wanted to get some small job done, and decided to swap the donor car's dashboard fascia into Daphne. So far I haven't broken anything, but after removing a number of pozidriv screws I'm stuck. How do I get at the reset buttons, which appears to be what's holding it all together still - do the cables for the instrument cluster need to be disconnected, and if yes, then what?

Thanks for helping a tool-challenged gal out!

1518410364248.jpg
 
DASHBOARD FASCIA TRANSPLANT

Naturally, I wanted to get some small job done, and decided to swap the donor car's dashboard fascia into Daphne. So far I haven't broken anything, but after removing a number of pozidriv screws I'm stuck. How do I get at the reset buttons, which appears to be what's holding it all together still - do the cables for the instrument cluster need to be disconnected, and if yes, then what?

Thanks for helping a tool-challenged gal out!

View attachment 103546

Not sure what you are up to there . . .

The whole cluster is removed as a unit, go under the bonnet and separate the speedo cable (the join is around the right hand sphere, just unscrews). Do as you have and remove the four pozi drive screws, withdraw the cluster and remove the 3 multipugs (yellow/green/white) and undo the speedo cable from the back of the cluster and the whole unit will be free.

Cheers
Chris
 
Be careful with the corners of the cluster. They are easily broken if you tighten the screws more than barely enough to stop them falling out. You might want to support the corners at the back with urethane and even use a small hidden dab of Blutak to hold the screws in place so they do not rattle.
 
Not sure what you are up to there . . .

The whole cluster is removed as a unit, go under the bonnet and separate the speedo cable (the join is around the right hand sphere, just unscrews). Do as you have and remove the four pozi drive screws, withdraw the cluster and remove the 3 multipugs (yellow/green/white) and undo the speedo cable from the back of the cluster and the whole unit will be free.

Cheers
Chris
Thanks Chris; I had thought I might bee able to just remove the fascia without the cluster, but this sounds do-able!

Sent from my LG-H815 using aussiefrogs mobile app
 
Thanks Chris; I had thought I might bee able to just remove the fascia without the cluster, but this sounds do-able!

Much easier to swap the better parts from the two clusters on the bench. If all you want to achieve is a better fascia just swap in the total replacement cluster.

Edit: The two 'reset' buttons are a press fit, they can be stubborn, if you have a set of fine nose pliers you can slip the open nose under the button and with a small block acting as pivot lever upwards.

Cheers
Chris
 
Be careful with the corners of the cluster. They are easily broken if you tighten the screws more than barely enough to stop them falling out. You might want to support the corners at the back with urethane and even use a small hidden dab of Blutak to hold the screws in place so they do not rattle.
Thanks for the tip, David - Daphne's is missing all four corners from this, so I was thrilled to find this one is intact!

Sent from my LG-H815 using aussiefrogs mobile app
 
HEIGHT ADJUSTER LEVER QUESTION

In Daphne there are 3 height settings between lowest and highest, but the new car has 5. Can anyone enlighten me about this?

1518472684604.jpg
 
Yes. It seems to have two extra 'half-notches'? Maybe someone just added them to give themselves more ride height options? Mind you, they don't look as though the lever would engage with them and stay there?

More interesting (for me anyway) is realising that on a RHD car, the height lever is down really low by the passengers feet. On my LHD car, the lever is higher up - above the level of the chassis box section.
 
Hi Melanie,
Welcome back...!
Just a comment on the cooling situation. DS21s should not overheat or run hot even in the hottest circumstances.
DS23 injection automatics with air-con - well yes, they get hot...
If your having cooling issues something is not quite right - I would encourage you to sort the cooling system back to front - and put a ladies stocking in the top radiator hose to stop detritus blocking the radiator flutes.
A 4 row core can be fitted to the down flow radiator (cap on top radiator tank) - well worth the effort.
Cheers,
Mark...:)
 
Hello Melanie,

I see you have finally commenced your Dee breeding program. It won't be long before more arrive. Better start stockpiling building materials. You are going to need a bigger shed soon.

Cheers,
Roger

PS someone has filed those notches. They are no real benefit. The normal ride setting is quite low enough.
 
Top