CX Power Steering Rack Restoration.
My Cx was leaking a fair amount of LHM from the steering rack. You could see it dripping out of the dust cover and onto the sub-frame, turning the grime a nice green colour.
The rack itself, and the steering worked fine. However, the leak was pretty severe, and LHM is not that cheap. Local dealers sell it for $19.40 per litre!
The first step is to obtain a seal kit from a Citroen parts supplier. I was quoted $190.00 from one supplier, and $200.00 plus GST from another.
Someone suggested it would be a good idea to sell the car. In my opinion this was not an option as the whole purpose of getting one of these cars was to restore it and learn from the exercise.
The removal of the rack is a fairly straight forward but dirty and unpleasant exercise. As usual, every pipe and fitting seems to have been strategically placed to prevent any servicing from being possible. I love a challenge.
These cars are really heavy and dangerous and if you don’t use common sense and caution, getting under one could be your last move.
If you support the car using the front jacking points, and you don’t have a full tank of petrol, they can roll forward and fall off the supports. As I didn’t have a full tank I made sure the rear wheels were chocked, and that the axle stands were both heavy duty ( 5000kgs load) and right under the frame where it is the strongest, right under the suspension arm position.
Once properly supported you could jump up and down on top of the car and it would not budge. Only then would any sane person get under one.
The rack mounting screws were 13mm and really tight. The tie rod end nuts were also tight because they are “nylock” nuts, which stay put. The tie rod bolt has to be held still while the nut is loosened. I used vice grip pliers and a large ring spanner.
Getting at the accumulator to loosen off the pressure relief was again difficult, but just possible. So many jobs on this car would be made so much easier if there was no air conditioning. The accumulator is right under the compressor. Off came the stone tray underneath.
Also, I removed the cabin air intake unit so I could actually see the steering flexible coupling. Next, I removed the fan (the interior fan on the bulkhead/firewall) to give even better clearance and visibility so I could remove the hydraulic pipes from the rack unit.
Now I’m wondering if I should bother refitting the air intake, it seems to get in the way of so many items, and do very little itself except take up room.
Underneath the rack I could see how to disconnect the exhaust pipe shield. There are two clips that just slide to either side , and then the plate can be removed.
Now it’s possible to see and unclip the wire clip that holds the pipe holder and 3 pipes to the top of rack unit.

Because of all the pipes and cables these simple procedures become difficult and time consuming.
Once removed, and all the pipes disconnected, you need to quickly plug the pipes or else even more LHM pours out on the ground. I used a short piece of plastic tubing plugged with a small plastic plug. This did the job.
The rack is held in place with 4 set screws, 13mm, two above and two below. The flexible coupling at the steering pinion is simple enough to undo. Once disconnected do not turn the coupling at all, or else you could put the control gears out of synch with the rack. This is apparently difficult to correct. As soon as the rack is disconnected it is recommended to put a pin through the pinion shaft to stop it from turning. I used a large screw with a plastic cap to keep it from falling out.
The tie rods have to be disconnected from the wheel/brake housing at the steering knuckle. Just undo the large nylock nut. You will have to hold the bolt still while undoing the nut, otherwise you will be there all day turning the nut while the bolt goes round with it. You will see that the lowest end of the shaft has two flat sides so you can grip it with a spanner or vice grip pliers. Once the nut and washer are off the shaft can be just pushed up and out.
Now the tie rods should be free of the wheel /brake unit.
In order to remove the rack, once everything was undone, you have to rotate the unit about 90 degrees so that the steering pinion is pointing upwards. This enables getting enough clearance to get it past the brake pedal unit, and out the side of the wheel arch.
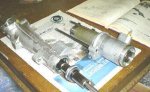
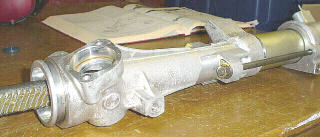
Once the rack is out of the car it’s simply a matter of giving it a good external clean with kerosene, and drying it. It’s amazing how nice and new it looks once the grease and grime is washed away. Carefully dismantle the whole unit, following the manual directions.
Have a good look for wear all around the hydraulic ram surfaces. Any sign of rust will mean replacement of the affected part.
The bearings will not come out until you remove the large o ring in either end. Some of these are deep inside the casings and difficult to get at. I ended up using two very sharp and pointed kitchen knives to grip and get under these o rings to remove them.
Lay all the seals and components out in order of removal and in the correct orientation. Clean out the casings thoroughly and dry them.
Find the matching seals from the replacement kit, and then one by one, dip them in LHM, then reassemble them in the places where the old ones came from.
Be very careful not to break them or force anything.

The manual just says to reassemble everything in the reverse order of disassembly. I found that to be an unintelligent method , because it would cause parts coming into contact with other parts that should not be in contact with each other.
I put both halves of the ram into their respective cylinders first, then assembled the piston, gently inserted the Teflon seal into it’s cylinder and finally put the rack-rod through the whole assembly last. This stops you from fouling one side of the ram with grease from the rack.
Once it’s all reassembled , It’s simply a matter of spending the best part of a day putting it all back into the car. Even knowing where everything came from and where it all should go will not save much time. It’s very awkward and difficult putting the large hydraulic pipe back in place with LHM dripping all over you , in your face , in your hair etc etc.
The rack, on it’s way back in going past the brake unit .
It’s all good fun, especially once it’s all done. The next job will be a wheel alignment. It’s possible to get it approximately right by sight, but the tyre guys have the gear to get it running true, with the toe in and toe out set correctly .
This job would not have been possible without the help of many and various members of AUSSIE FROGS who contributed helpful tips and hints. Those who had done this before were most helpful, and I thank them.
In Conclusion.
Now that I’ve reconditioned this power steering rack and seen the condition of the hydraulic ram I must say that I’m amazed at the quality of the engineering of these Citroen parts. I found no sign of wear on this 25 year old steering assembly. The only reason this rack leaked was because over time the rubber seals had become hardened and had worn down to the point where the LHM could escape. The Teflon rings and seals show no signs of wear and could have been re-used. In this instance I replaced all of them from the kit.
Cheers….George.
My Cx was leaking a fair amount of LHM from the steering rack. You could see it dripping out of the dust cover and onto the sub-frame, turning the grime a nice green colour.
The rack itself, and the steering worked fine. However, the leak was pretty severe, and LHM is not that cheap. Local dealers sell it for $19.40 per litre!
The first step is to obtain a seal kit from a Citroen parts supplier. I was quoted $190.00 from one supplier, and $200.00 plus GST from another.
Someone suggested it would be a good idea to sell the car. In my opinion this was not an option as the whole purpose of getting one of these cars was to restore it and learn from the exercise.
The removal of the rack is a fairly straight forward but dirty and unpleasant exercise. As usual, every pipe and fitting seems to have been strategically placed to prevent any servicing from being possible. I love a challenge.
These cars are really heavy and dangerous and if you don’t use common sense and caution, getting under one could be your last move.
If you support the car using the front jacking points, and you don’t have a full tank of petrol, they can roll forward and fall off the supports. As I didn’t have a full tank I made sure the rear wheels were chocked, and that the axle stands were both heavy duty ( 5000kgs load) and right under the frame where it is the strongest, right under the suspension arm position.
Once properly supported you could jump up and down on top of the car and it would not budge. Only then would any sane person get under one.
The rack mounting screws were 13mm and really tight. The tie rod end nuts were also tight because they are “nylock” nuts, which stay put. The tie rod bolt has to be held still while the nut is loosened. I used vice grip pliers and a large ring spanner.
Getting at the accumulator to loosen off the pressure relief was again difficult, but just possible. So many jobs on this car would be made so much easier if there was no air conditioning. The accumulator is right under the compressor. Off came the stone tray underneath.
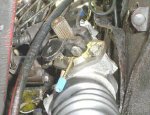
Also, I removed the cabin air intake unit so I could actually see the steering flexible coupling. Next, I removed the fan (the interior fan on the bulkhead/firewall) to give even better clearance and visibility so I could remove the hydraulic pipes from the rack unit.
Now I’m wondering if I should bother refitting the air intake, it seems to get in the way of so many items, and do very little itself except take up room.
Underneath the rack I could see how to disconnect the exhaust pipe shield. There are two clips that just slide to either side , and then the plate can be removed.
Now it’s possible to see and unclip the wire clip that holds the pipe holder and 3 pipes to the top of rack unit.
Because of all the pipes and cables these simple procedures become difficult and time consuming.
Once removed, and all the pipes disconnected, you need to quickly plug the pipes or else even more LHM pours out on the ground. I used a short piece of plastic tubing plugged with a small plastic plug. This did the job.
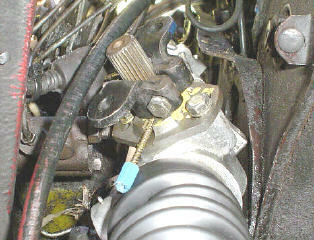
The rack is held in place with 4 set screws, 13mm, two above and two below. The flexible coupling at the steering pinion is simple enough to undo. Once disconnected do not turn the coupling at all, or else you could put the control gears out of synch with the rack. This is apparently difficult to correct. As soon as the rack is disconnected it is recommended to put a pin through the pinion shaft to stop it from turning. I used a large screw with a plastic cap to keep it from falling out.
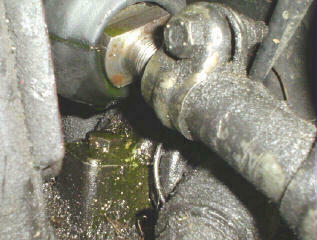
The tie rods have to be disconnected from the wheel/brake housing at the steering knuckle. Just undo the large nylock nut. You will have to hold the bolt still while undoing the nut, otherwise you will be there all day turning the nut while the bolt goes round with it. You will see that the lowest end of the shaft has two flat sides so you can grip it with a spanner or vice grip pliers. Once the nut and washer are off the shaft can be just pushed up and out.
Now the tie rods should be free of the wheel /brake unit.
In order to remove the rack, once everything was undone, you have to rotate the unit about 90 degrees so that the steering pinion is pointing upwards. This enables getting enough clearance to get it past the brake pedal unit, and out the side of the wheel arch.
Once the rack is out of the car it’s simply a matter of giving it a good external clean with kerosene, and drying it. It’s amazing how nice and new it looks once the grease and grime is washed away. Carefully dismantle the whole unit, following the manual directions.
Have a good look for wear all around the hydraulic ram surfaces. Any sign of rust will mean replacement of the affected part.
The bearings will not come out until you remove the large o ring in either end. Some of these are deep inside the casings and difficult to get at. I ended up using two very sharp and pointed kitchen knives to grip and get under these o rings to remove them.
Lay all the seals and components out in order of removal and in the correct orientation. Clean out the casings thoroughly and dry them.
Find the matching seals from the replacement kit, and then one by one, dip them in LHM, then reassemble them in the places where the old ones came from.
Be very careful not to break them or force anything.
The manual just says to reassemble everything in the reverse order of disassembly. I found that to be an unintelligent method , because it would cause parts coming into contact with other parts that should not be in contact with each other.
I put both halves of the ram into their respective cylinders first, then assembled the piston, gently inserted the Teflon seal into it’s cylinder and finally put the rack-rod through the whole assembly last. This stops you from fouling one side of the ram with grease from the rack.
Once it’s all reassembled , It’s simply a matter of spending the best part of a day putting it all back into the car. Even knowing where everything came from and where it all should go will not save much time. It’s very awkward and difficult putting the large hydraulic pipe back in place with LHM dripping all over you , in your face , in your hair etc etc.
The rack, on it’s way back in going past the brake unit .
It’s all good fun, especially once it’s all done. The next job will be a wheel alignment. It’s possible to get it approximately right by sight, but the tyre guys have the gear to get it running true, with the toe in and toe out set correctly .
This job would not have been possible without the help of many and various members of AUSSIE FROGS who contributed helpful tips and hints. Those who had done this before were most helpful, and I thank them.
In Conclusion.
Now that I’ve reconditioned this power steering rack and seen the condition of the hydraulic ram I must say that I’m amazed at the quality of the engineering of these Citroen parts. I found no sign of wear on this 25 year old steering assembly. The only reason this rack leaked was because over time the rubber seals had become hardened and had worn down to the point where the LHM could escape. The Teflon rings and seals show no signs of wear and could have been re-used. In this instance I replaced all of them from the kit.
Cheers….George.