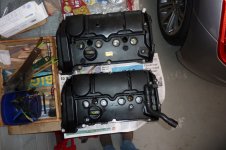
2011 RCZ THP200 midlife makeover

gwest

Member
Fellow Frogger
Tadpole
Joined
Apr 24, 2018
Messages
166
Location
Tasmania
The first impressions after buying this 2011 Peugeot RCZ manual transmission (131k km) was how high the clutch pedal was. And how far one had to raise one’s foot off the rest to apply it.
My 2011 DS3 manual (133k km) has the clutch pedal higher than the brake pedal by 20mm (measured putting a ruler horizontally across the clutch pedal over to the right and measuring the gap above the pedal), and the clutch pedal sits 152mm off the carpet (measured from the face of the pedal at right angles to the pad). I have pretty much got used to this.
The RCZ has the clutch pedal 26mm above the brake pedal and 171 mm off the floor. I’m struggling to get used to this. Not helped by the gap to the left of the clutch pedal being even narrower than the DS3.
My reading of the online literature indicates that this is a common problem without any solution. Does wear on the clutch friction plate affect the pedal height on these cars with a hydraulic clutch release?
 
I dont' think I've ever noticed that. and the one here has over 180,000kms on it .... Maybe the clutch was replaced prior to our ownership 🤔 Have you found the RCZ forum? that could be a good place to ask (though most there just talk about what polish to use, and which neon lights would look best flashing away on it... so I haven't really bothered with it).
 
At the moment I have put aside the clutch pedal issue in favour of diagnosing one of the two ECU fault codes the car has: P2263: turbocharging air circuit pressure too high.

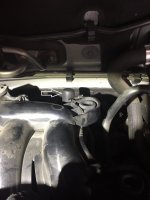
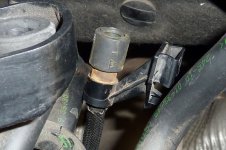
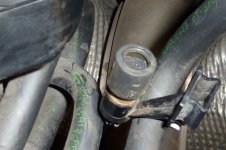
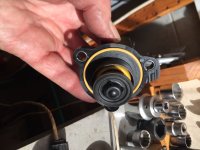
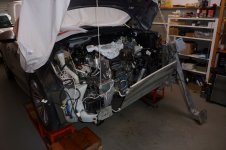
There was one solution on the Peugeot rcz forum ( I know, some of the owners are a bit precious!) and that was to clean the air filter on the end of the pipe that rises from the turbo solenoid. I’m embarrassed to admit how much time it took and how much of the engine I removed to find this thing! The rubber cover pulls off to reveal a cylindrical filter, with some grey foam at the end and a gauze area near the centre. Is there a recommended way to clean this?
 

Attachments

  • filter location.jpg
    filter location.jpg
    491.8 KB · Views: 48
  • line filter.jpg
    line filter.jpg
    319.6 KB · Views: 51
  • line filter-2.jpg
    line filter-2.jpg
    255.9 KB · Views: 47
Thats the air breather for the turbo solenoid, as long as air flows it doesn't need cleaning. Most of the 308s I've seen don't have the cap or little filter on the end.
Connects to the impossible to reach solenoid under the inlet manifold. Has anyone been working on the manifold? Could be the solenoid not not working but you'd notice boost is affected or maybe the vacuum pipes are crushed restricting air flows??
 
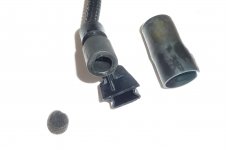
Well I was wrong about the 'gauze filter' in the middle - that turned out to be just yellow dust! There was just the bit of foam in the end that I washed out in water. It does show that the breather pipe is in a dusty area so I can see why blockage could be an issue. But I could also see why you would want to retain the filter to prevent dust entering the boost solenoid. I rushed into this job without collecting any appropriate live data with the result that because of the difficulty of access I will fit a new boost solenoid anyway. And I will fit a new intake pressure sensor as well. I have checked the action of the waste gate with a vacuum pump and it moved ok, and it looked ok, as did the electro valve on the turbo. Time will tell. In the meantime I am in the process of removing the leaking oil filter housing and moving on to the second ECU fault P000B: exhaust camshaft dephaser-linked control fault. Again, I didn't collect any live data, just thought I would remove the exhaust timing control solenoid to check if it was clogged. It was clean. As was the inlet solenoid. Someone has been here before I think.
Next step will be to check the timing.
 

Attachments

  • P1120893.JPG
    P1120893.JPG
    361.3 KB · Views: 38
No dimi I neglected to take a photo of the timing solenoids- I think I was a bit stunned that they were so clean.

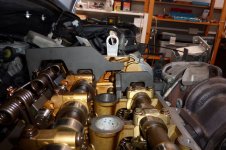
I did remove the timing cover and set up the timing tools and found that the inlet cam was just a bit retarded. The exhaust timing was fine but I could move that camshaft a little backwards and forwards – the inlet cam was solid. So I’m wondering if a replacement exhaust Vanos sprocket might be the way to go. I don’t really know how to test them but when I remove the exhaust sprocket I will look at the alignment of the centre mark with the body as per Haynes instructions. I inspected the crankshaft sprocket and the teeth showed very little wear so I think the timing assembly has been replaced at some stage. I removed the tensioner and checked the distance measurement to the chain guide and it was 71.5mm. The effective extended length of the tensioner was 76mm, which gives 3.5mm of reserve. The common measurement for turbo engines that dictates a replacement of the chain is 68mm. But that is for the single Vanos THP156 motor- specs on the THP200 are hard to find. The critical distance for the twin Vanos (non-turbo) engine is 73.5mm (Haynes Peugeot 308 #5561).

I had previously seen in Australian car reviews/recalls for the Gen 2 Mini Cooper that the critical distance for determining whether the timing chain tensioner was to be replaced was 72mm. If the measurement was less than this then the tensioner was to be replaced by part no. 1131 7607 551. Now my fitted tensioner was about 87mm total length, but there are a few web sites that actually give a length for the recommended part number as 92mm. My existing tensioner is really a bit on the short side for managing my chain – it has only 3.5mm of movement left in its total stroke of 20mm. Something 5mm longer would give closer to half the effective stroke in reserve. The part number above is the same as that for the N13 BMW engine, which is very similar to the THP200. My conclusion is that my existing tensioner is the wrong one. And it would be very desirable if sellers actually gave the dimensions of the products they sell.
 

Attachments

  • P1120900-1.jpg
    P1120900-1.jpg
    398.8 KB · Views: 42
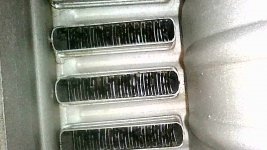
Today I had a look at the intercooler- the THP200 has a 700mm horizontal one and I was pleased to see that there was not a lot of oil in it- probably less than 10ml. But there was solid gunk at the ends of the air ducts at the intake end. Sloshing a bit of kero did nothing to remove them. I tried my leaf blower at the other end- the diameter of the inlet/outlet pipes was quite convenient, but it made no impression on the black gunk. What made an impression on me however was how much less air was coming out compared to what was going in! I also had not realised that the air ducts were not open- they have heat exchange fins within them! Given that I do have P2263: turbocharging air circuit pressure too high, I’m wondering if restricted flow in the intercooler might be a possible cause? I tried vacuuming out some of the accessible deposits but they were reluctant to move. I will fill it with kero and soak it for a week or so and see if the gunk dissolves.
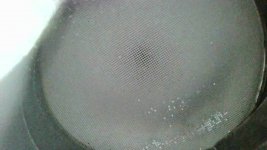
I also had a look at the catalytic converter and was relieved to find that there was little blockage in it.
 

Attachments

  • IMG_0032.JPG
    IMG_0032.JPG
    142 KB · Views: 39
  • IMG_0007.JPG
    IMG_0007.JPG
    102 KB · Views: 43
P2263 - You have checked the turbo pressure solenoid. Now check for breaks in the wastegate area, and particularly the blow off valve. These can develop a crack in the ring inside.
 
Would that mean the wastegate vacuum is not working, Check vacuum leak of hose connected to RHS of the actuator and actuator arm adjustment nut hasn't loosen off. Never seen this happy but Mini Cooper owners have experience this. Don't know what error code but controls the wastegate
 
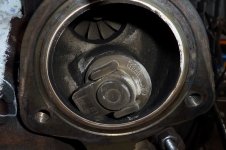
I see what you mean double chevron about the wastegate being a prime suspect. Unfortunately at this stage I have little understanding of where the pressures are measured that generate the error code but I did actuate the wastegate with a vacuum pump and the gate appears to look ok as do the actuator arm lock nuts. Likewise the blow off valve didn’t appear to have anything wrong with it. Things will become clearer when I get the engine back together but at present I am a little way off.
 

Attachments

  • wastegate.jpg
    wastegate.jpg
    355.3 KB · Views: 38
  • blow off valve.jpg
    blow off valve.jpg
    710.1 KB · Views: 37
  • status quo.jpg
    status quo.jpg
    320.4 KB · Views: 43
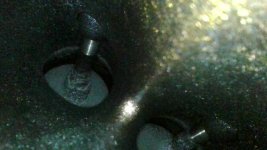
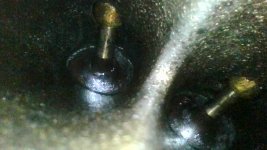
When I first drove this car it did not seem particularly lively, but then at 132k km I was expecting the inlet ports and valves to be clogged up. I did a cold compression test and was pleased to find that the readings were in the range 189-200 psi. I separated the inlet manifold from the head and had a look with an endoscope. I was amazed just how little carbon build-up there was. I have the service receipts only for the last two years and there was no mention of carbon cleaning. But I have previously observed in two BMW N13 engines, that are very similar to the THP200 (twin Vanos, variable valve height), that they also had much less carbon build-up at 90-100k km than in my single Vanos DS3 THP 150 and DS5 THP165 engines at 130k and 70k km respectively. These less powerful turbo engines have two breather pipes each end of the engine cover, leading to the inlet manifold and turbo intake. The THP200, like the N13 engines, only has a single breather pipe leading to the turbo intake. I don’t understand why the less powerful versions of the THP engines were set up in such a way as to exacerbate the carbon fouling problem that besets these direct injection engines?
I had a go at cleaning the valves using scrapers etc and used an endoscope to guide my activities, but my surgical skills are sadly lacking and it was pretty hit and miss.
 

Attachments

  • before.JPG
    before.JPG
    101.5 KB · Views: 39
  • after.JPG
    after.JPG
    111.5 KB · Views: 46
  • N13 top RCZ below.jpg
    N13 top RCZ below.jpg
    363.9 KB · Views: 40
I had read that the THP200 models were less prone to build up. Good to see it‘s likely true 👍🏼
 
I don’t understand why the less powerful versions of the THP engines were set up in such a way as to exacerbate the carbon fouling problem that besets these direct injection engines?
It's because the less powerful versions were the earlier versions of the THP - the later versions had various improvements, some of which were to help prevent the carbon fouling problems.

I'm sure the first THPs would have had a different breather setup if they hadn't somehow missed the entire carbon-fouling-cycle during development 😁
 
Very nice devotion.

I have a 2014 RCZ THP200 Mk 2.
Pug rcz.jpg


I have listed my service record since I purchased it at 39,000 klicks.

PEUGEOT RCZ THP200 SERVICE LOG

Date Klms Service

20th Dec 2018 39,500 Oil change Castrol
Oil filter change
Nulon engine oil flush
SA459
Fit K&N air filter
Replace pollen filter
Replace spark plugs
Replace wiper blades
Fit THP emblems

29th Dec 2018 39,700 Fit entry door lights

4th Jan 2019 40,000 Install new battery

15th Jan 2019 40,600 Fit door latch covers
Clean leather

9th Feb 2019 41,400 Fit new gear nob and
boot
Rotate wheels
Clean brakes

15th Feb 2019 41,600 Fit left foot rest plate

4th May 2019 44,700 Oil change Castrol
SA459

27th May 2019 45,600 Replace coolant cap

28th Sept 2019 50,000 Oil change Castrol
Oil filter change
SA459

28th Nov 2019 52,900 Fit new Bridgestone
Potenza S001 tyres x4
Change transmission
fluid. Redline MT-90

29th Feb 2020 55,300 Oil change Castrol

17th Mar 2020 55,800 Replace pencil coils

24th May 2020 58,500 Repair pop-up display
Replace coolant cap

3rd July 2020 60,000 Oil change Castrol
Oil filter change
SA459
Replace pollen filter

26th July 2020 60,600 Add Redline ST-1 fuel cleaner

18th Oct 2020 64,200 Replace coolant tank sensor

1st Nov 2020 65,000 Oil change Castrol
Replace spark plugs
(NGK ILZKBR7B8G)
Clean K&N filter
Add Redline ST-1 fuel cleaner

26th Dec 2020 68,000 Clean leather seats
Repair pop-up display

28th Feb 2021 70,000 Oil change Castrol
Oil filter change
SA459

26th March 2021 71,000 Fit new coolant exhaust pipe.
Fit new water tank/thermostat.
Flush coolant/refill
Change brake/clutch fluid

5th May 2021 72,500 Add Redline ST-1 fuel cleaner

16th May 2021 73,000 Replace brake light switch

29th May 2021 73,800 Replace key fob batteries

10th July 2021 75,200 Oil change Castrol
Add Redline ST-1 fuel cleaner
Replace pollen filter

24th July 2021 75,700 Replace pencil coils
Replace spark plugs
(NGK ILZKBR7B8G)

1st Aug 2021 76,000 Replace pop-up display

9th Aug 2021 76,300 Install new battery
Fit entry door lights

25th Sept 2021 77,700 Fit tyre valve caps

9th Oct 2021 78,200 Replace rear left tail/stop bulb 21/5w

9th Dec 2021 80,500 Oil change Castrol
Oil filter change
SA459
Nulon engine oil flush

5th Feb 2022 82,400 Fit Potenza Sport tyres (x2) front
Add Redline ST-1 fuel cleaner
Cut & Wax

20th Mar 2022 83,900 Clean leather seats
Add Redline ST-1 fuel cleaner

1st April 2022 84,000 Clean rear left ABS sensor and ring
Re calibrate the
steering wheel sensor

6th April 2022 84,200 Wheel alignment

5th June 2022 84,700
Fit Bilstein shocks
Fit new strut tops
Fit new brake rotors
Fit new brake pads
Bleed brake fluid
New rear wheel
New rear tyre
Replace torsion beam
Replace stud axel
(rear left)
Replace inside hub
Assembly (rear left)
Wheel alignment
Oil change Castrol

9th Aug 2022 85,200 Bleed brake/clutch fluid
Fit light weight
flywheel
Fit new clutch kit
Redline MT-90
transmission fluid
R & L driveshaft seals

17th Aug 2022 85,300 Replace wiper blades

25th Nov 2022 85,600 Replace cran
position sensor

7th Dec 2022 85,800 Walnut blast intake
valves

28th Dec 2022 86,200 Replace pollen filter

8th Feb 2023 86,400 Clean leather seats

27th Feb 2023 86,800 Add Redline ST-1 fuel cleaner

15th April 2023 87,300 Fit door light (RH/LH)

29th May 2023 87,400 Add Redline ST-1 fuel cleaner

13th June 2023 87,600 Oil change Castrol
Oil filter change
SA459
Nulon engine oil flush

16th Sept 2023 88,200 Fit Forge turbo pipe

10th Dec 2923 88,500 Re-gas A/C

19th Dec 2023 88,888 Replace transmission
fluid – Redline MT-90
Replace fuel filter
Add Redline ST-1 fuel cleaner

27th Feb 2024 89,300 Run a spanner over
under the vehicle
Degreased under


Kilometer
Item
90,000Clean K&N filter
90,000Clean MAF
90,000Clean air pressure sensor
90,000Replace spark plugs
95,000Replace pollen filter
100,000Fit new front suspension bits.
100,000Replace engine coolant
100,000New timing chain kit
120,000Replace oxygen sensors
120,000Replace fuel filter


Month
Item
June 2024/93,000Replace oil
June 2025Replace brake fluid
June 2025Replace oil and filter. SA459


I love it to bits. It goes out once every one/two weeks for a 50 kilometre run.

Cheers.

Bty – the lightened flywheel made a difference in acceleration in 1st, 2nd and 3rd gears.
 
good grief. here would be an overview of the rcz here.

every 20,000km ... change oil and filter.... even throw an air cleaner and fuel filter at it sometimes

13years later ... .@ 180,000kms change cambelt

keep changing oil and filter every 20,000kms.... maybe throw an air and fuel filter at it.

job done :)

Out of interest, why did it need a clutch at only 80,000kms ?
 
Hmm, the only part ever changed on our RCZ has been the oil filter, and an engine harness as part of a factory recall. Literally nothing else. Haven't even changed the air filter.
 
207CC- did fitting a new clutch make any difference to the pedal height?

Was the cleaning of the MAF and air pressure sensors in response to ECU fault codes?

What is the recommended interval for replacing the fuel filter? (I haven't spotted mine yet!)
 
207CC- did fitting a new clutch make any difference to the pedal height?

Was the cleaning of the MAF and air pressure sensors in response to ECU fault codes?

What is the recommended interval for replacing the fuel filter? (I haven't spotted mine yet!)
MAF and air pressure sensors cleaned as a matter of normal maintenance.

Fuel filter should be changed every 50,000 - kilometres. You will not see it, as it is behind a cover. In front of the rear driver's side wheel.

Clutch change did not change pedal height.
 
Last edited:
Top