My 504 Daily Driver Project

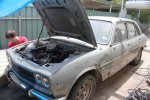
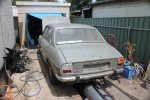
So I sat down and had a think about what I want to achieve here. The plan all along has been to get a nice early model 504 on the road, and if I convert the '80 model to look like the '70 model, no matter how well it's done, I'll still know.

So I'm going to repair the 1970 model. Problem is, I don't want to cut panel bits from the 1980 because I think it's too good to do that too. A future project down the track perhaps.

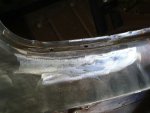
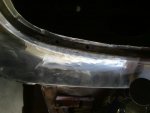
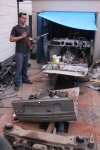
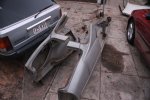
So it's a whole lot of metal fabrication ahead of me now!

Great stuff! Despite the hard work, it'll be worth it for sure. It'll keep us entertained also :D. Can't wait to see how it progresses.

I am getting my 74 504 on Friday. It'll also be a full resto but the only rust that I know of is in the boot.
 
I'll look forward to some photos of yours too then, James!

Take the sill covers off to check for rust, clean thoroughly and add a corrosion preventative compound as soon as possible. This seems to be a real weak spot in 504s! Other places to check are under the front and rear windscreen rubbers, A-pillars (where they crack) and the bottom of the rear guards, both the outside that you can see and the inside under the car.

Make sure all the windscreen drains are clear - easy on the back as they just drain to the boot channel but difficult on the front because it drains through a thin slot that's hidden behind the front guards. Removing the guards to have a look is not actually that big a job though, 504s are very easy to dismantle and reassemble!
 
Last edited:
504

No worries Scotty,

I'll probably create a thread.

It's been in a dry climate all of its life so should be good generally. I've pulled the front guards and front panel off a 504 before. Pretty easy job. I'll be doing this anyway. My first 504 was really rusty so I know the worst spots from first hand experience. I have to get through stripping an SLi and an STI first. I got the STI today and am toying with the idea of putting the motor (and 5 speed gearbox) into the 504. I got the STI running this evening - man that thing is a fast accelerating car for an old 505 with 450,000kms on the clock. The motor would go well in the 504 - another reason why your project is so interesting to me. Getting it engineered etc is my concern though, so I might keep it standard to start with - dunno yet. ...stay tuned...
 
:roflmao: If only it were as easy as that.

You could counter that with the grandfather's axe principal though. Isn't it better that some of the old one gets re-used rather than struggle on as a half finished project that eventually gets chucked because after a couple of years progress hasn't been great because of the level of difficulty/effort required? I've come to the conclusion that life is too short to spend doing major bodywork repairs and paying someone to do it wouldn't be economical for a 504.


Well speak for yourself :) You guys have perfect climate for these type of cars... You should really see how bad OUR cars goes in here.

I'd consider scottys 69 a very good project to begin with! :cheers:

504's are classic. Sometimes nice things costs. Buy a 405 if you want a cheap cars :) These cars are classics after all.

And beside there's a hell lot difference between a 69 504 compared to 83 504. 83 is pretty much worthless but 69 is a pure classic!
 
Rust repairs have commenced.....

attachment.php

attachment.php
 

Attachments

  • 26122010395.jpg
    26122010395.jpg
    63.3 KB · Views: 1,494
  • 26122010396.jpg
    26122010396.jpg
    80.2 KB · Views: 1,324
Last edited:
Rust

Scotty,

What are you using to clean up the metal? A Flap disk?

Thanks,
James
 
James,

What you can see there is where we've cut out a section and welded in a new section. A grinder has been used to clean up the welds, and a rotating 'scotchbrite' pad to clean it up to inspect it for defects.
 
Scotchbrite Pads

James,

What you can see there is where we've cut out a section and welded in a new section. A grinder has been used to clean up the welds, and a rotating 'scotchbrite' pad to clean it up to inspect it for defects.

Thanks Scotty,

It looks pretty well repaired and quite smooth so I thought that something in addition to the grinder must have been used. Where can you get these Scotchbrite pads and do they fit onto standard angle grinders?

James
 
Well speak for yourself :) You guys have perfect climate for these type of cars... You should really see how bad OUR cars goes in here.

Except in my wisdom I shipped two 504s from the UK to Australia and have one hell of a restoration job on one of them on my hands, easily a match for what Scotty has ahead of him.
 
Except in my wisdom I shipped two 504s from the UK to Australia and have one hell of a restoration job on one of them on my hands, easily a match for what Scotty has ahead of him.
Heh. I wish I would have as little rust as scottys car have!!

Scottys car is consired as a real survior in here. A pearl as I might say .

I think you really donät understand how bad cars go in our climate...

Please enlighthen him Scott! :D
 
Thanks Scotty,

It looks pretty well repaired and quite smooth so I thought that something in addition to the grinder must have been used. Where can you get these Scotchbrite pads and do they fit onto standard angle grinders?

James

I've been using these scotchbrite pads for stripping my 203.
I started with a 'supercraft' one from Mitre10 that cost $30. It was 100mm and designed to go on a 125mm angle grinder. I stripped the boot lid after which the disc was worn out. I then discovered the purple 3m ones from Blackwoods that cost $14 and to fit them on the 125mm angle grinder you have to take the guard off.
They are bloody dangerous[I took the end off a finger by touching it while spinning], but with one disc I did one rear guard and the entire roof, so half the price and three times the area or more of the mitre10 jobby.
They are the bees knees for stripping paint off metal if you have a delicate touch. They will erode the metal too if you are clumsy so be careful.
 
Scotchbrite

I've been using these scotchbrite pads for stripping my 203.
I started with a 'supercraft' one from Mitre10 that cost $30. It was 100mm and designed to go on a 125mm angle grinder. I stripped the boot lid after which the disc was worn out. I then discovered the purple 3m ones from Blackwoods that cost $14 and to fit them on the 125mm angle grinder you have to take the guard off.
They are bloody dangerous[I took the end off a finger by touching it while spinning], but with one disc I did one rear guard and the entire roof, so half the price and three times the area or more of the mitre10 jobby.
They are the bees knees for stripping paint off metal if you have a delicate touch. They will erode the metal too if you are clumsy so be careful.

Ouch on the finger. Not so good if you are actually a luthier and work with your hands in your job! Thanks for the info. Great to know. I am not planning on a back to bare metal respray at this point but there will be some bits that have to go back to metal for repairs etc.
 
It's been a rough past few weeks, a death in the family and a stroke, plus christmas and new year and I've been snowed under completely.

Anyhow, where were we?

Ahh yes.

I bought another parts car to provide the panels that were rusted in the '69. It's a 12/'75 build Automatique, a bit of rust here and there but not where I needed panels, so that's good. It had a seized engine that apparently only happened fairly recently.

Some photos will tell the story better than me!
attachment.php

attachment.php

attachment.php


My cousin doing the hard work for me...
attachment.php

attachment.php

attachment.php

attachment.php

attachment.php


Never leave my mate Phill hanging around with a glass of scotch and an electric saw.
attachment.php

attachment.php

attachment.php


And the bounty of parts cut from it.
attachment.php
 

Attachments

  • IMG_9664.JPG
    IMG_9664.JPG
    99.3 KB · Views: 1,351
  • IMG_9665.JPG
    IMG_9665.JPG
    97.6 KB · Views: 1,348
  • IMG_9666.JPG
    IMG_9666.JPG
    99.1 KB · Views: 1,354
  • IMG_9667.JPG
    IMG_9667.JPG
    99.5 KB · Views: 1,363
  • IMG_9668.JPG
    IMG_9668.JPG
    98.5 KB · Views: 1,372
  • IMG_9669.JPG
    IMG_9669.JPG
    98.2 KB · Views: 1,409
  • IMG_9670.JPG
    IMG_9670.JPG
    99.7 KB · Views: 1,332
  • IMG_9671.JPG
    IMG_9671.JPG
    99.3 KB · Views: 1,339
  • IMG_9903.JPG
    IMG_9903.JPG
    98.8 KB · Views: 1,330
  • IMG_9904.JPG
    IMG_9904.JPG
    99.7 KB · Views: 1,318
  • IMG_9905.JPG
    IMG_9905.JPG
    99.3 KB · Views: 1,271
  • IMG_9906.JPG
    IMG_9906.JPG
    97.4 KB · Views: 1,294
What's with the holey wheels? Have the centre holes been cut or are they a different wheel type? It should make balancing a whole lot easier.
 
Chadi - Don't be too sad, between the two cars there was never going to be enough good parts to make two good cars - so this one has given it's life so that another can live!

James - Yup, there's a box here now with your name on it that I'm filling with bits. I've put the photos of the aircon system up, I do like that little control panel in the centre console.

If you see any other bits in the photos that you want, now's the time to get in! The remaining bits almost fit in my 6x4 box trailer, and in a couple of hours they will!
 
Stephen - The parts car had a combination of 504 and 505 wheels on it. The 505 wheels have the larger hole in them and are easier to balance, but you can't fit standard 504 hubcaps to them.
 
Top