Traction Driveshafts

DoubleChevron

Real cars have hydraulics
Moderator
VIP Paid Subscriber
Fellow Frogger
Joined
May 8, 2000
Messages
22,367
Location
Ballarat,Vic,Aust.
20201028_185911.jpg


I had to post this ... There comedians right? Everyone knows Citroen owners only have metric tools..... The puller, 1" 3/8 .....

20201028_185929.jpg


I thought the DS was bad .... where do you jack this damn thing from ?

20201028_190155.jpg


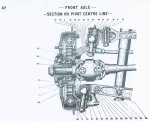
Yeah, the tapers are damaged in the drum. I fitted a good taper from the parts, the drum on the car has 4mm driveshaft protrusion, the spare has 3.4mm protrusion ... and both look munched.

20201028_191243.jpg


This one has pretty much no protrusion.... and was a right bastard to break the taper on .... MUCH harder for the puller than the other side.

So the tapers look good, I just need to buy a drum. I'll still whip the shafts out and re-grease and check them :)
 
What do the wheel bearings and seals look like? My inner wheel bearings were pretty well shot. I ended up replacing them all. My right hand bearings must have been overheated at some time because it took a 6-foot long pipe and all of my strength to break loose the retaining nut (and yes, I did realize it is a Left Hand thread and that there is a folded over tab washer in there). Here is what it took to get the nut loose.
IMG_4207.jpg
 
FWIW, you should have some rubber hockey pucks (a/k/a/ slotted jack pads) to jack up the car with. Simply put the hockey puck under the car with the pinch weld in the slot and jack away. The floor/sill immediately on opposite sides of the pinch weld is plenty strong enough. The pinch weld on my 11BL was damaged in quite a few places from jacks without the hockey pucks.....
 
Examine the taper on the stub axle very carefully. You will need a puller to remove the outer wheel bearing and a special tube spanner to undo the inner ring nut. John has shown the inner ring nut spanner in the above photo. ( PS. I know where you can borrow them).
 
Thanks all, yes I was going to check and replace the wheel bearings as requried.... I couldn't see how the came apart (so was going to read the manual..... How desperate is that!). Everything on this car needs special tools by the sounds of it!

seeya,
Shane L.
 
Just a couple of things that may be helpful:
Any tapered component like shown in the initial post [picture below], only the thread should protrude past the component being held to the taper [the brake drum hub]. The axle taper should be recessed 1mm or 2mm inside the hub.
20201028_191243.jpgpitman fitting_zps1okfinbi.jpg
There should be a space like shown in the above sketch I made for another thread topic some time ago.

Here is a tool bought from Trade Tools for about $30 & modified to accurately fit the hub groove & used to remove the brake drum hub:
DSCF2292.JPGDSCF2293.JPGDSCF2294.JPG
Fit feet to grove then tighten the bolt on the axle. Load up, then a good solid straight on whack to the bolt head with a club/gympie hammer & the hub should be loose.
 
Just a couple of things that may be helpful:
Any tapered component like shown in the initial post [picture below], only the thread should protrude past the component being held to the taper [the brake drum hub]. The axle taper should be recessed 1mm or 2mm inside the hub.
View attachment 126796View attachment 126797
There should be a space like shown in the above sketch I made for another thread topic some time ago.

Here is a tool bought from Trade Tools for about $30 & modified to accurately fit the hub groove & used to remove the brake drum hub:
View attachment 126798View attachment 126799View attachment 126800
Fit feet to grove then tighten the bolt on the axle. Load up, then a good solid straight on whack to the bolt head with a club/gympie hammer & the hub should be loose.

Interesting. I assumed that brake drum taper was fine, because when I looked at the nut, the nut itself is designed to cater for the amount of protrusion shown. Would the split pin recess in the nuts be deep enough if there was no protrusion as all (as shown in your diagram ?).

index.php


this puller was in with box of car parts. It is two halves that fully encapsulate the brake drums hub groove, then you slide a section of pipe over it that holds it all together.
 
Seems y'all have the original/genuine special tool for that purpose ~ I didn't have access, so made one that did the job.

This is general & good to know plus things that should always be checked:
Be aware that the taper needs to be pulled home, to be tight on the axle.
Then the hub is stopped from spinning using a key or spline.

Unless the nut has enough material removed from the internal thread to clear & accommodate that protruding axle + a couple of extra mm the taper will not be tightened properly. This can result in shearing the key, damaging the key way, axle & hub.

Also some marques keys are not symmetrical but slightly thicker on one end. Correctly fitted the tapered end is inboard or toward the thickest end of the axle. Incorrectly reversing this, when assembling, can result in a cracked hub.
 
The Woodruff Key on a traction is symmetrical. So no probs there. The hub nut is cleaned of threads for the first 2mm. A small amount of protrusion is permissible. The drive relies on tight fit of the tapers hence 180 ft/lbs. The key is only there for insurance, but if the taper is loose the key will fail eventually.
I may be able to help with a good drum if you cannot source on elsewhere.
Be aware that the hub taper fits tight on the large diameter and also the small diameter and that the centre portion of the hub bore is relieved so that it does not contact on the centre portion of the stub axle taper. IE. it makes contact at both ends and not in the middle!
 
Last edited:
Don't go spending 363.00 Euro for each drum until I have had a look at my supply. I have a few to look through but at the moment I cannot lift the boxes that they are hidden away inside without risking my hernia operation. ( three weeks ago)
 
Don't go spending 363.00 Euro for each drum until I have had a look at my supply. I have a few to look through but at the moment I cannot lift the boxes that they are hidden away inside without risking my hernia operation. ( three weeks ago)

Thanks Gerry.... There is absolutely no rush at all !!! first I need to fix the brakes, dismantle and check the driveshafts, check the wheels bearings ..... 1001 jobs to do :) Just as well there is no rush ( as it'll probably be waiting on me another 20years :clown: ).
 
I remember the wheel bearings have different widths depending on later /earlier models ? My '49 slough had 17mm (outer bearing has puller groove) bearings, others had 19mm I think . If you mix and match could be problematic depending which spacer is used
 
I found this on youtube a few days ago.
Its in French, but the video is informative. Its the best example I've seen of someone breaking down the front end of a traction.

There are two front end videos and one on window regulators.

Pete
 
John, I was able to replace silentblocs and splined pins with the use of half a front torsion bar as a drift, a stout steel tube as a support and a 5 lb sledge hammer. I have done several front ends this way. I did not undo the silentbloc mounting bolts until the splined pin was removed. There was no need for burning out the rubbers or for a fancy press.
 
I tried several ways including using a drift and sledge to no avail. Finally, it took every bit of 20 tons of force in the press. I had to burn out the rubber first because I was concerned about distorting the subframe trying to remove the splined shafts (and it allowed me to heat the splined collar). The Light 15 manual says it may take up to 80 Tons! (Operation 120 para. 8) so I felt lucky getting it out with only a 20 ton press....
 
80 tons was for the early full splined pins. The later pins will move with 20 tons. I hope you are pushing the pins out towards the rear of the cradle. When fitted the front silentbloc inner, the lower link arm and the rear silentbloc inner should form a continuous unit pressing against each other. If the bolts are loosened then there is no chance of cradle distortion. Having the rubbers in each silentbloc serves to keep everything in line whilst either impact or continuous pressure is applied. When assembling it is imperative to make sure that the line between the centres of each lower ball joint housing is parallel to the centre line of the cradle and sits at a distance of 4mm ahead of the cradle centre line. Plenty of 'Penetrine' helps.
PS. if you have a press it is obviously better to use it. I did not so, I had to improvise! It took a lot of effort!
 
Top