Help is needed i have just spent 2 hours lying under the CX Turbo trying to figure out how to remove the plastic cover from around the valve body that operates the leveling control (inner chassis front drivers side foot well forward ) in this car I have to loosen and pull away this valve to enable welding almost ready to attack with hammer and cold chisel did these f..g frenchys put this cover on before they built the car or something so simple but so annoying I can'nt see how I can get to the bolt (I hope ) with out removing this cover to much s..t in the road to move it grrrrrrr please shane or smiffy help before I get violent no pictures cause I'm so pissed of :nownow: I'm now mellowing out with a few :adrink: :adrink:

You are using an out of date browser. It may not display this or other websites correctly.
You should upgrade or use an alternative browser.
You should upgrade or use an alternative browser.
The operation ""help""
- Thread starter ARCHRIVAL
- Start date
ARCHRIVAL said:Help is needed i have just spent 2 hours lying under the CX Turbo trying to figure out how to remove the plastic cover from around the valve body that operates the leveling control (inner chassis front drivers side foot well forward ) in this car I have to loosen and pull away this valve to enable welding almost ready to attack with hammer and cold chisel did these f..g frenchys put this cover on before they built the car or something so simple but so annoying I can'nt see how I can get to the bolt (I hope ) with out removing this cover to much s..t in the road to move it grrrrrrr please shane or smiffy help before I get violent no pictures cause I'm so pissed of :nownow: I'm now mellowing out with a few :adrink: :adrink:
I pulled one of them off years ago .... Only can't remember how I did it ... Smiffy ?? (Alan or John) ??
I've a feeling it just clipped together ...
seeya,
Shane L
PS: Doncha just love laying under cars, you arms get more leaden with every passing seconds, you get more frustrated, some cr@p falls in your eyes.... You jump up to rub your eyes and crack your head (or burn yoursel f on the exhaust :roflmao: :roflmao: :roflmao: ).
Fun 'n' games for sure :roflmao:
PPS: If you get really stuck I'll run my car up on the ramps tomorow night and see if I can refresh my memory.
Isn't that bit the first bit they attach to the heater core?:roflmao::roflmao::roflmao:
There's always a way, and sometimes they are just more obvious than you think they could be. Sure it's not connected like one of those push in doovys that hold plastic trim and wheel arch inners on? You know, they're a sort of ridged plug thingy. You prise them out with a couple of flat blade screw drivers and then spend 20 minutes trying to find where the mongrel things went to!
There's always a way, and sometimes they are just more obvious than you think they could be. Sure it's not connected like one of those push in doovys that hold plastic trim and wheel arch inners on? You know, they're a sort of ridged plug thingy. You prise them out with a couple of flat blade screw drivers and then spend 20 minutes trying to find where the mongrel things went to!
we are in the same zone I managed to get the plastic panel apart 2 pieces just pull of but there is one large cup shape piece that goes behind and over the valve and every which way you move it you come up against pipes or sway bars and can'nt even see see the thing from above, these cars are complicated big mothers and proof coat everywhere  but the best girls are the most difficult
  this panel has lumps on it indicating that the bolt I am after if just behind the plastic
but the best girls are the most difficult this panel has lumps on it indicating that the bolt I am after if just behind the plastic
Last edited:
Afraid I can't help on this one, as when I renewed the LHM pipes on my turbo earlier this year, I saw how difficult the height corrector was to get at, and to be honest, I cheated! used a double ended femail connector instead to splice the pipes.
All I can say, is walk away from it just before you get the shits with it, and have a beer, cigarette, or whatever, then come back calm and see if you can work it out. This always works for me! Sorry I can't be more helpfull this time! john s
All I can say, is walk away from it just before you get the shits with it, and have a beer, cigarette, or whatever, then come back calm and see if you can work it out. This always works for me! Sorry I can't be more helpfull this time! john s
Boots And All
Well as it seems no one else has attacked this little problem yet I think the plastic must be cut of as where I have to weld is right up to and behind this height corrector valve and at the moment it sandwiches in the fuel and return lhm lines and i need to keep the heat away from them .Wish me luck
Well as it seems no one else has attacked this little problem yet I think the plastic must be cut of as where I have to weld is right up to and behind this height corrector valve and at the moment it sandwiches in the fuel and return lhm lines and i need to keep the heat away from them .Wish me luck
Got any thick asbestos sheeting you can shove in there... Maybe a tile out of a heaterbox... The heat is very sparodic, so if you allow everything to cool after each weld, possibly you could get away with not removing this stuff if you can isolate it well enough.
seeya,
Shane L.
seeya,
Shane L.
I"m going to have ago
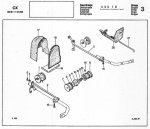
Shane I have to get the plastic cover out of the way because the rusted section runs right up next to and behind where the fuel line is trapped by this bl..dy thing I first might see if I can soften then plastic with a heat gun to distort it into a shape that I can pull out between the sway bar and the corrector i don't think the heat will affect the corrector although those rubber cups on the ends look a bit delicate .Its that number 17 bit just can'nt figure out how they got it in and how you get it out :disappr: :disappr:
Shane I have to get the plastic cover out of the way because the rusted section runs right up next to and behind where the fuel line is trapped by this bl..dy thing I first might see if I can soften then plastic with a heat gun to distort it into a shape that I can pull out between the sway bar and the corrector i don't think the heat will affect the corrector although those rubber cups on the ends look a bit delicate .Its that number 17 bit just can'nt figure out how they got it in and how you get it out :disappr: :disappr:
Attachments
If I manage to get out to the shed tonight I'll have a look... Most things are impossible on these cars .... Until the minute you work out how it comes apart ... Then it's simple. From memory these plastic bits were flexible, I guess you have already tried bending out of place.
By your description is sounds like you'll have to remove the height corrector to get it out :disappr: All the stressing and swearing and thinking about it is usually a lot harder than just pulling the bloody thing off. You learn that very quickly when working on DS's. It's MUCH easier to just remove what in the way as opposed to spending hours screaming abuse at whats's in the way and trying to work around it. Then finally hours later removing the parts in the way anyway.
seeya,
Shane L.
THATS THE CATCH 22 SHANE the plastic thingy is concealing the bolt that secures the corrector I can just see the back of the plastic by looking thru from wheel side it has a couple of suspious lumps on it .Well enough procrastinating fire extinguisher handy :wink2: if I'd wanted a black car I would have brought one not burnt one 
Progress Report
PROGRESS REPORT All rusty metal removed and that which remains has been soaked in ranex(phosphoric acid tastes like coke use to) replacement bits cut out and bashed into shape good 1.6mm galv sheet I Knew all those real estate signs I nicked would come in handy :nownow: will paint the exposed inner panels with por 15 tonite then setup the protection ie glass plastic and upolstry and welding do'nt mix .Then before I do any more probing with the screw driver I have to get these WA PLATES ON HER
PROGRESS REPORT All rusty metal removed and that which remains has been soaked in ranex(phosphoric acid tastes like coke use to) replacement bits cut out and bashed into shape good 1.6mm galv sheet I Knew all those real estate signs I nicked would come in handy :nownow: will paint the exposed inner panels with por 15 tonite then setup the protection ie glass plastic and upolstry and welding do'nt mix .Then before I do any more probing with the screw driver I have to get these WA PLATES ON HER
ARCHRIVAL said:PROGRESS REPORT All rusty metal removed and that which remains has been soaked in ranex(phosphoric acid tastes like coke use to) replacement bits cut out and bashed into shape good 1.6mm galv sheet I Knew all those real estate signs I nicked would come in handy :nownow: will paint the exposed inner panels with por 15 tonite
Quick question mate; where do you get your POR15 from???
I cant find it in Melbourne - anyone know?
PS: dont drink too much more Ranex
