Rear window demister on 505

Hugo

Member
Fellow Frogger
Joined
Aug 4, 2013
Messages
133
Location
Melbourne
Hi all

I have a 1992 505 GTi wagon and the rear window demister/defogger does not work.

I'm guessing this is normal for the car's age, but was wondering what other people have experienced.

It hasn't worked since I got the car about 7 years ago, but today I decided to have a closer look using a multimeter and I discovered that every trace was broken in at least one place if not multiple places. The breaks were so small I couldn't actually see then. It is consistent with the traces shrinking and creating tiny cracks that break the circuit, maybe due to shrinkage, but that is speculation.

So what do people do to get it working again?

Repair each tiny break - but it seems more tiny breaks would likely occur over time.

Replace the entire grid? I found a company in the USA here: https://frostfighter.com/how-to-replace-defroster-gridlines.htm
Can the old grid lines be removed?

Thanks in advance for your thoughts,
Hugo
 
The grid lines cannot be removed. A window tinting place tried to scrape off mine once before tinting but no go. The surface got scraped but traces remained embedded in glass. I didn't need the demister as I live in Brisbane.
 
Many years ago you could buy "demister repair kits" which were some conductive paint and some masking to create a fine line of the paint. You would position the mask over the broken part of the element, brush the magic paint into the slit, let it set for a minute or two and remove the mask. Leave it to dry for a day before using.
I don't know if it worked well or not, I haven't seen them for years.
I just did a google search - here it is on Amazon Australia... try it and let us know if it works...

There are user reviews in the Amazon listing, they seem mostly positive. Average rating is 4.1 out of 5.
 
As each line breaks the current increases through the remaining ones :(
Until none work as you have found.
I have used the Permatex stuff
Use a multimeter along each line till you find the breaks.
 
Thanks for your thoughts everyone

@Beano - Good to know that the existing lines effectively can't be removed.

@simca1100 - Thanks for those details. Repco also sell the Permatex product.

@driven - That would explain why every line was broken.

It looks like using the Permatex stuff painstakingly on each identified break is the way forward. I've got my work cut out for me. :)

I'll report back with my results.

Cheers
Hugo
 
As each line breaks the current increases through the remaining ones :(
I think that's wrong. The rear demister is a number of parallel grounded resistors fed a straight 12V via a relay. Each parallel track can draw as much current as it wants. When a track breaks, the total current drops accordingly. The reason they tend to fail together is probably just that they're all suffering the same conditions baking in the back window.

Only a nitpick. Will be interested to hear how Hugo goes with the repair. Might motivate me to get mine working again.

Have fun,

Rob.
 
never did any good on an r20 eons ago.... could be a lot of luck involved in finding all the gaps... :)

Bob
 
there doesn't seem to be any mention if there is 12 volts going to it, maybe that would be a good place to start ,
 
Why not just get a fine no. 0 brush and paint every track? I've heard 6b pencils also work... But maybe don't start the day with an espresso...
 
Are these tracks made of a copper transfer that's glued to the interior windscreen, or is it a spray on stencil? If it's a spray, on then time and heat may well have made the whole grid dodgy.
 
Hi all

@Rob - I think you are right and that each parallel track can draw as much current as it wants. My leading theory is also that the breaks in each line is some form of deterioration from baking in the back window over the years.

I am testing the lines with a multimeter. It is a bit painstaking, but a reliable method. I tested two of the fourteen lines all the way across today and they had on average two breaks each line. So there are probably about 35 breaks in total.

@bob - with the multimeter I can find the breaks. I am however mindful that if I fix the 35 or so breaks, I'm not sure how reliable it will be in the coming years. I'm still thinking about that.

@pugwash - I tested it both for resistance between the two tabs (it is currently an open circuit). I also checked it for supply of 12v and that function is also broken. So also I'm checking the circuit with the switch, fuses and relay. I think the whole thing has been ignored for many years. But for the moment I'm focusing on the faulty grid.

@lowpugV2 - painting over every tract would be a good thorough solution. I might consider that if I could find the right conductive paint at a reasonable price (the Permatex repair kit has a tiny bottle and the kit costs $30 or so).

@Peter C - Looking at it, I'm pretty sure it was made using a spray on stencil.

Are everyone's 505 wagon rear window grids all similarly broken?

More as it comes to hand.

Cheers
Hugo
 
Conductive paint

That link is probably what you need. Patience not included! I reckon some careful masking with tape over the long sections would help to just apple the paint in a thin line.
 
I haven’t made or used DIY conductive paint but I have come across the following recipes:

(Obligatory OHS warning: graphite powder is an inhalation hazard. Mask up and commence mixing gently to wet the powder.)

1 part Elmer’s glue : at least 1 part graphite powder (may be thinned with water)

Or

Acrylic poster paint < graphite powder (+optional distilled water as thinner during brush application)
Two references vaguely say saturate the solution with as much graphite powder as possible while still paintable and not lumpy; one reference suggests a satay skewer in the adjustable chuck of a Dremel as the best mixing tool.

Or

Shellac or epoxy base with 60-80% powdered silver, copper or graphite
This is Oppi Untract’s recipe for a water impervious surface preparation for electroforming substrates and he notes a lower percentage of metal pigment is used if applied as a spray.

Surface must be dirt-, dust- and grease-free.
 
Hi all

Thanks for your advice everyone.

Thanks @shibuichi for the conductive paint suggestions. I'll start by using the Permatex paint since it has the advantage of being tested for this application.

Update on the repairs

The story so far: the rear window demister does not work because of two faults. Firstly, power is not getting to it and secondly, there are in the order of 30 or so breaks in the grid lines themselves.

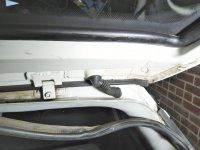
I have found and fixed the first problem of power not getting to the grid. Unsurprisingly, it turns out that the supply wire (wire 107) and some other wires were broken inside the rubber boot that brings 109 wires from the body of the car to the rear door:
10 IMG_20230212_153652 the location.jpg
20 IMG_20230209_161745 the break.jpg


25 IMG_20230209_161745 the break - closeup.png


Decades of opening and closing the door eventually resulted in these breaks. I removed the broken sections and soldered in some 55 mm long patch wires:


30 IMG_20230212_200444 the repair.jpg
40 IMG_20230212_202318 the end.jpg


The resulting patches made that section of the loom quite thick, but the repair worked ok. A better, more involved repair would be to remove and repair more, if not all, of the loom so that there are no solder joints near where the wires flex in the boot.

So now on to the second fault - repairing the breaks in the grid itself.

More on that later.

Cheers,
Hugo
 

Attachments

  • 40 IMG_20230212_202318 the end.jpg
    40 IMG_20230212_202318 the end.jpg
    381.5 KB · Views: 60
"...inside the rubber boot that brings 109 wires..."
should read
"...inside the rubber boot that brings 10 wires..."
:)
 
"109 wires..."
You're lucky it's not a modern car or it would've been 109 :ROFLMAO:

Our theory back in the old days was that breaks were caused by things scratching the wires, I'd never considered heat stress might break them.

Do new cars still use the same system? I haven't looked much to know.
 
Hi Nigel

There is no evidence of scratches where most breaks are. Heat stress over decades seems the most likely cause. Not sure how if differs with modern cars.

I have put this project off for months, but I'll update here when I get it done.

Cheers
Hugo
 
Top