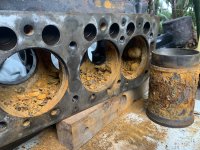
Piston sleeve removal

It's pretty much what Greenpeace said above with two bolts at opposite ends of a diameter. I would also believe this is right. You can apply a huge amount of force to pull straight up or you can rock it side to side with Greenpeace's method incrementally until the rust or whatever bonds break and then it doesn't take much force to pull it out.

I would also suggest some freeze and release might be of help. I managed to get some really stubborn headbolts broken in the block to move that way.

Why pull out the sleeves anyway? I mean if they are to be replaced one doesn't need to take any care in extracting them, which opens a lot of other options. If they are to be reused, why take them out in the first place?
To hone them for a start, they may move when the honer is operated. Also to replace the liner seals.
 
... and to clean out rusty scale that can reduce the heat transfer. Also to remove any lumps of Stop Leak can go to the bottom of the block and set like a rock if you don't dilute it first.
 
Yeah, I appreciate all that but if I had to go the trouble of removing liners, I would throw them away. I did think in the past that liner/piston kits were expensive but experience showed me otherwise considering all the trouble and cost of machining, matching pistons and rings, etc. Just get a new kit form the manufacturer or some reputable aftermarket house and you can get on with it.
 
I can see the merit in the technique, but where do you fit levers given the fit per picture in post #4 above?
My bad....apologies to all. I just assumed they were like the sleeves on XN1 engines.
 
I made this years ago out of hardwood to pull some 504 sleeves out. Can't remember why the bottom piece is that funny shape - I think it was just a random piece that I used to support the middle piece that is shaped to fit in the base of the sleeve. It worked!


sleeve puller.jpg
 
The liners can crack if hit directly with a metal hammer.
O
Yeah, I appreciate all that but if I had to go the trouble of removing liners, I would throw them away. I did think in the past that liner/piston kits were expensive but experience showed me otherwise considering all the trouble and cost of machining, matching pistons and rings, etc. Just get a new kit form the manufacturer or some reputable aftermarket house and you can get on with it.
I've done pistons and liners twice and I've always thought that they cheap for what got. Factory designed liners when most cars you at least have to hone or even rebore.
 
I have, somewhere, a machined steel puller with an M 16 threaded rod - gets liners out of quite badly scaled blocks without damage. I vaguely remember lending it to Dano, or talking about lending it...
 
I laid my hands on a rather agricultural Chinese sleeve puller and the picture is the result. Rather a shock to me as this is the first time I’ve seen inside, beautiful colours! I’ve spent a few hours cleaning out the flakey bits. I was thinking of the rejuvenated radiator needing more than a sock, humm add a centrifuge to the cooling system.


I also thought I’d check the 35 year old Repco piston sleeve kit had the ring gap spaces traditionally arranged, and if this was really important anyway, they weren’t, so that was a job that needed doing. I get a bit stressed playing with rings. The liners fit beautifully without seals. I’m using new seals in preference to the Repco ones even though they still feel supple. Also picked up the rebuilt clutch, looks better than new.
 

Attachments

  • IMG_0942.jpeg
    IMG_0942.jpeg
    467.3 KB · Views: 57
^ That brings up an interesting point. Does anyone here know if the old style piston rings have to be used still, on an older engine like his ?

I've never understood how modern engines can get away with having rings which have not much outwards tension. Apparently you hardly even need a ring compressor any more.
What exactly is it about the design of the more modern engines that allows this ?
 
I can give a definitive answer to how to get them out EVERY time.

The problem is not a lack of outward force made by some extraction tool.

The trick is to get two levers and put them on opposite sides of the sleeve, pivoting on the block and giving slight upwards pressure, but largely back and forth pressure, patiently many times, until a tiny bit of back and forth movement happens. Then just work patiently until that gap widens and it will come up. Doesn't take particularly long at all. Always works on XN1 engines, anyway..
Deno that will work if the sleeves are just normally tight but a hardwood block machined to fit might be used to knock them out too. But if they are totally rusted in or worse glued in by some idiot previously you need a good solution that will not cause more collateral damage to the block face or the actual block cracking.
In diesels the dry sleeves are pressed in and need to be pulled out using a thick machined bottom plate that fits the sleeve and a central bolt and a bridge on the block face. Done regularly, and the sleeves can be pulled in to fit also preferably chilled. Or if the block is out then pressed out and in using a press and the machined plate.
Modern car engines use low ring tension to reduce friction. Actually they are not always getting away with it and it has caused problems on many engines. The manufacturers just ignore problems but like the low fuel consumption figures ! High oil consumption is just a glitch and will go away when the engine is run in properly :rolleyes: !!
Jaahn
 
Last edited:
^ That brings up an interesting point. Does anyone here know if the old style piston rings have to be used still, on an older engine like his ?

I've never understood how modern engines can get away with having rings which have not much outwards tension. Apparently you hardly even need a ring compressor any more.
What exactly is it about the design of the more modern engines that allows this ?
They use low tension rings because the rings are pressed out against the cylinder walls by the combustion pressure.
Modern direct injection engines generally have higher compression ratios, and therefore higher cylinder pressures than port injected and carburettored engines (to compensate for the lower ring tension).
 
I've never understood how modern engines can get away with having rings which have not much outwards tension. Apparently you hardly even need a ring compressor any more.
What exactly is it about the design of the more modern engines that allows this ?
The rings need just a little bit of tension outwards because on the fire stroke, the pressure, be it 1000 psi or whatever is equal all around the combustion chamber. That pressure goes in at the side skirts of the piston above where the rings are located, which is smaller in diameter than the bottom skirt of the piston and the gases/pressure also goes in behind the rings and forces the rings hard against the sleeve to create a proper seal. In the sketch, you can see that the same pressure is located behind the ring. That is why the static ring tension is not all that important and I don't think it is for less friction. The thinner type rings might be for less friction but definitely not the tension.

That is why when running an engine in, you have to put load on it, the more the better, or else the bores can glaze. The rings will also seat much quicker due to the extra forces against the bore.

The picture might explain better than me because I can't explain not using my hands ;)

Untitled.jpg
 
thank you - brilliant, saved - but now i just need to know what BMEP stands for?
( that section would seem to have a smaller diameter below, btw )
does crankcase pressure factor, under a rapidly descending column of gas? or BMEP?
 
Last edited:
thank you - brilliant, saved - but now i just need to know what BMEP stands for?
( that section would seem to have a smaller diameter below, btw )
does crankcase pressure factor, under a rapidly descending column of gas? or BMEP?
Brake Mean Effective Pressure.
The mean average pressure imposed on the piston for the length of the power stroke.
 
Frans, Just to clarify what you mean by load. My experience suggests little load/throttle opening with lots of rpm variation from minimum to maximum. My experience is with air cooled motorbikes. I do know of one car from new (my dad’s BMW 2002) that was always used in 2 gears to low i.e. throttle load and few revs, when that was inspected because of low compression the bores had a mirror finish.
Keith
 
I used to build a lot of performance engines when I was younger. I always used Hastings ring sets with a moly top ring.
On the back of the Hastings packet it had break-in instructions that read "accelerate hard in high gear from 40 to 70 mph at least 10 times".
Keeping in mind most of the vehicles back then had a 1 to 1 top gear ratio, this equated to going from around 2000 rpm to 3500 rpm at full throttle 10 times.
I always followed this routine (using a running in oil) and never had a problem with poor ring sealing.
Other people may have different routines, but they will all involve NOT cruising at light throttle at a continuous speed early in the engine's life.
I do the same but always wondered how do you run in the camshaft?
 
Make sure the engine starts first key after a rebuild and keep it anywhere between 2000 to 3000-something RPM for about 20 minutes varying up and down the RPM (within these limits). Frans has explained in some detail in the past and many youtubers support the method. I used this method on all my rebuilt engines and so far so good.

More detail here:

 
Make sure the engine starts first key after a rebuild and keep it anywhere between 2000 to 3000-something RPM for about 20 minutes varying up and down the RPM (within these limits). Frans has explained in some detail in the past and many youtubers support the method. I used this method on all my rebuilt engines and so far so good.
Yes, but then you can't bed the rings in.
 
I do the same but always wondered how do you run in the camshaft?
I do the 20 minute cam break in then go straight for a drive.
In theory if the engine was torque plate bored and honed, with the correct grit and crosshatch, the rings should have bedded in straiģht away anyway. The 10 runs under load was just a bit of an "insurance policy".
Of course a sleeved engine skips the torque plate/s step.
 
Top