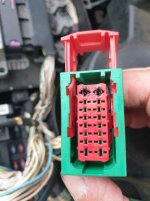
Anyone replaced one of these Molex (has AMP part number) connectors
A bit too much current drawn from blower fan/ AC unit me thinks.
No AC working at the moment but fan stopped as well so removed blower fan cleaned brushes which still have some life in them. Lubed the shift but still no go untill i found this damage.
Temp fix with some additional pressure on the female pins.
Have sourced a brand new Molex connector and spare pins but if i knew how to remove the pins I could reuse the pre terminated pins and just repair the 2x blue wires.
And yes the blower fan resistor unit is a genuine Valeo unit and new connector leads have been working well for the past 12 months.
Anyone know what type of extraction tool required?