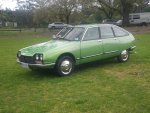
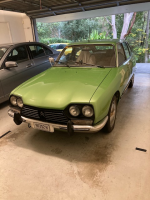
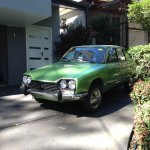
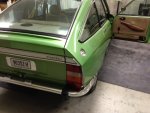
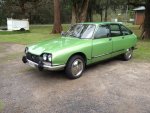
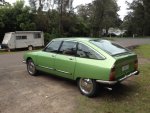
I am constantly inspired by amazing technical and restoration project stories on Aussiefrogs. Largely inspired by the restoration story Lamoor was putting up, I purchased a 1978 Citroen GS Pallas sight unseen from Perth almost 3 years ago and I must say that the commentary on Aussiefrogs about all sorts of issues kept me working on "Gaston" to see the project through, particularly Pottsy’s posts which give me courage to investigate the really technical stuff. So, I thought it was only fair that I put my project up in the hope that those who contributed will take pleasure in the final outcome, and that maybe, someone who stumbles on a GS needing work, will bite the bullet and bring that car back to life. He now looks like this.
 IMG_1956.JPG (181.5 KB)
I fell in love with a GS in the mid-1970s. I was keen to buy the station wagon model as a family car to replace my well worn Renault 10 , with the benefit of extra room to accommodate my growing young family. Unfortunately, my then wife did not agree with the purchase of a Citroen because of the risk of being caught out with a breakdown of the “funny” (her words) French suspension that nobody understood. We thus bought the first of our subsequent series of Renault 12s which we thoroughly enjoyed and found to be fantastic cars. Nevertheless, I retained a hankering to own a GS.
Fast forward through many years to my now retirement, and the opportunity finally arrived to acquire a Citroen. My lust these days would be for a good DS 23 or a well specced D special, but my now partner just cannot get her head around the “funny” (her words) shape of those cars and so that is not to be. A GS would be acceptable. So, when a pleasant looking ‘78 GS Pallas appeared in Just Cars, the opportunity arrived. The car was in Perth, so I bought it sight unseen. The Seller’s representations made the car sound very appealing (you know the story, previously owned by the Citroen Car Club president, well maintained, lots of new work recently completed). The reality is that when a relatively rare car that you are seeking turns up on the market, you buy it and sort out the problems when they arrive. The deal was concluded by e-mail and bank transfer, but I was fortunate to have been able to get to Perth at the time the car was being delivered to the transport company to freight it to Sydney. It turned out to be in complete and reasonably sound condition, reasonable paint finish but otherwise quite tatty and unloved.
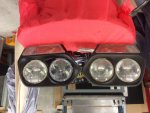
Despite there being a large sign which I had written and taped to the steering wheel requiring anybody moving the car to make sure that the hydraulic pressure was built up before the car was moved, the transport company rolled Gaston from the top deck of their car transporter without having started him. That resulted in the vehicle finally stopping when it ran into the back of another parked car transporter. The fact that the ground clearance had not been lifted caused a couple of bits underneath to be bumped as well. There was resulting damage to the rear right corner bumper, boot, taillight and fender, and for some reason a broken high beam headlight. Fortunately, the transport company recognised that they might have made a bit of a mistake, and did not quibble about the quote that I got to repair the damage, and paid me out in full.
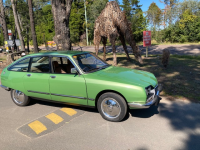
Still driveable, I took Gaston from the freight yards at Minto in the south-west of Sydney through the freeway system and the “Old Road” to the Central Coast where I live. Missing a boot lid rubber and excessively rich exhaust made the ingress of exhaust fumes a challenge. But that feeling of driving the GS swinging through the bends on the old Pacific Highway from Berowra to the Central Coast confirmed that I'd made the right decision in my choice of car. Old tyres of various pressures, running “over rich” with the resulting limited power band, and that constant exhaust present in the cabin notwithstanding, I fell in love with this car.
The original aim was to get the car registered as soon as possible, and then progressively upgrade bits and pieces, both cosmetically and mechanically to keep it running in good condition for club rallies and events. On getting Gaston home and doing some serious inspection, I recognised that it would be impossible to register the car in New South Wales. It had still been registered in Western Australia but I don't know how that testing mechanic slept at night. With copious oil leaks from the suspension and the engine, along with the over rich running and lack of protection from exhaust fumes in the car, and rust at the base of both B pillars, not even the most sympathetic inspector in New South Wales would pass it. To repair the various bits and pieces that were needed, the car needed to be pulled apart, so I put it up on jack stands and got to work .
Mechanically, the car was sold to me with new rotors and pads, all new spheres and a new clutch, with everything working. That was basically correct, however, the timing belts were over three years old, the carburettor could not be tuned to get rid of the rich running, the oil leaks were not acceptable, and the exhaust system leaked at almost every joint. There wasn't a lot of visible rust, but it was there anyway.
Fortunately, other than the leaks, the hydraulics did everything they should, and a compression test showed a mid range reading of 115 psi, but uniform across all 4 cylinders. Synchro on second gear is weak ( helped now by better choice of oil ), but otherwise no nasty noises and smooth gearshifts, and brakes and steering are good. An engine and gearbox rebuild in the medium term (phase 2 of my ownership) will sort those issues.
After re-kitting the carburettor myself, with no resolution of its problems, I took it to be fully rebuilt by Carburettor Service Co, in Parramatta Road, Burwood, a company who had worked on these sorts of carburettors when the cars were current. It needed a new idle jet cut-out solenoid, accelerator pump jet, needle and seat and machining to the base and the top deck. The best part of the work that they did was to replace the step nose mixture screw in the Weber carburettor by modifying the seat and installing a tapered screw out of a Solex carburettor. Now fully tunable and working perfectly.
I replaced points, condenser, plugs and plug leads to get the ignition circuit working correctly. I put new sphere seals and gaiters on all four corners, and replaced the timing belts, the front crankshaft seal and the engine mountings. At that time I also reset the valve clearances and renewed the rocker cover seals. I also replaced the missing hot air tube from the manifold to the aircleaner to bring it back to original specification Most people tell me that that is unnecessary in Australia, but I figure Andre Citroen knew a bit about these things and that was why they were installed in the first place. That got the suspension sorted and the engine working properly. I then got down to try and sort out the exhaust system leaks. Well, what an interesting job that is.
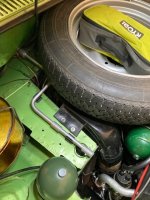
IMG_0133.JPG (128.2 KB)
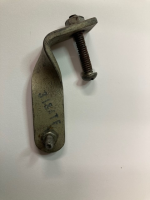
I started by pressurising the exhaust system via the tailpipe using my very first spraypaint outfit, the CIG Little Beaver that I bought in the early 1980s. Then I got a small spray bottle with soapy water and applied that to each of the joints, starting at the back. I found small cracks at the inlet and outlet pipes on the muffler, which were easily welded up. The main issue was the 3 mm gap at the outlet end of each exhaust manifold (which my predecessor had tried to bridge with silicone, to no avail) and the major problem being splits in the left-hand side exhaust manifold. I have to say that the exhaust system is a masterpiece of design. It really is a 4 into 2 into 1 extractor system, but with the separator between the cylinders from each head being welded internally in the manifold, rather than being separate pipes. This makes it a very complicated unit to work on, and unfortunately a predecessor who had tried to fix this manifold before had used brazing, so it was now impossible to repair because you can't weld to bronze. What to do? Aussiefrogs to the rescue. I posted a request in "parts wanted" to see if anyone happened to have a left side manifold in good condition lying around, and for a while got no response. Then just days before Christmas last year David Rogers contacted me to say that he had one that he could let me have. Talk about Santa Claus. David posted it to me, and it turned out to be in great condition and is now comfortably mounted into the car. Thanks again, David. I separated the whole exhaust system from front to back, including the heating tubes up to the carburettor base and back down, and then started progressively from the manifolds backwards to mount each component. The previous gap at the end of the manifolds existed because the Y piece bracket had been modified and incorrectly mounted, limiting forward movement of that section. I put each section in place with the clamps loosely mounted, placing timber above the exhaust piece and a jack stand or jack (it needs a few) beneath each section to hold it into the correct alignment, and then progressively tightened all of the joints a bit at a time. I needed to bend a ring spanner to reach some of the nuts at the less exposed unions, but Voila ! - A properly sealed exhaust.
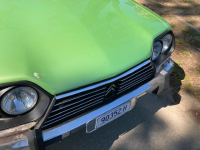
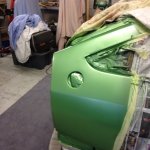
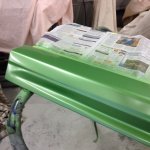
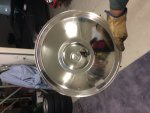
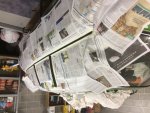
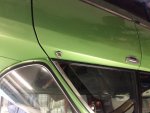
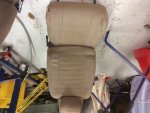
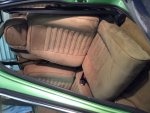
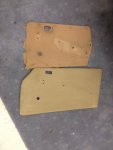
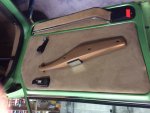
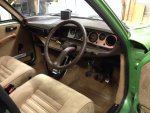
Overall the bodywork was quite good. A previous owner had resprayed the bonnet, bootlid and sides, (but for some reason not the roof) a few years ago and the paint was in reasonable condition. There was no sealing rubber to the boot aperture, but all four door seals were still sound, with hinges and catches on the doors operating properly. On two doors the windows had separated from the winding mechanism. All four corners of the bumpers had been bumped and scraped out of shape, as had all four full disk hubcaps. These had been pressed against the curb and folded around the ridge in the centre of the wheels. The beam across the front of the under tray was badly rusted and there was some rust at the base of both B pillars. Obviously, there was the damage from the transport incident also to be repaired. The electrics were in good condition, only requiring two new high beam units (you can't replace just one. Can you?) and a new tail lamp cover, plus a new indicator flasher can to get the Flash rate up to the correct specification for New South Wales registration. All of the switchgear, warning lights and the buzzer in the cockpit worked fine. I took out all four window winding mechanisms and gave them a good clean and lube, and then reglued all four glass panels to their respective slides. I used lots of thinners to make sure the glue would bind, and used super strength Araldite for the job. So far so good. So, to the rust. A large hole in the main frame of the under tray had been filled with silicon and covered with an aluminium plate pop riveted to the structure to hide the rust. Questionable structural integrity, I would think. To effect these repairs I like to cut out the rusted material and butt weld patches back into place. I use magnets to hold the new piece into place while tacking, and then Mig weld the full perimeter of the patch. I did the same at the base of the B pillars. The thing to watch here is to make sure that you make one large patch, rather than a number of small patches because welding in small areas distorts the parent panel. I make that mistake on the driver’s side sill and needed to use a bit more body filler than I would usually like to rectify that error. Once I had done the repairs I treated all box sections and the doors to a copious serve of fish oil. The repair to the body panels was quite complicated, because the profile of the boot lid is very complex and backed by a reinforcing panel to carry the hinges, and as I didn't want to unpick all of the spot welds around the whole boot lid, it was better solved by forming a new section of steel to be butt welded into place. The fender had been compressed forward so that it bulged outwards, but I was able to pull that out with a large slide hammer to get it back into the correct profile around the fuel filler cap, The combination of the aggressive use of a slide hammer and the damage done in the original crash meant that the top corner of that panel was so scrunched up it had to be replaced. I made up the section and then cut out the un- repairable section so that I had a well matched panel to weld. That came out okay. Unfortunately, try as we might we couldn’t match the body colour, I took a fender up to Peninsula Paint in West Gosford, a very helpful business. The colour has a goldy tone and we couldn’t quite get there. When you are only buying two litres of colour, there is a limit as to how much time the business can put into colour matching, which is a dark art at the best of times. Maybe the sunshine will help the blending over time. My longer term plan (Phase three) is to fix a bit of presently inconsequential surface rust at the leading edge of the bonnet and at the base of two doors, and then do a complete repaint inside and out. I then got on to the hubcaps and the bumper ends. Fortunately they are all stainless steel, and can be self polished, rather than needing chroming after the work was done. Each of the hubcaps required quite a bit of heat shrinking and planishing to get them back into shape. Unfortunately, in some places I had to use a steel hammer rather than a timber mallet and this meant that refinishing the surface would be that much harder. After getting them back into shape, they needed sanding with successive grits of 240, 320, 600, 1000, and 1500 followed by a long time on the stitched and loose cloth wheels to polish them to their final finish. Similarly, the bumper ends needed to be tapped out from inside, using a variety of modified coach bolts as drifts to reach in and get pressure behind the welded in mounting brackets. Again, this damaged the outer surface a bit, requiring the same refinishing as the hubcaps. The major sections of the bumpers were straight and true, so only needed polishing. The transport company had broken one of the high beam headlights in transit. I spent some time on the Interweb and found a pair of Hella units which had the right diameter and reflector depth. I wanted to keep the adjustable mounting so I cut the reflector of the broken lamp and bonded the new unit into the existing with superstrength Araldite. I have used this fix before on some Alfa Romeo headlights and found that that glue can withstand the vibration and temperature. I did both lights because the new light was so much clearer than the old and I wanted a match. I probably should have done all four for an even better result. I also refurbished the surround panel to improve its appearance. The stainless steel mouldings around the side windows are usually polished stainless steel, but for some reason mine have been largely painted out in flat black. I tried to remove some paint and found the surface beneath would be very difficult to polish up, so I resolved to repaint these. Two hours of sanding and masking up for 10 min of painting. The rubber seals for the door glass were very badly perished and shrunken all round. I found an online catalogue for a business in Melbourne called Scott's Old Auto Rubber, and in that found a profile that could be adapted into the Citroen stainless steel mouldings. I think it is from an old Rover, but it works a treat. The filler beads in the front and rear windscreen rubbers had also perished badly, and were chalky and black. I measured the critical dimensions and went to my friendly Auto One store, where they allowed me to look at all of the replacement fillers that they had in stock to see if I could find one that fitted. For the front rubber I used a filler from a Holden Gemini, and for the rear the filler from an LH Holden Torana fitted well. The profile is a little more prominent than was standard on the GS when new, but the replacements certainly do the job. The interior of the car was in the saddest condition. The dashboard and instruments were fine, as were the carpets throughout, but the steering wheel had an ill- fitting leather cover that had seen better days, and the seats and door trims were just stuffed. The rubber rings in the seats were perished and broken, the foam was crumbling and mouldy, and the upholstery, which had obviously been replaced somewhere in the life of the car, was badly shaped and in terrible condition. The seats were taken back to their bare frames, and rebuilt using Pirelli webbing for the suspension, foam for the main construction, and a beautiful suede finish for the trimming. Because the seat trims were so badly out of shape they could not be used as templates, so we had to scale up photographs of original cars to get the upholstery dimensions and stitch patterns right. A costly exercise. This were done professionally, but I got the upholsterer to buy an extra couple of metres of the cloth so that I could repair the door cards. The seats don’t have the “lounge chair” feel of the rubber loop suspended seats, but they are supportive and very comfortable.
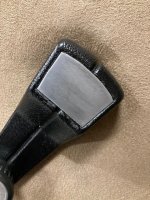
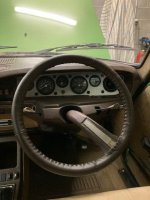
I hunted high and low in the auto parts stores for a suitable steering wheel cover but no luck. Eventually I got back onto the Interweb and found a perforated leather stitch- on cover from a company called "Wheelskins" in the US. They have a wide range of colours and patterns, and will make to non-standard specification if necessary. The price was good, but the freight from the US to Australia these days is astronomical. I found a colour that matched the original steering wheel and dashboard well, placed the order, and four days later it was at my post office box. The old steering cover had burnt itself to the rubber steering wheel, so it was a difficult job to get that off without damaging the base. I had to fill a couple of tears in the rubber with silicone to get a smooth finish, but then the new cover stitched on perfectly, following the manufacturer’s instructions. I'm really happy with the result. There are only a few little things to do now, such as brush finished decorator trims for the window winders and door handles which I have yet to make, and the sun faded switch heads on the controls. But Gaston is now registered on club plates and has knocked up his first thousand kilometres. It is such a delight to play with this car. 23 On the road at last
IMG_0660.JPG (165.1 KB)
24
IMG_0661.JPG (149.4 KB)
Fast forward through many years to my now retirement, and the opportunity finally arrived to acquire a Citroen. My lust these days would be for a good DS 23 or a well specced D special, but my now partner just cannot get her head around the “funny” (her words) shape of those cars and so that is not to be. A GS would be acceptable. So, when a pleasant looking ‘78 GS Pallas appeared in Just Cars, the opportunity arrived. The car was in Perth, so I bought it sight unseen. The Seller’s representations made the car sound very appealing (you know the story, previously owned by the Citroen Car Club president, well maintained, lots of new work recently completed). The reality is that when a relatively rare car that you are seeking turns up on the market, you buy it and sort out the problems when they arrive. The deal was concluded by e-mail and bank transfer, but I was fortunate to have been able to get to Perth at the time the car was being delivered to the transport company to freight it to Sydney. It turned out to be in complete and reasonably sound condition, reasonable paint finish but otherwise quite tatty and unloved.
Despite there being a large sign which I had written and taped to the steering wheel requiring anybody moving the car to make sure that the hydraulic pressure was built up before the car was moved, the transport company rolled Gaston from the top deck of their car transporter without having started him. That resulted in the vehicle finally stopping when it ran into the back of another parked car transporter. The fact that the ground clearance had not been lifted caused a couple of bits underneath to be bumped as well. There was resulting damage to the rear right corner bumper, boot, taillight and fender, and for some reason a broken high beam headlight. Fortunately, the transport company recognised that they might have made a bit of a mistake, and did not quibble about the quote that I got to repair the damage, and paid me out in full.
Still driveable, I took Gaston from the freight yards at Minto in the south-west of Sydney through the freeway system and the “Old Road” to the Central Coast where I live. Missing a boot lid rubber and excessively rich exhaust made the ingress of exhaust fumes a challenge. But that feeling of driving the GS swinging through the bends on the old Pacific Highway from Berowra to the Central Coast confirmed that I'd made the right decision in my choice of car. Old tyres of various pressures, running “over rich” with the resulting limited power band, and that constant exhaust present in the cabin notwithstanding, I fell in love with this car.
The original aim was to get the car registered as soon as possible, and then progressively upgrade bits and pieces, both cosmetically and mechanically to keep it running in good condition for club rallies and events. On getting Gaston home and doing some serious inspection, I recognised that it would be impossible to register the car in New South Wales. It had still been registered in Western Australia but I don't know how that testing mechanic slept at night. With copious oil leaks from the suspension and the engine, along with the over rich running and lack of protection from exhaust fumes in the car, and rust at the base of both B pillars, not even the most sympathetic inspector in New South Wales would pass it. To repair the various bits and pieces that were needed, the car needed to be pulled apart, so I put it up on jack stands and got to work .
Mechanically, the car was sold to me with new rotors and pads, all new spheres and a new clutch, with everything working. That was basically correct, however, the timing belts were over three years old, the carburettor could not be tuned to get rid of the rich running, the oil leaks were not acceptable, and the exhaust system leaked at almost every joint. There wasn't a lot of visible rust, but it was there anyway.
Fortunately, other than the leaks, the hydraulics did everything they should, and a compression test showed a mid range reading of 115 psi, but uniform across all 4 cylinders. Synchro on second gear is weak ( helped now by better choice of oil ), but otherwise no nasty noises and smooth gearshifts, and brakes and steering are good. An engine and gearbox rebuild in the medium term (phase 2 of my ownership) will sort those issues.
After re-kitting the carburettor myself, with no resolution of its problems, I took it to be fully rebuilt by Carburettor Service Co, in Parramatta Road, Burwood, a company who had worked on these sorts of carburettors when the cars were current. It needed a new idle jet cut-out solenoid, accelerator pump jet, needle and seat and machining to the base and the top deck. The best part of the work that they did was to replace the step nose mixture screw in the Weber carburettor by modifying the seat and installing a tapered screw out of a Solex carburettor. Now fully tunable and working perfectly.
I replaced points, condenser, plugs and plug leads to get the ignition circuit working correctly. I put new sphere seals and gaiters on all four corners, and replaced the timing belts, the front crankshaft seal and the engine mountings. At that time I also reset the valve clearances and renewed the rocker cover seals. I also replaced the missing hot air tube from the manifold to the aircleaner to bring it back to original specification Most people tell me that that is unnecessary in Australia, but I figure Andre Citroen knew a bit about these things and that was why they were installed in the first place. That got the suspension sorted and the engine working properly. I then got down to try and sort out the exhaust system leaks. Well, what an interesting job that is.
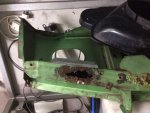
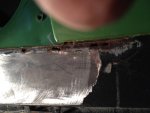
Overall the bodywork was quite good. A previous owner had resprayed the bonnet, bootlid and sides, (but for some reason not the roof) a few years ago and the paint was in reasonable condition. There was no sealing rubber to the boot aperture, but all four door seals were still sound, with hinges and catches on the doors operating properly. On two doors the windows had separated from the winding mechanism. All four corners of the bumpers had been bumped and scraped out of shape, as had all four full disk hubcaps. These had been pressed against the curb and folded around the ridge in the centre of the wheels. The beam across the front of the under tray was badly rusted and there was some rust at the base of both B pillars. Obviously, there was the damage from the transport incident also to be repaired. The electrics were in good condition, only requiring two new high beam units (you can't replace just one. Can you?) and a new tail lamp cover, plus a new indicator flasher can to get the Flash rate up to the correct specification for New South Wales registration. All of the switchgear, warning lights and the buzzer in the cockpit worked fine. I took out all four window winding mechanisms and gave them a good clean and lube, and then reglued all four glass panels to their respective slides. I used lots of thinners to make sure the glue would bind, and used super strength Araldite for the job. So far so good. So, to the rust. A large hole in the main frame of the under tray had been filled with silicon and covered with an aluminium plate pop riveted to the structure to hide the rust. Questionable structural integrity, I would think.
3 who said no rust?
IMG_0115.JPG (1,002.0 KB)
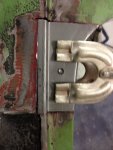
4 patch time
IMG_1172.JPG (40.7 KB)
5 More patching
IMG_0134.JPG (136.8 KB
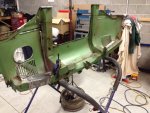
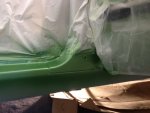
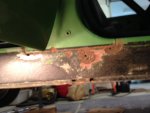
6 More rust - Left side
IMG_0142.JPG (86.9 KB)
7 More rust - right side
IMG_0147.JPG (73.0 KB)
8 Bit tidier
IMG_0187.JPG (90.3 KB)
9 Fabricated patch
IMG_0204.JPG (101.8 KB)
10 Bit tidier
IMG_0371.JPG (132.2 KB)
11 Bit tidier 2
IMG_0372.JPG (131.9 KB)
12 Happy with the panel fit
IMG_2254.JPG (105.3 KB
13 Finished hubcap
IMG_0124.JPG (1.14 MB)
.
14 Before and after
IMG_0289.JPG (1.36 MB)
15 What a masking job
IMG_0310.JPG (1.32 MB)
\
16 Seal in position
IMG_0557.JPG (1.13 MB)
17 Windscreen filler bead from Holden Gemini
IMG_0321.JPG (1.17 MB
18 Seat as the car arrived
IMG_0303.JPG (1.44 MB)
19 Seat now
IMG_0555.JPG (1.25 MB)
20 Original and refaced door card
IMG_0225.JPG (97.9 KB)
21 Finished door card
IMG_0551.JPG (1,020.0 KB
22 Wheelskin in place
IMG_2252.JPG (120.8 KB
\
24
Attachments
-
 IMG_1956.JPG181.5 KB · Views: 459
 -
 IMG_0115.JPG1,002 KB · Views: 427
 -
 IMG_0133.JPG128.2 KB · Views: 440
 -
 IMG_1172.JPG40.7 KB · Views: 411
 -
 IMG_0134.JPG136.8 KB · Views: 389
 -
 IMG_0142.JPG86.9 KB · Views: 402
 -
 IMG_0187.JPG90.3 KB · Views: 455
 -
 IMG_0204.JPG101.8 KB · Views: 396
 -
 IMG_0371.JPG132.2 KB · Views: 378
 -
 IMG_0372.JPG131.9 KB · Views: 386
 -
 IMG_2254.JPG105.3 KB · Views: 402
 -
 IMG_0124.JPG1.1 MB · Views: 417
 -
 IMG_0289.JPG1.4 MB · Views: 426
 -
 IMG_0310.JPG1.3 MB · Views: 403
 -
 IMG_0557.JPG1.1 MB · Views: 397
 -
 IMG_0321.JPG1.2 MB · Views: 411
 -
 IMG_0303.JPG1.4 MB · Views: 424
 -
 IMG_0555.JPG1.3 MB · Views: 414
 -
 IMG_0225.JPG97.9 KB · Views: 375
 -
 IMG_0551.JPG1,020 KB · Views: 449
 -
 IMG_2252.JPG120.8 KB · Views: 542
 -
 IMG_0660.JPG165.1 KB · Views: 511
 -
 IMG_0661.JPG149.4 KB · Views: 494
 -
 IMG_0147.JPG73 KB · Views: 444
") .
.