Citroen CX lower arm pre-loading

DoubleChevron

Real cars have hydraulics
Moderator
VIP Paid Subscriber
Fellow Frogger
Joined
May 8, 2000
Messages
22,449
Location
Ballarat,Vic,Aust.
Hi Guys,

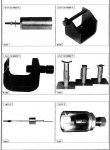
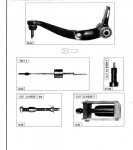
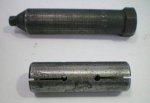
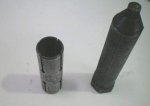
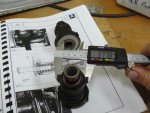
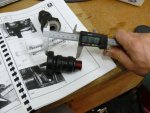
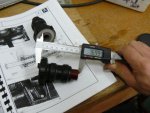
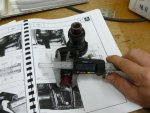
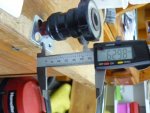
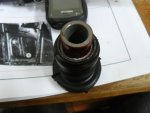
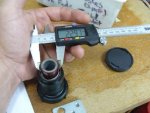
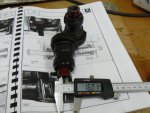
does anyone have a lower arm bush special tool that could measure up ?? I'd like to make one so I can get the lower arms into my car and pre-loaded correctly. The old girl has start wandering a little lately. I'm going to try and pre-load the lower arms perfectly.... It feels weird though (it seems to slightly move suddenly when there is a camber under one wheel). I'm wondering if it's developing a cracked steering rack mounting frame like Andys old car did ?? hmmm.....

I've never had success getting those lower arm bushes in with any sort of precision and it drives me bloody insane (I always end up having to leave out one of the washers).

Actually.... I bet I didn't tighten the adjuster between the rack on column a couple of year back when I set the center position.... :rolleyes:

How do others hold the lower arm bushes in the "compressed" state while they refit the arms ??

seeya
Shane L.
 
You need tool 6312-T. Do you have a picture of it? I have some factory CX tooling, which I'll check, but I can't find a picture. You may also want 6314-T according to the manual. Have you checked the castor and set up the shims in the lower arm?
 
Its 20 years since I've replaced the lower arm bushes on a CX. So, this is from memory.

The bush comes in two parts. The inner bush is basically a steel tube with white nylon in a waffle pattern on the outside. This then slips into the outer bush, which is a bigger metal tube that flares out at one end and is covered in rubber. It is the outer bush that creates all the drama.

Removal

After removing the lower arm from the car, secure it in a vice.

To remove the inner bushes, which join together in the centre of arm, you need to make a tool that slips into the bush. I used a long cup head bolt about the same length as the bolt holding the arm to the car. Have a couple of nuts tightened and locked together, then a washer that just fits inside the bush, then a rubber grommet, another washer and finally a nut. The idea is you slip this through the arm and tighten the nut to squeeze the rubber grommet between the two washers so that it expands and grips the inner bush. A tap on the cup head pushes the inner bush out enough so that it can be levered the rest of the way with a screwdriver. The bush on the other side can just be knocked out using a drift. Just thinking of this, maybe experiment with a dynabolt, anything to grip the bush.

The outer bush is the hard part. From memory, they are not as long as the inner bushes. I made a tool, again from a cup bolt, where I ground most of the head away to just leave a hook. I had a metal cylinder lathed so that it just slipped inside the outer bush and it had a hole through the centre to allow the cup bolt to slide through. To operate, the cup bolt was slide into the bush so that it hooked the back of the bush. The cylinder was then slipped on to centralise the bolt. A 2" waterpipe threaded T had a hole drilled right at the top of the T for the bolt to protrude through. A nut was threaded on and tightened and tightened until the bush was pulled free. The T was large enough diameter so that it slipped over the lower arm.

It is hard to explain, but once you see the problems the tools start to make sense.

Once, out of desperation and ignorance, I hacksawed the bushes out. Took forever. Don't attempt it.

Replacement

Lubricate the outer bush rubber. Have the lower suspension arm in a vice. position the outer bush into the hole. Using a rubber mallet, hit it as hard as you can. Its a good idea put in old inner bush into the outer bush so that you have a better target to hit and so you don't bugger the new bush. Repeat for the other side of the suspension arm. Then insert the new inner bushes. Insert a cup bolt, washer and nut and tighten to compress the bushes together.

Then all you have to do is put the arm back on the car, using the correct spacers on the front and the rear, align the lot and insert the bolt. This last exercise can take a hour or so. The spacers seem to be far too thick. When you finally get them in, you can't seem to align them, so the bolt won't fit, etc. A rod of similar dimension to the bolt but with a taper going to a point can help in aligning the spacer holes with the bushes.

This job improves the ride and sharpens the steering. It is amazing how the white plastic/nylon of the inner bush only needs to wear/compress a minute amount to allow a slight play in the suspension that spoils the ride and steering. I had the nylon machined off and bronze bushes made up to replace it. Gave super sharp steering but the ride suffered in that you could feel the metal on metal, rather than nylon on metal. All this movement is sub millimetre, yet it makes a noticeable difference.

John
 
Thanks Guys,

I have done the job a couple of times. The problem is the keeping the bushes compressed while I re-fit the arms. Hey John, if you could do yours as suggested, someone had already removed one of the spacing washers (probably the thickest one)... You need to compress the bushes into the arm using a vice/press. Then insert a special tool where the bolt passes through the bushes. This expands along it's length holding the bushes in the compressed position. then you fit the arm to the car will all the spaces intact. This keep the bush pre-load correct and ensures the caster is still within spec.

I've never found it possible to refit all of the shims..... unless someone has been there before and removed several of them for you :)

seeya,
Shane L.
 
Shane, you could well be right. One never knows the full history of a used car. There may have been some missing when I bought the car.

I always managed to reinsert all the shims in the correct order, but it was a frustrating and long job. I think I used every French word I knew of, many times over.

I did file the edge of one or all shims so I could belt them into place. It doesn't effect the preload as its just the outside 3mm.

At one stage, I was able to buy a bagfull of the inner bushes through a contact in France. I replaced them every six months, leaving the outside bushes alone. They were cheap (compared to Aus) and they gave brilliant ride and handling, making a crap job worthwhile.

John
 
There is a note in the factory manual saying not to use the old style bush, which has a measurement of 79.5mm. I gather there is a later and larger bush, but the manual printing would pre-date later CX's, so there may be others.

Anyone got a picture of the tool? What diameter is the arm bolt Shane? I have what seems to be the collet part of a double ended collet type affair that would need a tapered centre to lock it in place. It about 1/2 inch in diameter, but I couldn't find any tapered fittings. I would think you could easily make something up with a lathe and a bit of thought.
 
Hi David,

it even says in several places in the manual how critical it is you use 6312T .... to hold the bushes compressed so the spacers can be re-fitted.

attachment.php


The bit that looks like a big bolt I'm pretty sure is just a fancy alan key... It turns the other bit that expands along it's length locking the bushes in place once you have compressed them together in a vice/press.

I was hoping someone had one so they could describe how it works allowing us to replicate it :)

seeya,
Shane L.
 

Attachments

  • 6312T.jpg
    6312T.jpg
    37.5 KB · Views: 1,180
I think I have at least part of that, but having a picture helps.
Any idea what 6314-T look like?
 
6314T doesn't have a description of it's use. However to me it looks like it may be used to remove the old bushes. I have little hope of it being sucessful ... usually I have to burn them out (and chisel/butcher/twist/pry/hammer).

CX's have quite a few "special" tools for working on the suspension. most you can manage without (not always without damaging boots/parts on dismantling though).

seeya,
Shane L.
 

Attachments

  • tools1.jpg
    tools1.jpg
    35.6 KB · Views: 538
  • tools2.jpg
    tools2.jpg
    30.4 KB · Views: 500
  • tools3.jpg
    tools3.jpg
    23.3 KB · Views: 468
  • tools4.jpg
    tools4.jpg
    25.7 KB · Views: 431
Haynes reads that 6314-T is for removing old bushes and I can see how it should work. From the better image, I have the collet part of 6312-T and I think the glorified Allen key, but I wasn't able to find anything that looked like it would fit inside the collet. The collet is the most important part in any case and making a tapered insert to expand it would be simple enough. I'll try to measure it next week and identify some of the other special tools.

The manual stresses that it's essential to use 6312-T for the lower arms.
 
The 6314T is what I fashioned myself to remove the rubber outer bush.

The little hook catches the rear of the bush. I fashioned that out of the cup bolt head, by grinding a lot away.

The cylinder keeps it located in the centre of the bush. I had that turned on a lathe.

The big round tube at the end goes over the suspension arm. Its closed at one end and the threaded rod goes through with a nut on it. Tighten the nut to extract the bush. I used a threaded water pipe T junction, with the vertical part of the T going over the suspension arm. Drilled a hole central in the top of the T for the threaded rod (cup bolt) to go through and attach a nut. From memory, the cup bolt was about 1/2" diameter.

The expanding mandrel for holding the bushes under compression would certainly save a lot of time and frustration. Thinking back, I am fairly sure that I had all the shims in place, because I remember how hard it was to remove the suspension arm after the bolt was removed prior to the bushes being replaced.

John
 
Shane,

Last time I did the bushes in my car I managed to get the left side assembled OK. But on the right side I had to file a tapered edge on one of the washers so that I could tap it into place. Took quite a while to get it exactly central so that the bolt would pass thru. At the time I thought that it was too tight and I still get a bit of a groan from the suspension. So it is still a bit too tight even after several years. It would have been better to substitute slightly thinner washers. Thats a lesson for 'next time'.

I dont have the tool, but I can rustle up a drawing for something that is functionally equivalent to 6312T, but it will have to wait until tonight. The tool is basically one cone inside another. A slit in the outer allows it to expand easily. And a socket head cap screw up the centre allows the two cones to be drawn together. The trick will be to get it out again after the arm is fitted. Hopefully there is enough space in the chassis to allow the whole length of the tool to be drifted out from the front.

I made a simple stepped boss to press the outer bush out. Cut in half with a hacksaw so that it can be inserted one half at a time and then use a stepped rod down the centre to press the bush out. I will take some photos later.
 
Drawing attached shows and expanding pin. I have assumed the 12 mm OD but don't have any parts to confirm this. Let me know if the diameter is bigger and I will alter the drawing.

Operation is simple. Tighten the cap screw to draw the tapered inner into the sleeve. The 2 degree taper shown is about the maximum that will fit in the 12mm diameter. This taper will be self locking so you will need to loosen the screw a few turns and tap with a hammer to release the sleeve. I have shown spanner flats as a just in case option. You will need to achieve the best finish possible on the tapered surfaces - ideally they should have a ground finish. The slot on the outer is not critical - it can be cut by hand with a hacksaw.

Check that it is possible to knock the tool out of the arm once it is installed in the car. IIRC you will have to drift from the front of the vehicle towards the back - but I cant remember if there is enough space behind to remove the tool.

You will have to assemble the suspension arm complete with new bushes and squeeze the inner sleeves together until they touch each other using a big vice or similar. Insert the tool to mid position and expand it to grip the bush inners. Sounds simple in theory....
 

Attachments

  • 6312T ASSEMBLY REV A.PDF
    51 KB · Views: 366
Hi Rod,

what an amazing amount of work you have put into that. I do have a couple of new bushes in the shed, so I'll measure one up for you.

I was wondering if the factory tool would be a taper. You see the "tip" of it will lock down really well, but the opposite side (ie: the other bush) may have very little expansion ??

seeya,
Shane L.
 
Here is the collet part of the factory tool, but missing the expander set. Simply, it's a double ended collet, internal taper at each end, 15mm OD and 5cm long. Approximately 2mm thick tube wall, down to about 1mm at the ends.
 

Attachments

  • 6312T_sml.jpg
    6312T_sml.jpg
    16.8 KB · Views: 391
  • 6312Tb_sml.jpg
    6312Tb_sml.jpg
    10.4 KB · Views: 384
Last edited:
Thanks Guys,

that's brilliant. Here's the description Vince on the CX list has sent.

Hi Shane,
Here is the email i sent regarding the tool.
The parts that expands is a tube with slots cut longitudinally. If you look
at the picture you will see holes in the tube. These are where the slots
runout. The slots alternate from side to side, one from left then next from
right and so on. It is similar in priciple to an contracting collet on a
lathe but in reverse (expands). It has a taper at both ends internally for
the cones to fit into it.
There is a cone shaped piece at each end that when pushed into the tube
causes the tube to expand in diameter. They have a hole for the bolt to pass
through.
The centre is a socket head bolt which pulls both cones inwards. The tool
they mention as key has a hex drive end to fit into the socket head bolt to
tighten and loosen it.
So the assembly is a spindle with an internal thread for the bolt, a cone,
an expanding tube, another cone then the bolt.
If you can give me the internal diameter of the arm bush plus the overall
length of the arm i can draw up the tool by scaling from my cross section
detail. I need these dimensions to scale the partsand draw them.
Regards
Vince

Sounds like an interesting design.

seeya,
Shane L.
 
I found the pictures in the other manual are clearer. They clearly show Davids tools is the exact tool, but the cylinder part is missing the expanding bit as he suggests.

Here's the measurments for Vince also. I'll have to find an arm already out of a car and remove the bushes and get the bare arm measurements. The reason I had huge issues the last time I changes these bushes is they wouldn't quite seat into the arm. If I squished the bushes into the arm using a press I gain another 3mm of compressession. However trying to get them back into the car with all the spaces correct without the bushes compressed that extra 3mm+ was bloody impossible without this tool :(

The lower arm also sets the caster on a CX. so leaving out spacers will effect the caster of the front end. The caster can be checked/set with this tool here:

http://cx-basis.de/eshop/product_info.php?products_id=3209


seeya,
Shane L.
 

Attachments

  • larm2.jpg
    larm2.jpg
    61.1 KB · Views: 377
  • larm6.jpg
    larm6.jpg
    95.7 KB · Views: 565
  • larm5.jpg
    larm5.jpg
    63.3 KB · Views: 404
  • larm4.jpg
    larm4.jpg
    61.1 KB · Views: 429
  • larm3.jpg
    larm3.jpg
    66.4 KB · Views: 414
  • larm1.jpg
    larm1.jpg
    67 KB · Views: 422
Of course, there is one more measurement required!

attachment.php


Keep inner mind, the bush is actually a bearing. The "inner" part the bolt passes through, and the outer part that is coated in rubber. If you look at the picture above you can see the grease cover "plastic type" material the bushes rotates on.

Given this the measurements may change slightly when it's installed under pressure/tension.

seeya,
Shane L.
 

Attachments

  • larm7.jpg
    larm7.jpg
    89.7 KB · Views: 389
  • larm8.jpg
    larm8.jpg
    70.2 KB · Views: 985
  • larm9.jpg
    larm9.jpg
    61.9 KB · Views: 369
  • larm10.jpg
    larm10.jpg
    63.6 KB · Views: 434
Last edited:
There will be a slight change in the measurement of the first photo.

You have taken the inside measurement of the distance between the stem of the inner bush and the rubber backing of the outer bush head, whilst it is uncompressed. When compressed in a vice, the two inner bush stems touch, all the compression being the black rubber behind the outer bush head.

Without the expanding collet holding the two inner bushes together, the rubber expands taking the inner bush with it. I reckon there is about 2mm (say, 1mm at each end) difference between compressed bushes and non compressed bushes. Thats enough to cause plenty of grief in getting the shims in.

You can feel in the vice when the inner bushes touch. If you then take the arm out of the vice, you will see a slight gap in the middle of the arm where the inner bush stems have parted.

John
 
... which makes it obvious why you really do need to use the tool to do the lower arm bushes and fit the shims and why it needs to lock the two tubes together as a double ended collet. Have now found the smaller of the two expanding cones.
 
Top