Well, having written off my beloved C5, I now have another almost identical, 2010 Comfort HDi, silver and low miles 56,000. Drives beautifully. Lucky to find it in Perth. New tyres and timing belt. The only thing that is a problem is the glovebox lid which I didn't notice before I took it away from the dealer. The lefthand latch on the glovebox won't withdraw fully, and the lever which opens it is sort of loose. I can force the lid open with difficulty, and figure there must be some way of actually removing it and taking it apart, as I the latch still appears to be attached to the opening mechanism. Does any one know how I can remove the glovebox lid? It probably needs some of the trim surrounding it and the fusebox. Don't want to damage anything. Grateful for any advice.

You are using an out of date browser. It may not display this or other websites correctly.
You should upgrade or use an alternative browser.
You should upgrade or use an alternative browser.
C5 glovebox lid
- Thread starter Allen
- Start date
Thanks Ken. Looking at that, and the tools you need, I'll leave it to the professionals. A new lid is an astronomical price, but can't do without it. A second hand one I doubt is an option. It would probably be broken during removal. Anyway, the rest of the car is in terrific shape, so I'll have to roll with the punches.
Allen
Allen
The Citroen dealer in Perth quoted approx $880 for the lid plus $160 for fitting, but said they had one in stock they would like to move on and I could have it for around $660 plus fitting. However Greg (Double Chevron) has sourced a new one one in France for $384, a more than somewhat better deal, as I'm sure you'll agree. But what a shocking dealer mark-up. I'll have Perth Ciity Citroen fit it, because at 84 I'm just not as supple as I used to be and I don't want to bugger something up which might lead to even more expense. Thanks to everyone for the helpful feedback. What a great site AussieFrogs is! Allen.
Now next problem. I need to replace the storage door in the dashboard beneath the multifunction screen. The dealer I bought the car from has a new door (the plastic was peeling off the old one for some reason), but it needs to be fitted. The dealer will do it but it means that I have to drive 300kms from Margaret River to Perth (and back). Looking at it, I suspect that the whole dash panel has to come off, which may involve the airbag. I saw somewhere that the kind of "fake" carbon fibre trim strip below the whole panel has to be removed, because when you get that off (with a special tool?) there is a line of set screws which presumably you undo to remove the whole dash panel. I suppose it is too fanciful to assume that there is something on the little door that you can unlatch to remove it. I want to get these bits fixed, because the rest of the car is in almost "as new" condition and runs beautifully.
From the peugeot service parts diagram, it looks like that small storage container comes out with the facia panel so the whole dashboard does not have to come off. You too can set up a free independent service operator account on this website to get exploded parts diagrams.
Cheers, Ken
Cheers, Ken
Attachments
Just threw one of these out  *
*
4008
Gone but not forgotten C5 x7 3008 206 GTI 180 306 XR SED 405 MI16 x2 xzara VTS 406 SV 206 XT Berlingo 2011 (best car ever) 306 HDI 307 XSE HDI touring
Fix it right the first time
*4008
Gone but not forgotten C5 x7 3008 206 GTI 180 306 XR SED 405 MI16 x2 xzara VTS 406 SV 206 XT Berlingo 2011 (best car ever) 306 HDI 307 XSE HDI touring
Fix it right the first time
I had to separate my glovebox today. Still not sure why it is not latching properly when reassembled.
Last edited:
What's the best way of splitting the glovebox cover open without damaging anything? Anyone any clues?
By the way, the new car (C5 2010 X7) is a beauty. Only 67,000 kms. Gearbox works superbly, and vehicle lurches from side to side on difficult roads far less than the last car did. Brakes don't grab either (the last car had new discs and pads but the (minor) problem continued). Looked a a Holden ZB today because it has all the current safety stuff. Lovely car, made the C5 look rather old fashioned, but my wife (5'2) found that the dashboard was in line with her vision, and the seat (unlike the driver's) couldn't be raised. Might look at a Calais in another couple of years. So the C5 will be with us for a good while yet. Great touring vehicle for the trip between Margaret River and Perth.
Allen
Dcc236:I had to separate my glovebox today. Still not sure why it is not latching properly when reassembled.
How did you get it apart? Did you do it in situ??
Allen
How did you get it apart? Did you do it in situ??
Allen
Last edited:
How did you get it apart? Did you do it "in situ"?I had to separate my glovebox today. Still not sure why it is not latching properly when reassembled.
Allen
Allen, I must say, where you live is worth having to put up with the occasional trip to Perth! I love the place and get down there at least once a year. Best of luck with your C5.
I removed the glove box and then used some plastic tools to separate it to access the latch mechanism.
Sent from my SM-N950F using Tapatalk
Sent from my SM-N950F using Tapatalk
I note that no one above has actually posted the detail on how to remove and refit the Glovebox and Lid.
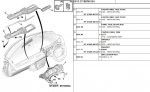
The removal, replacement of Glovebox and Lid on the RHD C5X7 is difficult to do properly. The Citroen procedure covers only the LHD version that has the opening damper on the outside of the car so it can be accessed by taking the panel off the side of the dashboard. On the RHD version, the opening damper is next to the aircon box in the centre and passes through the part of the structure of the dashboard to get to the Lid.
I bought an early C5X7 in 2009, and almost immediately, one of the latches on the lid stopped responding the the release lever and it had to be forced to get the glovebox to open. I got that replaced under warranty but the job never really felt right. Then when I changed my pollen filter for the first time, I did unscrew the screws holding the glovebox in place and move it out a bit to give me more room (not that that really helped much). At the same time, the pipe that carried the cooling down to the top of the glovebox fell out. Sometime later another big pipe with foam on one end fell out from in there somewhere. And somewhere else in there was the gearbox Park release relay had become so unreliable especially if it was cold, that we were leaving the car in Neutral and relying only on the electric handbrake to keep the car stopped when parked.
So when the Electric Handbrake failed, it was time to sort out all the previous degradation with the Park lock relay and the Glovebox and its Lid. I have taken some pictures so I will post this then get the pictures sorted and ready for the next post. At least I will be able to find this post easily to add to it.
Cheers, Ken
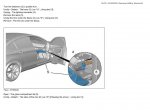
Glovebox Lid Removal.
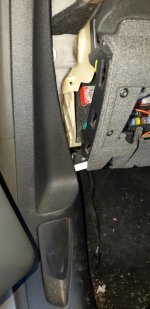
First take out the undertray as if you were going to replace the pollen filter. There are two 90 degree turn wheels to release and then manoeuvre it down from the car centre first and then back into the passenger foot space. Disconnect the floor light lead.
Use your plastic upholstery tool to lever off the dashboard side panel. Make sure the glovebox lid is closed and take our the white hinge pins next. The right hand pin can be seen from under the dash. Push on the rounded end and it should pop out a bit the other side and allow you to wriggle it the rest of the way out. The left side pin can be seen when looking at the bottom of the glovebox lid where the side panel was removed. Use some pliers to wiggle it out to the position shown and try to leave it there for later re-insertion. If the pin falls into the panel work with the bonnet release lever, unclip the panel at the top, pull the panel back a bit with the door seal and lift it at floor level and the pin should fall through onto the floor of the passenger footwell.
Once the pins are removed, operate the release lever while support the lid, open the lid and pull the opening damper on the right side to full extension. You may elect to unhook the top of the hinges that restrict how far the lid will open. The damper clasps onto either side of a hole in the framework at the bottom of the right hinge. Use some small screwdrivers to separate the clasps so the damper releases. The lid can now be removed.
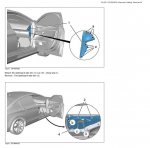
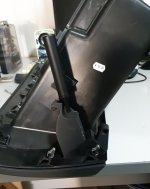
Glovebox Removal
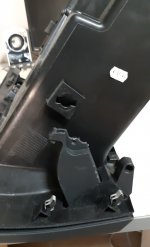
Take out the cool air entry swivel (it just unclips downward), the glovebox light (this unclips down at the rear and is then fed backwards into the glovebox so you can now unclip the wiring connector then put in a safe place), the AV module if you have one and the dummy plug for the airbag switch. Push the damper arm up into the damper and get it to sit horizontal.
Push all the wires up through their holes and undo 3 T20 screws across the top, two on the left near the fuse box, three across the bottom and two threaded large head screws in the boxy part. Both sides are also fastened with clips on plastic flats and the upholstery tool will be needed to release these and the glovebox should side out so long as the wires have room to get out of the way.
If you need to replace you pollen filter, now is the time.
Glovebox Replacement
First, tie some fine wire onto the damper arm through the slot above the clasper mechanism. When the glovebox (with the damper in the horizontal postion) is nearly back in, thread the wire through the dash panel work and out the hinge slot as shown. Get all the wires poking back though their respective holes, click the glovebox back in place and replace all the screws, lights, switches and cool air entry (after getting the cool air pipe from above sitting nicely above the hole).
Lid Replacement
Reattaching the damper to the lid is the tricky bit. I found a small square to plastic 3mm thick and filed one edge down to a wedge. Pull the damper arm down through the hinge slot with the wire and insert the 3mm thick wedge into the clasper mechanism and rotate 90 degrees. Offer the hole in the hinge to the expanded clasper while holding the wire tight and the clasper should snick straight into the hole (mine did first time!). Then insert lid into the hinge slots and close the lid engaging the locking tags. This puts the hinge holes in just the right place to engage the pins. Re-engage the hinge pins and refit the under tray with floor light lead.
The reason I had to take my Glovebox Lid off was because it would not close properly on the centre side and would droop down when opened. I found the hinge hole on that side of the lid had broken and pulled across the pin. Maybe someone slammed the glovebox lid when there was too much stuff in the lid and the hinge hole broke in response. If you look and the pics carefully, you might be able to see some untidy plastic welding I did with my soldering iron the close the ring. Al least it has held together so far.
Cheers, Ken
First take out the undertray as if you were going to replace the pollen filter. There are two 90 degree turn wheels to release and then manoeuvre it down from the car centre first and then back into the passenger foot space. Disconnect the floor light lead.
Use your plastic upholstery tool to lever off the dashboard side panel. Make sure the glovebox lid is closed and take our the white hinge pins next. The right hand pin can be seen from under the dash. Push on the rounded end and it should pop out a bit the other side and allow you to wriggle it the rest of the way out. The left side pin can be seen when looking at the bottom of the glovebox lid where the side panel was removed. Use some pliers to wiggle it out to the position shown and try to leave it there for later re-insertion. If the pin falls into the panel work with the bonnet release lever, unclip the panel at the top, pull the panel back a bit with the door seal and lift it at floor level and the pin should fall through onto the floor of the passenger footwell.
Once the pins are removed, operate the release lever while support the lid, open the lid and pull the opening damper on the right side to full extension. You may elect to unhook the top of the hinges that restrict how far the lid will open. The damper clasps onto either side of a hole in the framework at the bottom of the right hinge. Use some small screwdrivers to separate the clasps so the damper releases. The lid can now be removed.
Glovebox Removal
Take out the cool air entry swivel (it just unclips downward), the glovebox light (this unclips down at the rear and is then fed backwards into the glovebox so you can now unclip the wiring connector then put in a safe place), the AV module if you have one and the dummy plug for the airbag switch. Push the damper arm up into the damper and get it to sit horizontal.
Push all the wires up through their holes and undo 3 T20 screws across the top, two on the left near the fuse box, three across the bottom and two threaded large head screws in the boxy part. Both sides are also fastened with clips on plastic flats and the upholstery tool will be needed to release these and the glovebox should side out so long as the wires have room to get out of the way.
If you need to replace you pollen filter, now is the time.
Glovebox Replacement
First, tie some fine wire onto the damper arm through the slot above the clasper mechanism. When the glovebox (with the damper in the horizontal postion) is nearly back in, thread the wire through the dash panel work and out the hinge slot as shown. Get all the wires poking back though their respective holes, click the glovebox back in place and replace all the screws, lights, switches and cool air entry (after getting the cool air pipe from above sitting nicely above the hole).
Lid Replacement
Reattaching the damper to the lid is the tricky bit. I found a small square to plastic 3mm thick and filed one edge down to a wedge. Pull the damper arm down through the hinge slot with the wire and insert the 3mm thick wedge into the clasper mechanism and rotate 90 degrees. Offer the hole in the hinge to the expanded clasper while holding the wire tight and the clasper should snick straight into the hole (mine did first time!). Then insert lid into the hinge slots and close the lid engaging the locking tags. This puts the hinge holes in just the right place to engage the pins. Re-engage the hinge pins and refit the under tray with floor light lead.
The reason I had to take my Glovebox Lid off was because it would not close properly on the centre side and would droop down when opened. I found the hinge hole on that side of the lid had broken and pulled across the pin. Maybe someone slammed the glovebox lid when there was too much stuff in the lid and the hinge hole broke in response. If you look and the pics carefully, you might be able to see some untidy plastic welding I did with my soldering iron the close the ring. Al least it has held together so far.
Cheers, Ken
Attachments
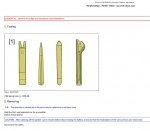
This is a good place to add some photos of my fix for this lid. Supposedly later lids were improved and are less likely to fail this way, but this may help someone. It is possible to remove the two little pen holder clips and then get inside the lid with a pick to refit the latch mechanism, but it will probably pop out again. So, once you've removed the lid, you need to insert a flat blade in the gap and split the two halves, which are fused together. You'd need to reassemble using urethane sealant covering all of the original contact points plus a couple of good extra dobs. You need three 1/2" self tappers, a small piece of scrap steel and a 5.5mm drill. Steps:
1-Remove the cog and ream out the middle to 5.5mm so it turns easily on the pin. It can bind up. Refit with some lube.
2-Install a self tapper for each latch / rack to tie the tops of the guide clips together to stop them popping out in use.
3-Add a piece of bent scrap steel or copper to prevent the support from moving and allowing the master rack to jump teeth.
Hopefully this will stay stuck together and outlive the car.
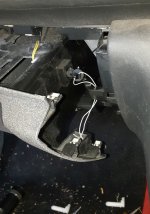
Hello there,
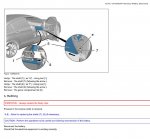
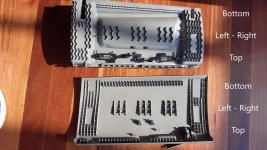
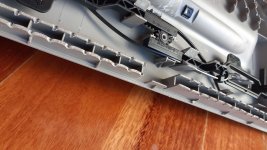
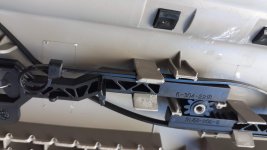
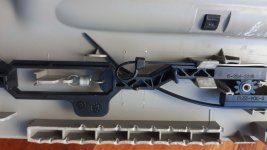
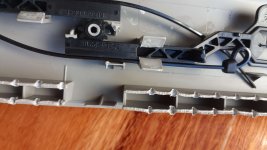
I have a Citroen C5 x7 that I am currently fixing a few things on. One thing that needed to be fixed was the glove box lid, which would not open properly and would require force to open. While I managed to work out how to take the glove box lid off the car (special thanks to the previous posts in this forum) I struggled to find a guide as to how to separate the glove box lid into its two parts.
After spending much time, I managed to open the lid up and I thought I would share the process and some images of what the inner side looks like. I tried prying the sides apart with a plastic trim removal tool and a flathead screwdriver and while they were usual for making a small gap, I recommend you use something wider. I used a wide paint scraper.
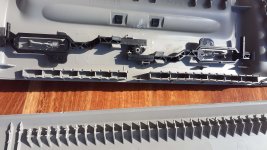
Once separated I discovered the real issue with the mechanism is down to design, the handle pushes a plastic piece which at the other end turns a cog. This cog then further pulls another plastic piece on the other side. It was this second plastic piece that did not retract properly, which caused the lid to get stuck when opening. Due to the force acting on the right plastic piece, it can struggle to turn the cog and will instead jump over a couple of teeth and will be unable to pull the other piece in enough.
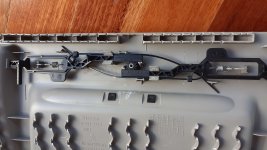
After some thought, I decided to get two zip-lock ties and run them along the plastic pieces. This helps reduce the side-to-side movement that the plastic pieces had, Aswell as acting as a sort of track to help stop the plastic piece from separating too far away from the cog and skipping over teeth. Other items could be used to wedge the pieces, but I just happened to have access to zip lock ties.
Do note that the while the two sides of the glove box lid are 'clipped' into each other, they are mostly held together by glue, so when taken apart it is normal to hear some light cracking sounds (just the glue breaking away). Upon rebuilding, I suggest you lightly re-apply some glue. However, I did not do this as I am wanting to test out my fix for a while and see whether the zip tie solutions work long term. At the time of writing, I have just then reinstalled the glove box lid into the car, and it opens smoothly.
I have a Citroen C5 x7 that I am currently fixing a few things on. One thing that needed to be fixed was the glove box lid, which would not open properly and would require force to open. While I managed to work out how to take the glove box lid off the car (special thanks to the previous posts in this forum) I struggled to find a guide as to how to separate the glove box lid into its two parts.
After spending much time, I managed to open the lid up and I thought I would share the process and some images of what the inner side looks like. I tried prying the sides apart with a plastic trim removal tool and a flathead screwdriver and while they were usual for making a small gap, I recommend you use something wider. I used a wide paint scraper.
Once separated I discovered the real issue with the mechanism is down to design, the handle pushes a plastic piece which at the other end turns a cog. This cog then further pulls another plastic piece on the other side. It was this second plastic piece that did not retract properly, which caused the lid to get stuck when opening. Due to the force acting on the right plastic piece, it can struggle to turn the cog and will instead jump over a couple of teeth and will be unable to pull the other piece in enough.
After some thought, I decided to get two zip-lock ties and run them along the plastic pieces. This helps reduce the side-to-side movement that the plastic pieces had, Aswell as acting as a sort of track to help stop the plastic piece from separating too far away from the cog and skipping over teeth. Other items could be used to wedge the pieces, but I just happened to have access to zip lock ties.
Do note that the while the two sides of the glove box lid are 'clipped' into each other, they are mostly held together by glue, so when taken apart it is normal to hear some light cracking sounds (just the glue breaking away). Upon rebuilding, I suggest you lightly re-apply some glue. However, I did not do this as I am wanting to test out my fix for a while and see whether the zip tie solutions work long term. At the time of writing, I have just then reinstalled the glove box lid into the car, and it opens smoothly.
Attachments
-
 20240327_145419.jpg502.6 KB · Views: 23
 -
 Glove box lid separated.jpg634.7 KB · Views: 24
 -
 20240327_145329.jpg519.9 KB · Views: 20
 -
 20240327_155257.jpg514.3 KB · Views: 19
 -
 20240327_155303.jpg471.9 KB · Views: 22
 -
 20240327_155309.jpg343.7 KB · Views: 22
 -
 20240327_155314.jpg303.4 KB · Views: 21
 -
 20240327_155317.jpg352.9 KB · Views: 21