72 r12 restoration and upgrade

Rory

Member
Fellow Frogger
Joined
Oct 6, 2011
Messages
108
Location
Adelaide
Hi all, I have been working on a r12 restoration for the past couple of year and thought I'd share some progress as approach reaching a drivable car again.

The car was my daily driver since about 2011 or 12 and earnt plenty of sentimental value. A fun car to drive with surprising reliability.

I really let the car go unfortunately with panel damage and rust and poor paint, so when the opportunity came up for a parts car with 17g running gear in it I jumped at the opportunity and let the build snowball into a more complete restoration.

It has been the first full build I have undertaken so there has been lots of learning the hard way through mistakes and trail and error but nonetheless has been fun learning experience. And the support in sourcing parts within the community has been exceptional. I have a lot of appreciation for everyone who has helped and contributed in some way

So details of the build are as follows.
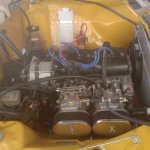
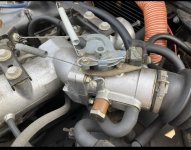
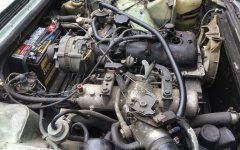
844-12 engine with 40dcoes and 123 ignition. Fully rebuild, reground crank and cam.
Only a 4spd bolted up ATM. But I have a 5spd ng3 to be sorted out at a later time
17 vented brakes up front and gordini sway bars front and rear.
Rear axle with disc brakes also to be fitted at a later date.
Suspension lowered 1-2imches all bushes, ball joints and shocks new
I think I'd like to upgrade to adjustable coilovers at a later date also.
Electrical system refreshed with new extra fuses and relays. With a few additions including wideband o2 sensor, electric fuel pump and fan. Hazard light circuit, addition front fog lights.

Bodywork
Front panel replaced
Three good used rust free doors
Nos door skin on driver's door
Rust free front gaurds.
Rust and dents repaired in rear quarter panel and rear window surround
Paint stripped and repainted. This has been my first respray so there are some imperfections but overall happy with how it is turning out
Repaired cracked dash and other cosmetic parts

I will try and upload some photos now
 
Glad you have started a thread for your R12 resto project Rory, looking forward to the pics. Lots of support is available on here if you get stuck. Keep up the good work. (y)
 
Uploading pictures is proving to be a challenge.
Sorry for the disorder but here are some pictures in to particular order

Front suspension rebuild and homemade compressor
IMG_20231228_132858_(1080_x_1080_pixel).jpg

Front hubs rebuilt with vented dics
IMG_20231228_132812_(1080_x_1080_pixel).jpg
removal of old parts
IMG_20231228_132534_(1080_x_1080_pixel).jpg
front panel replacement. You can see some minor differences between parts
IMG_20231228_132352_(1080_x_1080_pixel).jpg
engine rebuilt, had to reshape combustion chambers after getting head skimmed. A lesson learnt here in checking head thickness
IMG_20231228_132316_(1080_x_1080_pixel).jpg
repainted the engine bay, safe area for learning to paint
IMG_20231228_132117_(1080_x_1080_pixel).jpg
front panel removed and LH Egine bay wall reshaped and repaired from accident damage
IMG_20231228_131946_(1080_x_1080_pixel).jpg

Rear suspension rebuilt. Will need to put stiffer springs in
IMG_20231228_131919_(1080_x_1080_pixel).jpg
primed after rust section cut out
IMG_20231228_131827_(1080_x_1080_pixel).jpg

Surface rust removed from floor, centre hand brake fitted and sound deadening installed
IMG_20231228_131713_(1080_x_1080_pixel).jpg
 
Engine installed work on orientation on hoses and wiring
Had a set of silicon hoses made up and a custom alloy radiator
IMG_20231228_131637_(1080_x_1080_pixel).jpg
rust in window frame corners, cut and sandblasted
IMG_20231228_131615_(1080_x_1080_pixel).jpg
work on rebuilding the structure in dash boar. Was completely disintegrated
IMG_20231228_131528_(1080_x_1080_pixel).jpg
from suspension rebuild, springs cut/lowered

IMG_20231228_131459_(1080_x_1080_pixel).jpg
sanded back to bare metal. Was a time consuming process. It was pleasant to find the main frame had minimal rust or repairs
IMG_20231228_131428_(1080_x_1080_pixel).jpg


IMG_20231228_131305_(1080_x_1080_pixel).jpg

Painting time. No suprises here I made a few runs and spilt paint on the floor. A couple of sections required to be redone. And a cut and polish a month later bought it to life.
I used a colour matched Sungold yellow acyrilic
IMG_20231228_131221_(1080_x_1080_pixel).jpg

Engine bay/front ready to be repaired
IMG_20231228_112012_(1080_x_1080_pixel).jpg
after paint bought it out in the sun. Before it's wet sand and polish
IMG_20231228_111857_(1080_x_1080_pixel).jpg
 

Attachments

  • IMG_20231228_111930_(1080_x_1080_pixel).jpg
    IMG_20231228_111930_(1080_x_1080_pixel).jpg
    247.4 KB · Views: 47
After hours of wet sanding and buffing

IMG_20231228_111754_(1080_x_1080_pixel).jpg
had to repaint this quarter due to runs with I burnt through trying to correct.
Some lessons to be learnt here in correct masking practices
IMG_20231228_111724_(1080_x_1080_pixel).jpg
the donor Car is very rusty with no usable body parts and mechanical parts needing full refubishments and sitting for a few decades
IMG_20231228_111639_(1080_x_1080_pixel).jpg
 
Some TS wheels I refurbished, later I acquired some cosmic rims I am yet to clean and paint
IMG_20231228_140531_(1080_x_1080_pixel).jpg
dashboard with new vinyl fabric
IMG_20231228_140504_(1080_x_1080_pixel).jpg

Welded up the trim locator holes on the good used doors I acquired
IMG_20231228_140425_(1080_x_1080_pixel).jpg
attaching the vinyl to the dash
IMG_20231228_140350_(1080_x_1080_pixel).jpg
inside boot area painted. Fuel tank removed, cleaned and painted
IMG_20231228_140316_(1080_x_1080_pixel).jpg

Front spring FYI
IMG_20231228_140219_(1080_x_1080_pixel).jpg

CUT OUT RUST IN BOOT LID
IMG_20231228_140150_(1080_x_1080_pixel).jpg
repaired rust section LH rear quarter
IMG_20231228_140048_(1080_x_1080_pixel).jpg

Donor car 844 engine prior to rebuild
IMG_20231228_135936_(1080_x_1080_pixel).jpg
rust cut from rear quarter. I would have gone about it differently if tackling it today
IMG_20231228_135842_(1080_x_1080_pixel).jpg
 
There are lots of details I have left out here. And when you look back through you're photos it is surprising to see lack of progress and particularly before pictures. But I'll try and get some more details up when I get a chance to put a bit more time into the car.
 
Rory you have answered one of my questions and that was how well does an 844-** motor with its fuel injection fit into and R12, looks like snugly with a bit of room. I thought I was going to have to modify the mounting of the fuel injection when I got to that stage on my R12 project.

Also I see you have found a good use for under sized brake rotors.

Keep the pics coming. (y)
yes snugly. it appears with that setup the air filter was just rubbing on the underside of the standard bonnet
 
  • Like
Reactions: COL
Very nice! I'd like to do the same to my '78 Virage wagon. I have a spare D-Jetronic set up. I just need to get the car on the road first!
North American R17 Gordinis had a different plenum and throttle body set up on the D-Jetronic compared to the rest of the world. Might be easier to squeeze under the R12 bonnet, if you can source one!
 

Attachments

  • Screenshot_20240104_071723_Chrome.jpg
    Screenshot_20240104_071723_Chrome.jpg
    287 KB · Views: 54
  • 070422-1979-Renault-17-Gordini-5.jpg
    070422-1979-Renault-17-Gordini-5.jpg
    240.8 KB · Views: 57
  • Like
Reactions: COL
My advice is throw the FI away and go Webers (40mm). When it goes wrong there is very little fixing available.

A R17 I did recently, runs like a Steam Train .........(With 123 Ignition).

17G Webers.jpg
 
I think he has Ray

Rory, where did you get those Leads? Nice lengths!
IMG_20240104_171505_(1080_x_1080_pixel).jpg

Super cheap leads. The coil wire is from the parts car, will need to find a replacement so it is new as well. Needed a longer lead than was supplied.
 
I think he has Ray

Rory, where did you get those Leads? Nice lengths!
Sorry pictures a bit disjointed, will be much better. Only FI is modern 4 port, Jenvey or similar and some of the good small computers.

Ray
 
A bit of work done over this Christmas break. Front gaurds prepped and painted.
I seem to never accomplish this in an organised fashion as these should have been painted when I did all the other panels.

Bitumen type coating on inside of gaurds and in front wheel arch
IMG_20240104_171907_(1080_x_1080_pixel).jpg

Stripped and body filler where I welded up holes for the badges
IMG_20240104_171639_(1080_x_1080_pixel).jpg
guide coating
IMG_20240104_171558_(1080_x_1080_pixel).jpg
happy with the shape
IMG_20240104_171541_(1080_x_1080_pixel).jpg

Paint. It's impossible to avoid all contaminats when painting in an open carport. Some small fleck of dust and a bug hopefully will sand out
IMG_20240104_171522_(1080_x_1080_pixel).jpg
chasing electrical gremlins getting all the lights working again.mostly problems due to bad earth's from painting and a stuck flasher can

IMG_20240104_171929_(1080_x_1080_pixel).jpg

Oil pressure, wideband and coolant temp
IMG_20240104_171843_(1080_x_1080_pixel).jpg

Spun up a new handle for the handbrake on my friends wood lathe to replace the broken plastic one
IMG_20240104_171823_(1080_x_1080_pixel).jpg
IMG_20240104_171754_(1080_x_1080_pixel).jpg

I am missing this rear window corner chrome peice if anyone knows where I can find one
IMG_20240104_171704_(1080_x_1080_pixel).jpg
 
My advice is throw the FI away and go Webers (40mm). When it goes wrong there is very little fixing available.

A R17 I did recently, runs like a Steam Train .........(With 123 Ignition).

View attachment 233743
Looks very nice.
Over the past few days I managed to take the car out for a small road test and the engine performed nicely. The sound of the dcoes is awesome.
With the wideband I was able to confirm afr's were all pretty close for now maybe some small tweaking down the track.

I'd be interested to know what sort of ignition curve people have been running with their ignition systems. I've uploaded a few samples into the program and am yet to give it a proper trial

Also thoughts on the oil cooler whether it's necessary for a street car, I do not have one
 
Shoji should be able to give you a good ignition curve,

If you run points/condenser you must rebuild the distributor, as weights have a tendency to come off. And springs stretch. And they are not as crisp at the computer generated spark. Hence the "123-Tune".

As for oil coolers, on relatively standard motors, not really needed. But on decent modified I always put.

Ray
 
Dude!

It’s beautiful :)

So much work there, good on ya!

Re ignition curve, they were printed in a manual somewhere, the different dizzy curves available via the different models..

I’ll see if can remember where I saw them,
 
Top