407 cambelt change

DoubleChevron

Real cars have hydraulics
Moderator
VIP Paid Subscriber
Fellow Frogger
Joined
May 8, 2000
Messages
22,398
Location
Ballarat,Vic,Aust.
@ 230,000km and 15 years of age .... its probably time to fit the new cambelt kit (I've had sitting on a shelf for about 5years)..... and look what I just found.


I've watched the first 5 minutes and its remarkably detailed. I think i have a haymes manual somewhere, no doubt it say "Not user changable, please see dealer :rolleyes: ". I'm amazed that he jacked the motor by its plastic sump and it didn't break!
 
It’s not plastic it’s just a sound deadening cover. That cam belt is one of the easiest on pugs.

That's good to know. The space available look tiny! Even the C2 has lots of space once you remove everything out they way. The Xantia and XM look positively spacious to trying to get down in there :)
 
@ 230,000km and 15 years of age .... its probably time to fit the new cambelt kit (I've had sitting on a shelf for about 5years)..... and look what I just found.


I've watched the first 5 minutes and its remarkably detailed. I think i have a haymes manual somewhere, no doubt it say "Not user changable, please see dealer :rolleyes: ". I'm amazed that he jacked the motor by its plastic sump and it didn't break!
Replacing mine was a pig of a job (idler puley fell off among other challenges). I only had a haynes manual and zero internet on the day so couldn't check onlinefor detail. TBH, I found the 307 petrol much easier to do.

Thankfully all worked out well.

Main issues I had -
1.getting the alternator belt off (spanner too short and no suitable extension)
2. Two piece engine mount - don't remove the bolt that holds the idler pulley - Haynes failed to show clear photo:-(

Tip: Removing the starter motor to put in flywheel locking pin is easy and saves a heap of time trying to see the hidden hole.


The guide i found is this one, also very detailed (Still unclear why he disconnected the cam position sensor though):

 
The RHR motor timing belt is covered in the Citroen C5 2008 Pocket Handbook. It used to be open online, but is now concealed in service.citroen.

A couple of French sites have full descriptions as well.
 
Last edited:
Recommended - Buy latest new dated belts neoprene/rubber parts preferably & don't use old stock/stuff stored for years. Old isn't equal. Tyres & brake kits as well. Playing with danger - Russian Roulette. . JG.
 
Replacing mine was a pig of a job (idler puley fell off among other challenges). I only had a haynes manual and zero internet on the day so couldn't check onlinefor detail. TBH, I found the 307 petrol much easier to do.

Thankfully all worked out well.

Main issues I had -
1.getting the alternator belt off (spanner too short and no suitable extension)
2. Two piece engine mount - don't remove the bolt that holds the idler pulley - Haynes failed to show clear photo:-(

Tip: Removing the starter motor to put in flywheel locking pin is easy and saves a heap of time trying to see the hidden hole.


The guide i found is this one, also very detailed (Still unclear why he disconnected the cam position sensor though):

thanks. I guess I will find out. I couldn't remember the sump wasn't plastic, so i'm guessing me thinking there is a 1/2" square drive ratchet hole into the tensioner is wrong too :)
 
20220925_112624.jpg


230'ish thousand kms and 15 years of age. Looks fine right ?


.
.
.
.
.
.
.
.
.
.
.
.
.
.
.
.
.
.
.
.
.
.
.
.
.
.
.
.
.
.
.
.
.
.
.


407_cambelt.jpg


Just don't zoom in on that image!
 
It sure is tight in there .... I'm surprised how straight for it is. all you need is the steps, not those hugely long detailed videos really.

-whip out the air cleaner box ( 90 seconds )
-whip off the intake tube ( 3 minutes )
-the starter is now staring you in the face..... excellent advice to move this.... 10minutes maybe. You would NEVER find that hole with the starter still in place.

then just support hte engine and whip the mount out of the way.

20220925_112641.jpg


access is very "snug".

20220925_112725.jpg


I'll change the belt, wp and tensionsers/idlers this afternoon. I'm pleased someone here told me to replace the bottom part of that top engine mount. I managed to tear it apart when I took the weight off the mount :rolleyes: I should have removed the nut on the top of the mount before taking the weight I guess. both the lower part and the dog bone part of the mount were toast either way :)

20220925_112742.jpg


Poor old impact.... I killed it on the crank bolt (there was a HUGE amount of locktite on it). I wonder where I can find another cheapie that's on its last legs to replace it :clown:
 
Put some new brakes on while you’re in there… Those rotors look a bit scary!
 
20220925_174521.jpg


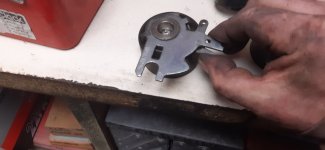
This is just nuts, no matter how simple the task .... I just can't buy quality parts. I've just wasted an hour trying to *just* fit the cambelt itself. The tensioner ... it just jumps off its stays and spins around so the pulley isn't backed right off ... which means you can't get the belt on. Here is the tensioner off the car ... Note the pointer and the holes in it.

20220925_174641.jpg


So to fully release the tension, you line the holes up and pin it ... see how the old tensioner locks in nicely.

20220925_174701.jpg


You would think something made if france wouldn't be a piece of junk.

20220925_174742.jpg


The didn't bother to include the pin to lock the tensioner back..... See what the back of its doing when there is tension there. The entire base that is supposed to lock into the tabs on the engine block flexes out (no bolting it down doesn't prevent this). So as soon as you try to back the tensioner off so the belt can be fitted, the entire bottom of the housing flexes out and it releases from the locking tag on the block and spins.

20220925_174809.jpg


How the hell is anyone using these SKF kits? they can't be fitted. This would be enough to drive you insane. I can't return this, I bought it years ago and can't remember who I purchased it from.
 

Attachments

  • 20220925_174552.jpg
    20220925_174552.jpg
    155.7 KB · Views: 55
Now I've stopped swearing and ranting at it .... I think that tensioner is a different design. You don't lock it off against the spring loading, you just rotate the eccentric in the middle right off .... then rotate the ecentric back aroudn against the spring tension to tension the belt ... and the pointers should then move without twisting/flexing to show you the correct tension .... maybe. ie: there is no spring tension to work against to fully release the tensioner.
 
This is just nuts. Another hour swearing at the mongrel thing. It doesn't matter where I put that tensioner..... I need about 0.5mm more slack to get the belt on ..... I just can't get the damn belt on. Does anyone know the trick .... or the exact setup for this SKF type tensioner ?
 
hmm... i just fast forwarded that video to see if he had any issues. he bolts the tensioner into place once the belt is on..... I'm guessing that must be the only way to do it ..... why make something so simple, so incredibly difficult .... grrrrrrr......
 
Here is what the C5 handbook has to say -
 

Attachments

  • 276-280.pdf
    280.1 KB · Views: 93
I think that's the same as the original tensioner on this ... the same as the C2 I did a couple of months back. You just rotate the tensioner and pin it so its fully released and fit the belt. I can't do that with the SKF one, it just buckles out of shape. If I fit the belt in place, then bolt the tensioner in like that video, that should work .... it SO CLOSE ... you only need 0.5mm more slack and I'd be able to get the belt over the tensioner ... but I just can't. I don't think the SKF tensioner backs off quite as much as the other one.
 
If it is an SKF kit you're using there are always instruction included.
I've used before, followed these instructions & not a problem.
Perhaps a re-read & starting from scratch?
Plus one must ensure the belt is pulled taught in one direction before so as to fit over the tensioner.
If it is that close it will fit.
 
Top