306 S16 gearbox removal

haha I suspect the other time was my wife, the one in this thread was my old girfriend who decided she wanted to move to Spain. But my wife has been very understanding about how much time I've been spending the last two weekends working on the car!

I still don't have the box out (I must be the worlds slowest mechainic ;) ) . I got to the point where I only need to remove a couple more bolts and the gearbox mount and it is ready to come out.

I decided to call it quits as everything else has taken much longer than I anticipated, and I was feeling pretty tired (even though I only spent a couple of hours today). I didn't want to start and have to leave the trolley jack under the gearbox for a few days if I found it wasn't going as smooth as planned.

So it looks like it will be coming out next weekend now :rolleyes:

I think it is going to be public transport for a bit longer than I originally thought. But I'd rather take it slowly and not stuff anything up, I might have finally learned that lesson after many years!

Tony.
 
Another question, Do I need a new clutch cable when I do the clutch? I'm geussing the current one will have auto adjusted itself up to take up the wear in the clutch??

The one in the car at the moment is about 5 years old. The original one died at about the 10 year mark (the platic bit on the clutch pedal broke) , and then another one a year after that (the actual cable snapped near the clutch pedal!).

Tony.
 
I'd leave it, but its good preventative maintenance. By the looks of things it may add an extra week to your labour times :)

Gil
 
:roflmao: you are probably right!! ;) doing the throttle cable was an absolute PITA (mainly the pedal end) I'm guessing that the clutch cable is similarly painful!

I once pulled the engine out of my morris 1100, flywheel off, separated transmission, retrieved the distributor drive (don't ask) put it all back together and had it back in the car and running ready to drive in less than 3 hours (it may have even been less than two hours). I had admittedly only just reassembled the motor and put it back in, so nothing was frozen up and I knew exactly where everything was. I had also pulled the engine out at least 3 times prior to that too . But I tell you what, there was a lot of swearing going on and some threats to torch it before I calmed down and got to the task at hand :)

Tony.
 
For anyone reading this thread, I'd strongly advise to get the correct size 35mm socket for the driveshaft nuts! Please see this post showing the damage to the driveshaft nuts that I incurred getting them off. http://www.aussiefrogs.com/forum/showpost.php?p=1047059&postcount=15 So perhaps my comment about having learned the lesson about not rushing things was premature :rolleyes:


The Quaife arrived today :) I really hope that this gearbox is coming out this weekend!!

I went down to the car this evening to check the number on the throttle position sensor and noticed that the butterfly's in the inlet manifold are not even. The two drivers side ones are completely level when in the open position, but the two near side ones are not fully open. I think that the vacuum pot spindle is going to be getting an adjustment! No doubt when I replaced them the nearside one was not quite right. Not sure how much of a difference it would make but it must cause at least some imbalance. The manifold picture actually shows something else that I'm sure could affect performance, but I'm not going to try doing anything about it at this stage as to do it properly the head would need to come off. The intake ports do not line up properly with the manifold! you can see the shiny bits on the edges. I'm sure this must cause turbulence in the ports, I can't imagine that is supposed to be there..

Tony.
 

Attachments

  • DSC_0549.jpg
    DSC_0549.jpg
    102 KB · Views: 552
  • DSC_0548.jpg
    DSC_0548.jpg
    100.1 KB · Views: 3,158
Help :)

Does anyone know the size of the gearbox mount stud. 15mm is too small 16mm is too big :( shifter is no good.

9/16 is too small, 5/8th is too big.

I'm loath to try the vice grips.

Tony.
 
Why are you removing the stud? That's not normal.
 
You shouldn't be having clearance issues. Just lean the engine and gearbox over so the studs comes clear
 
Also loosen the sub-frame. A little on drivers side, lots on passenger side. It makes it a lot easier.
 
Thanks Guys, the haynes manual said to remove the stud. I didn't see these posts but I did drop the engine down a bit and that got around the problem :)

Had a terrible time getting the gearbox out though. I read the couple of relevant paragraphs went down stairs, removed the remaining bolts and then proceded to rotate the box so the diff went down instead of up doh. I smashed the plug on the temperature sender as well :(

In the end after a lot of manouvering I got the diff back up and clear of the subframe but it wasn't smooth. I'd already got the splines out of the pressure plate before I realised my stupidity!

There is a massive hole in the housing, will take pics later. Had to pack up and rush off to dinner at about 4:00PM.

Tony.
 
Some pics of the carnage

OK so here are the pics of the carnage. I suspect that this actually was what went bang when towing back home turning into the driveway. I can't imagine that I wouldn't have heard this whilst driving. The diff is minced. there is just a bunch of lose bits an pieces floating around inside.

Tony.
 

Attachments

  • DSC_0550.jpg
    DSC_0550.jpg
    103 KB · Views: 3,347
  • DSC_0551.jpg
    DSC_0551.jpg
    104.4 KB · Views: 576
  • DSC_0552.jpg
    DSC_0552.jpg
    100.9 KB · Views: 482
Ouch - what a mess.

For info, I think I used a 10mm stud remover to remove the gearbox mount stud on my GTi6 when I did my clutch - much easier to get in and out that way. Just make sure you use Loctite when putting the stud back in again.

Be careful 'dropping the engine' down as you're putting a lot of strain on the engine mounts - moving them to a position where they're not really designed to be. Let alone the exhaust system and every pipe (air-con / power steering) and wire connected to the engine. The engine should stay pretty much in it's normal position.

I realise it's a bit late now, but I ordered my 35mm socket from Repco - they ordered it and I picked it up directly from the supplier. Very handy !

Yep - some info on GTi6.com has to be examined before being put into use !

Just be aware that ALL fittings on a Peugeot are METRIC. There should never be a reason to use non-metric tools. Not unless you can't find your hammer .... :joker:

You shouldn't have too many probs finding parts for your BE3.

Cheers

Justin
 
Yes it has been an experience I must say. Makes me really appreciate how easy the Morris 1100 was to work on in comparison!!

I'm picking up a gearbox tonight and dropping off to Adrian. I'm a bit concerned about the condition of the doner box due to play on the input shaft but hopefully it will be ok.

I'm hoping the internals of mine are still ok but I'm probably being overly optimistic.

Tony.
 
wow those driveshaft nuts... where sooo much better then mine before I pulled them off! I've always used 36mm socket on them (lots of times) and never had an incident. Use the 36 when putting back in and still no issue! Anyway horses for courses! Have fun putting back in!

Where'd you end up getting the quaffe and how much was it (if you don't mind me asking)
 
Hi Cav, I got the quaife from Palmside Imports in NZ price was $1190NZ inlcuding shipping. Worked out to about $1030 AU once the bank charged me 3% for overseas transaction on the CC. So the good thing is it is under the limit for any customs charges :)

They are an authorized quaife distributor so it comes with full lifetime warranty as well :) Very quick service too. I got it within 4 days I think.

The nuts looked brand new before I pulled them off. Perhaps they were! I'm wondering if I should re-use them or replace them.

Tony.
 
I spent the evening at Adrian's while he pulled down the two boxes. On preliminary inspection it looks like my box came out of the ordeal pretty well, and he should be able to put a new box together for me with the best bits from both :)

I'm feeling much happier now!

Thanks Adrian!! :cheers: 
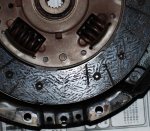
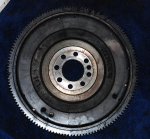
and thanks Adnan for the new box :)

Tony.
 
I didn't do much this weekend. I spent a short while this afternoon removing the clutch and the flywheel.

The clutch friction plate was worn down to the rivets. They had just started to be touched. I guess not surprising after around 235,000LM. The throw out bearing seems to be completely stuffed! but since I've never seen a new one I can't be sure.

The pressure plate and flywheel are pretty smooth but show some crazing. I'm not sure whether that is something that a machine can deal with or if it is more serious.

The main seal doesn't appear to be the culprit with respect to the oil in the bell housing. I'm really hesitant to touch it after talking to Adrian about the correct way to replace it.

Pictures attached.

The third one is a close up of the crazing on the flywheel surface. The pressure plate was similar. The fourth picture is of the back of the flywheel, there is some indication of oil from the main seal but very little, however now I look at the fifth pic a bit more closely it does look like the seal may be going. The main issue with dropping the sump is that I would need to remove the air cond comrpessor as it mounts onto the sump. This is not something I'd be keen on doing. The haynes manual says I can do the seal without pulling the sump by drilling a couple of holes in the seal putting self tappers in and pulling it out with pliers. I'm not sure how keen I am on that procedure.... But maybe it is better than putting the whole thing back together without dealing with it...

Tony.
 

Attachments

  • DSC_0573.jpg
    DSC_0573.jpg
    99.9 KB · Views: 758
  • DSC_0575.jpg
    DSC_0575.jpg
    98.9 KB · Views: 412
  • DSC_0581.jpg
    DSC_0581.jpg
    106.3 KB · Views: 366
  • DSC_0582.jpg
    DSC_0582.jpg
    100.5 KB · Views: 453
  • DSC_0584.jpg
    DSC_0584.jpg
    101.1 KB · Views: 643
I didn't do much this weekend. I spent a short while this afternoon removing the clutch and the flywheel.

The clutch friction plate was worn down to the rivets. They had just started to be touched. I guess not surprising after around 235,000LM. The throw out bearing seems to be completely stuffed! but since I've never seen a new one I can't be sure.

The pressure plate and flywheel are pretty smooth but show some crazing. I'm not sure whether that is something that a machine can deal with or if it is more serious.

The main seal doesn't appear to be the culprit with respect to the oil in the bell housing. I'm really hesitant to touch it after talking to Adrian about the correct way to replace it.

Pictures attached.

The third one is a close up of the crazing on the flywheel surface. The pressure plate was similar. The fourth picture is of the back of the flywheel, there is some indication of oil from the main seal but very little, however now I look at the fifth pic a bit more closely it does look like the seal may be going. The main issue with dropping the sump is that I would need to remove the air cond comrpessor as it mounts onto the sump. This is not something I'd be keen on doing. The haynes manual says I can do the seal without pulling the sump by drilling a couple of holes in the seal putting self tappers in and pulling it out with pliers. I'm not sure how keen I am on that procedure.... But maybe it is better than putting the whole thing back together without dealing with it...

Tony.

I'll bow to greater knowledge regarding the flywheel face but:

1. I'd definitely do the crankshaft seal and what's more I'd do it without dropping the sump unless it is obvious that the sump gasket is leaking. Resealing sump gaskets from underneath isn't much fun in my older experience. You also need to be very careful to check for a wear groove from the old seal in the end of the crankshaft and to avoid setting the new seal lip in it. Again others will have 306 experience and can give better advice.
2. New clutch thrust goes without saying.
3. New clutch driven plate goes without saying.

Good luck.

Lots of cleaning around the end of the engine before drilling in the self tappers. Everything should be clean enough to eat dinner off.
 
Thanks John :) Yes it was very gritty around there, it will get a VERY through-rough clean. One thing that really surprised me was grit in the ends of the flywheel bolts. They were also oily. It's very hard to tell looking at it whether it is leaking around the bottom bracket that the seal sits in, but If I clean it up well then if it is weeping I guess after a few days I should be able to tell :)

I was going to get the valeo clutch kit which includes the pressure plate, friction plate and thrust race. I'll also do the fork bushes if I can get them, and perhaps the fork itself as it has visible wear.

Tony.

edit also if someone could suggest somewhere in Sydney for machining that would be great, I've seen RAMS mentioned but don't know who/where they are, goggle search turned up only a place in WA.
 
Last edited:
Thanks John :) Yes it was very gritty around there, it will get a VERY through-rough clean. One thing that really surprised me was grit in the ends of the flywheel bolts. They were also oily. It's very hard to tell looking at it whether it is leaking around the bottom bracket that the seal sits in, but If I clean it up well then if it is weeping I guess after a few days I should be able to tell :)

I was going to get the valeo clutch kit which includes the pressure plate, friction plate and thrust race. I'll also do the fork bushes if I can get them, and perhaps the fork itself as it has visible wear.

Tony.

edit also if someone could suggest somewhere in Sydney for machining that would be great, I've seen RAMS mentioned but don't know who/where they are, goggle search turned up only a place in WA.

Interesting - I've no idea about oil on those flywheel bolts, but I've never done that job on a 306. Our time will come as ours has only done 170,000 km!

Good you aren't rushing it. Takes less time than doing things twice quickly!!

Cheers
 
Top