
You are using an out of date browser. It may not display this or other websites correctly.
You should upgrade or use an alternative browser.
You should upgrade or use an alternative browser.
1966 Aus. ID19
- Thread starter SuppleC
- Start date


That looks really nicely done! How does it go with a single pipe when the cars is sitting on its belly? it doesn't touch the ground or risk getting caught on anything ? I had assumed the idea of twin rear pipes was for ground clearance.
It’s an ID19, no power steering - stays up for weeks!That looks really nicely done! How does it go with a single pipe when the cars is sitting on its belly? it doesn't touch the ground or risk getting caught on anything ? I had assumed the idea of twin rear pipes was for ground clearance.
I had a thought that when the Ds went to the 5 bearing motors with more capacity and hp, they increased the exhaust diameter (as is required). The area of a 1 3/4” (44mm) pipe is 15.2cm 2, whereas for two 1 1/8” it is ~16.1 cm 2. But the rolling/ flattening of my ex rusty muffler-back pipe may be a ground clearance solution.That looks really nicely done! How does it go with a single pipe when the cars is sitting on its belly? it doesn't touch the ground or risk getting caught on anything ? I had assumed the idea of twin rear pipes was for ground clearance.
My '71 DS has two x 1 1/4" OD tailpipes.
A single 1 3/4" OD pipe flows about 30% more than two x 1 1/8" OD pipes, and is all but identical to two x 1 1/4" OD pipes. Remember you have to calculate flow comparisons on the internal diameter of the pipe/s.
Assuming mandrel bends not press bends your single 1 3/4" OD pipe will flow 126 bhp.
A single 1 3/4" OD pipe flows about 30% more than two x 1 1/8" OD pipes, and is all but identical to two x 1 1/4" OD pipes. Remember you have to calculate flow comparisons on the internal diameter of the pipe/s.
Assuming mandrel bends not press bends your single 1 3/4" OD pipe will flow 126 bhp.
There is always someone smarter than me. Also I don’t know the internals of the NOS s/s muffler, but I can’t imagine it’s cutting edge. Have a NOS downpipe and new flex section, so should be good underneath for a while.My '71 DS has two x 1 1/4" OD tailpipes.
A single 1 3/4" OD pipe flows about 30% more than two x 1 1/8" OD pipes, and is all but identical to two x 1 1/4" OD pipes. Remember you have to calculate flow comparisons on the internal diameter of the pipe/s.
Assuming mandrel bends not press bends your single 1 3/4" OD pipe will flow 126 bhp.
Being a NOS muffler it would flow what the engine requires, which is all that matters. Main thing is your new tailpipe is also well up to the task.There is always someone smarter than me. Also I don’t know the internals of the NOS s/s muffler, but I can’t imagine it’s cutting edge. Have a NOS downpipe and new flex section, so should be good underneath for a while.
It looks good too by the way, neat job.
I do all my own exhausts, not because I enjoy it, but because someone willing to do quality custom exhaust work is getting harder to find, and the ones that still do it charge like a brain surgeon.

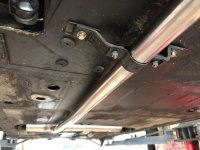
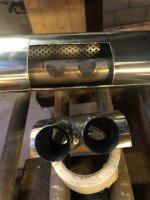
Yeah, I did this one also. Got a flex section welded into some original end pieces and had the rear pipe bent up at an exhaust shop to match a supplied sample. Bought a section of 5” 304 stainless tube and drilled and shaped it to fit the muffler with the 1 3/4” exit pipe. Had these professionally tig welded, then fitted it on a friend’s hoist.Being a NOS muffler it would flow what the engine requires, which is all that matters. Main thing is your new tailpipe is also well up to the task.
It looks good too by the way, neat job.
I do all my own exhausts, not because I enjoy it, but because someone willing to do quality custom exhaust work is getting harder to find, and the ones that still do it charge like a brain surgeon.
This is is the sort of thing I"m planning on doing for all of my cars (I'll just MIG weld it all together though). How did you build the muffler? ie: what internals did you put in .... and how di you create the outer shape ")
The only other change I'd make is to make sure it can all come apart with Vbands. I HATE trying to get exhausts apart down the track if required for maintenance.
seeya,
Shane L.
The only other change I'd make is to make sure it can all come apart with Vbands. I HATE trying to get exhausts apart down the track if required for maintenance.
seeya,
Shane L.
I didn’t build the muffler, just modified it from a twin outlet to single. It was from a batch Ian Steele from Maleny had made up about 20 y ago. I had one fitted to my 1971 Safari all those years ago.This is is the sort of thing I"m planning on doing for all of my cars (I'll just MIG weld it all together though). How did you build the muffler? ie: what internals did you put in .... and how di you create the outer shape
The only other change I'd make is to make sure it can all come apart with Vbands. I HATE trying to get exhausts apart down the track if required for maintenance.
seeya,
Shane L.
Attachments
T
That looks quite nicely made inside. You always wonder if expensive stainless mufflers are "stainless" inside as well
I didn’t build the muffler, just modified it from a twin outlet to single. It was from a batch Ian Steele from Maleny had made up about 20 y ago. I had one fitted to my 1971 Safari all those years ago.
Yes, I was worried as I cut into it. The twin pipes were originally mig welded (hence spatter) and painted black. That explains the black circles of paint on the inside pipe.T
That looks quite nicely made inside. You always wonder if expensive stainless mufflers are "stainless" inside as well
I like using 2 bolt flanges, if you clock them right they only hang 8 to 10mm lower than the pipe. Plus you can just about weld them to the pipe with your eyes shut, which is handy in my case.The only other change I'd make is to make sure it can all come apart with Vbands. I HATE trying to get exhausts apart down the track if required for maintenence
The 3 wheel Reliant exhaust is 2" mandrel bent aluminium, I cut the flanges out of 6mm alloy plate. I set the whole thing up with jubilee clips and strips of metal to support the joins then got a mate to TIG it together as I only have a stick welder. He just tacked it between the metal strips, then removed them and then fully welded it. The photo is a bit deceptive, it has over 6" of ground clearance at the flange.
The local custom exhaust shop reckoned my '57 Studebaker was "impossible" to fit a dual exhaust on.
Pfffft, hold my beer.
Mind you it wasn't easy. The LH engine pipe now runs forward goes across the front under the harmonic balancer and back down under the RH pipe and straiģht to the diff. The RH pipe runs down to the back of the engine, crosses over in the recess between the bellhousing and sump then runs diagonally back across to meet the other pipe on the RH side.
That way they ended up up the same overall length.
Because the petrol tank is offset to the left there is nowhere to fit a pipe so I ran them both out the R side between the tank and the spare wheel's well, then kicked them back across to the middle and fitted a "Buck Rogers" quad central outlet for a bit of '50s pizzazz.
Just got to remember the left pipes are the right bank and the right pipes are the left bank when listening to the engine at the back.

This has exhaust has 6 sets of flanges on it.
Oh ... if I can find cheap flanges ... Yes! The other positive of Vbands is you can clock themI like using 2 bolt flanges, if you clock them right they only hang 8 to 10mm lower than the pipe. Plus you can just about weld them to the pipe with your eyes shut, which is handy in my case.
The 3 wheel Reliant exhaust is 2" mandrel bent aluminium, I cut the flanges out of 6mm alloy plate. I set the whole thing up with jubilee clips and strips of metal to support the joins then got a mate to TIG it together as I only have a stick welder. He just tacked it between the metal strips, then removed them and then fully welded it. The photo is a bit deceptive, it has over 6" of ground clearance at the flange.
View attachment 216931
The local custom exhaust shop reckoned my '57 Studebaker was "impossible" to fit a dual exhaust on.
Pfffft, hold my beer.
Mind you it wasn't easy. The LH engine pipe now runs forward goes across the front under the harmonic balancer and back down under the RH pipe and straiģht to the diff. The RH pipe runs down to the back of the engine, crosses over in the recess between the bellhousing and sump then runs diagonally back across to meet the other pipe on the RH side.
That way they ended up up the same overall length.
Because the petrol tank is offset to the left there is nowhere to fit a pipe so I ran them both out the R side between the tank and the spare wheel's well, then kicked them back across to the middle and fitted a "Buck Rogers" quad central outlet for a bit of '50s pizzazz.
Just got to remember the left pipes are the right bank and the right pipes are the left bank when listening to the engine at the back.
This has exhaust has 6 sets of flanges on it.
View attachment 216933View attachment 216932
My one all comes apart - nothing welded, just high temp. silicone. Original one bolt clamps have a bit of paint on them.Oh ... if I can find cheap flanges ... Yes! The other positive of Vbands is you can clock them
My one all comes apart - nothing welded, just high temp. silicone. Original one bolt clamps have a bit of paint on them.
Want to make a bet
Just try getting it apart in 2 years time! (if its the tubing slotted together). exhausts effectively weld themselves together really quickly if 'slotted/overlapped' for assembly.Yes, it is slotted and overlapped. The beauty of the D is that you just drop the whole exhaust with the 6 bolts of the muffler mount and from the down pipe or flex and then work on the floor. A bit of torch heat and they twist apart.
Yes, it is slotted and overlapped. The beauty of the D is that you just drop the whole exhaust with the 6 bolts of the muffler mount and from the down pipe or flex and then work on the floor. A bit of torch heat and they twist apart.
Interesting, that has never been my experiance. You often break the flexible pipe as its impossible to remove. You completely destroy the connections getting them apart (after spending hours chiseling the slots open etc ...). I find it easier just to cut/re-weld it.