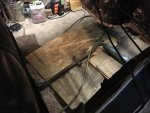
Preparing to replace the rusty front floor in my 1954 11BL. I have the replacement floor on hand. Before I start cutting out the old floor, to what extent is the floor a structural element? Do I need to weld braces across the door openings and diagonals to keep the structure from sagging or is there sufficient remaining rigidity? Other than the fuel line and brake line that go through the left side Vee brace is there anything else to look out for when I start using the body saw?

You are using an out of date browser. It may not display this or other websites correctly.
You should upgrade or use an alternative browser.
You should upgrade or use an alternative browser.
11BL rusty floor
- Thread starter citroenthusiast
- Start date
All the strength is in the triple thicknesses built into the sills that support the floor. You can remove the entire floor and still maintain structural integrity. It would be wise to tack weld the floor in by working around the edges with diagonally opposite welds. Ie. rear right corner --front left corner --rear left corner --front right corner. Then keep halving the distances. Next welds would be left middle--right middle-- rear middle-- front middle etc. Eventually by continuing the process of halving you can get down to 25mm spacings. This keeps distortion to an absolute minimum. I assume you will be using TIG?
Thankfully I have never had to replace the floor, but I have hand made and replaced the complete boot( trunk to you Americans) on a 51 11BL. It was a fun exercise. Turned out pretty well though. This was before the Continentals were fabricating exact replicas of these panels. It would have made life a lot easier!
Thankfully I have never had to replace the floor, but I have hand made and replaced the complete boot( trunk to you Americans) on a 51 11BL. It was a fun exercise. Turned out pretty well though. This was before the Continentals were fabricating exact replicas of these panels. It would have made life a lot easier!
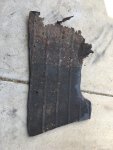
Thanks, yes I will be using the TIG welder. Same as I used to reconstruct the firewall behind the battery box. I may have to make a small angle piece to transition up the sill in one place where the rust extended beyond the horizontal part of the floor. You can't see it in the photo, but the P/O used something that looks like a street sign to cover the holes.

Ooh I like Swiss Cheese!
Are you going to replace the complete floor, or just the drivers side section that is rusty?
You have a small section of rust in the outer sill as well!
Are you going to replace the complete floor, or just the drivers side section that is rusty?
You have a small section of rust in the outer sill as well!
I have a full front floor panel. The rest of the floor seems to be OK. I will probably have to make a small "L" section to repair the transition between the floor and the sill where you see the sill has gone away.... The passenger side has a few small holes but is not nearly as bad.
Good luck with it John! You are a brave man, because this is no easy task!
Thanks. The first step will be to drill out the pop rivets holding the patch to the sill and the solid part of the floor, then I can finally begin a proper repair. This is the last reconstruction job other than going through the transmission. Then it is just a matter of bolting parts together.
In for a penny, in for a pound. The rotten floor is out. It looks like the sill repair will be pretty straightforward, a simple L shaped patch panel and I will be ready to put in the reproduction floor. Unfortunately, the triangular reinforcements on the repair panel don't line up (not even close) to the reinforcements in the original floor. I will probably make some additional gussets to reinforce the transition but it also complicates routing the fuel line and the rear brake line. (When I removed the rear brake line I discovered the P/O had made it out of common household copper tubing with simple flared ends - YIKES. I will definitely replace that with proper Cunifer lines with double-flared ends).


Here is the sill. The bottom of the sill is in good shape, thanks to the substantially thicker metal and the weep holes in the bottom.

Here is the sill. The bottom of the sill is in good shape, thanks to the substantially thicker metal and the weep holes in the bottom.View attachment 125559
That should be simple enough.... As you actually have something to weld too! (says he who is running away in fright
John that is the inner sill that is visible but once you cut away the rusted steel how will the central sill panel be? Remember that these sills are made of three sections of steel sheet, inner outer and centre!
I'm into Peugeots but stumbled onto this thread. Doesn't really matter, a car is a car, is a car.
As one who could be doing some rust repairs I'll be following this great thread closely. Please keep us posted on your progress.
As one who could be doing some rust repairs I'll be following this great thread closely. Please keep us posted on your progress.
Hi Peter C
Have you had look at the "My new challenge - 1964 ID19F Safari" thread yet? Fill yer boots!
Have you had look at the "My new challenge - 1964 ID19F Safari" thread yet? Fill yer boots!
Those weep holes look like rust holes ?
As Gerry points out the floor's not necessarily structural and P/O had put in a new sheet on my T/A but when fixing the firewall deficiencies I decided to "connect" the firewall to the undamaged floor section at the box-section cross-brace {seat mounting}. This I did by plating over the previous "repair" at the three locations where the "vee brace" is underneath, then through-drilled from the inside to the flanges of the vee brace, followed by a series of plug-welds holding my new plate to the 'old' repair to the vee brace. Hopefully that will be enough for it to cope with whatever Aussie Roads throw at it in the future.
Rob
Rob
Yes, those are rust holes where the sill inner wall meets the bottom of the sill. Here is what the bottom of the sill looks like from below. I Identified two small round holes in the bottom of the sill as weep holes (not visible in the photo due to the resolution). There is still good metal under 80% of the seat support so I am (cautiously) optimistic that part of the repair will be fairly straightforward. I will post more later today as I cut away the bad part of the sill inner wall.Those weep holes look like rust holes ?
Cut away the rest of the rotten metal. Underneath looks pretty good. I'm sure I can find something to weld to here.

Mine had the same problem in that one inner sill area like yours. Yes drain holes under the sill are good. I used them to spray wax / oil in to slow further problems. My floor was very sound just the little bit of Swiss on the inner sill footwell (LHS)