Hi Shane,
Those stripping disks contain silicon carbide as an abrasive so the silicon could have come from there. You can buy a product called "silicon off" which can remove it.
The primer Gerry is referring to is a weak acid etch which also may work in prepping the surface correctly.
POR based stuff is not the only thing that lasts - the cantrail on my 71 was done in killrust 15 years ago (before trying POR) and is still perfect.
I hope you get it sussed - you've done a great job so far.
There is something else which I've just used which I think is fabulous.
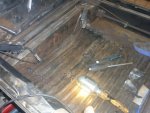
I took the opportunity to vacumn out the box sections with a 3/4" hose taped to the end of a vac cleaner - then I filled the sills and box sections with engine oil - and when that drained off I then sprayed some Wurth transparent cavity wax. It's a really nice product to use - nice and runny, then slowly hardens to a soft coating - with no real smell. Perfect for D model box sections.
All the best,
Mark...")
Those stripping disks contain silicon carbide as an abrasive so the silicon could have come from there. You can buy a product called "silicon off" which can remove it.
The primer Gerry is referring to is a weak acid etch which also may work in prepping the surface correctly.
POR based stuff is not the only thing that lasts - the cantrail on my 71 was done in killrust 15 years ago (before trying POR) and is still perfect.
I hope you get it sussed - you've done a great job so far.
There is something else which I've just used which I think is fabulous.
I took the opportunity to vacumn out the box sections with a 3/4" hose taped to the end of a vac cleaner - then I filled the sills and box sections with engine oil - and when that drained off I then sprayed some Wurth transparent cavity wax. It's a really nice product to use - nice and runny, then slowly hardens to a soft coating - with no real smell. Perfect for D model box sections.
All the best,
Mark...