S16 Rebuild

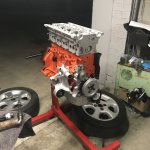
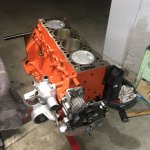
So what are my options here gents... Trying to get this done by the end of the month and trying my best to be patient...

I searched the glyco catalogue (below - highlighted in yellow) and they say .100 is within spec... just, but feel kinda sketchy about running a rebuild at the limit of the spec.

OPTION A - Run it, and face what consequences?

OPTION B - Get the undersized .30mm, and have to the crank grinded to suit, correct? What will that set me back.

InkedAnnotation 2020-06-07 174936_LI.jpg
 
Option B for sure.
Buy the undersize bearings and supply them to your engineering house and get the crank reground to suit them. 0.002" sounds about right. Whatever it costs is money well spent.
Option A will result in low oil pressure and probably lead to further problems later on.
 
Hey guys,

UPDATES:

Got the crank reground for the thicker bearings. Bottom end done. Top end done (doing those head bolts with just myself on an engine stand that likes to roll around wasn't fun - hence the tires).

Top end all timed... I didn't have the proper timing pins for the pulleys... so in order to could get a little bit of tension on the rollers without spinning the crank, you can see I locked the cam's in place in a makeSHIFT way.

SO, I'm getting ready to do the flywheel/clutch and put gearbox on with the NEW QUAIFE inside.

MY DUMB QUESTION:
The Quaife LSD seems to be kinda loose in the bell housing. I'm assuming that once the driveshafts are fully driven into place from both sides and the speedo housing is on, it will be propped up and not knocking about.... Is this correct, or have I done something wrong.... Video to demonstrate the movement...

https://www.dropbox.com/s/m2jc8aax4kym1kd/IMG_1106.MOV?dl=0
 

Attachments

  • IMG_1047.jpg
    IMG_1047.jpg
    358.4 KB · Views: 245
  • IMG_1056.jpg
    IMG_1056.jpg
    346.7 KB · Views: 254
  • 61831590023__78B5B52E-8F13-4CE9-AB98-EA6AB4685819.jpg
    61831590023__78B5B52E-8F13-4CE9-AB98-EA6AB4685819.jpg
    376.2 KB · Views: 290
You can use Ø6.5mm drills to lock the pulleys. Unsure about the diff. Ask Adrian.
 
After I bolted up the speedo housing on the box it all got snug and the lsd wasn’t flopping about.

It’s getting closer to the business end now.

Got a timing kit with the flywheel lock to check my work and it was all spot on. Just didn’t know how else to lock the flywheel without risking snap the box housing my jamming it.

Starting to get nervous. Does anyone else just get too nervous to turn the key after a big resto?
 
1. Getting out these wheel bearings was a task. o_O 
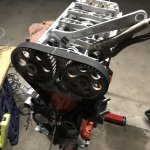
Two propane flames, a shop press, a custom hand sanded pulley to match the diameter of the tiny .5mm lip on the outer shell that protrudes from the carrier.... FAR OUT! Happy that's done though...

2. Also, gutted to find out I received the wrong Ferodo pads for the 266mm lucas caliper... apparently there's two types (1994-1997 AND 1997-2001) that are different sized pads (and calipers I guess)... Does anyone have the newer 1997-2001 caliper set laying about - I can swap them two sets of the older style:p?

Getting closer....slowly.

3. ALSO, still hunting 1.9 Injectors and Timing Cover

4. Can someone please explain what the resonator box does (last pic) in the filter/intake system. I had previously blanked it since the previous owner had snapped the mount and didn't fix it, causing me to suck up a whole heap of water from a deep puddle which flooded my engine.

Image from iOS (5).jpg

Image from iOS (6).jpg

Image from iOS (7).jpg

Image from iOS (8).jpg
 
Good progress, coming along nicely.

As for the chamber you mentioned, it looks like a Helmholtz resonator (#8) used to take advantage of the pulse/pressure waves created when an inlet valve closes. It increases volumetric efficiency/cylinder fill.-ie: like forced induction.
 
Last edited:
Woah. That's pretty fascinating. I started reading this: https://www.brighthubengineering.co...ake-resonators-improve-volumetric-efficiency/

Looks like I'm in the hunt for one of those now, as the size/volume and neck shape is tuned to the engine.


Good progress, coming along nicely.

As for the chamber you mentioned, it looks like a Helmholtz resonator (#8) used to take advantage of the pulse/pressure waves created when an inlet valve closes. It increases volumetric efficiency/cylinder fill.-ie: like forced induction.
 
Which covers are you after? There's the inner one behind the cam gears, a small filler piece on the front, crankshaft cover and the large outer cover.
 
Woah. That's pretty fascinating. I started reading this: https://www.brighthubengineering.co...ake-resonators-improve-volumetric-efficiency/

Looks like I'm in the hunt for one of those now, as the size/volume and neck shape is tuned to the engine.

If it is a resonator, it is an awkward design since it is behind the filter (opposite side of the filter to the valves/intake) so the wavefront has to travel back and forth through the filter, which to my mind says it will be less effective (it will have a damping effect). I would say it's more for retaining debris and crap coming in through the intake but I am no intake engineer. It could be that it was put there because of space restrictions or who knows what other considerations. The plenum usually takes care of the resonator job.

That said, you could experiment with building your own chamber there, the shape doesn't matter, just the volume. Something cylindrical should work fine if it is indeed a resonator.
 
The XU10J4RS engine had two resonators. One connected roughly the same as the diagram (#8), and another under the intake runners of the manifold.
Maybe with two, they could harness the pulse waves better to improve the volumetric efficiency.
 
In terms of the cover, probably the whole assembly is best.
I hope you enjoy my picasso btw.
I have:
1. Main piece, (although cracked where the small hex bolts go)
2. Side piece, radiator side (OK condition)
3. Main crank drive protector behind crank pulley (OK condition)
Missing:
4. Top piece that covers cam pulleys and rollers (firewall side)
5. Metal Shim to lock it
Screenshot 2020-10-27 161048.jpg
Which covers are you after? There's the inner one behind the cam gears, a small filler piece on the front, crankshaft cover and the large outer cover.
 
schlitzaugen, you're right in the fact it's before the filter, meaning air would have to travel back against the filter.

pgti6 - XU10J4RS is the gti6, where as the XU10J4 is the s16 - likely different induction setup due to ACAV. I know the intake manifold is quite
different.

I had thought of using a stiff plastic bottle, but really don't know the volume required as the previous part is MIA due to previous owner.

If it is a resonator, it is an awkward design since it is behind the filter (opposite side of the filter to the valves/intake) so the wavefront has to travel back and forth through the filter, which to my mind says it will be less effective (it will have a damping effect). I would say it's more for retaining debris and crap coming in through the intake but I am no intake engineer. It could be that it was put there because of space restrictions or who knows what other considerations. The plenum usually takes care of the resonator job.

That said, you could experiment with building your own chamber there, the shape doesn't matter, just the volume. Something cylindrical should work fine if it is indeed a resonator.
 
Does your cover have 2 or 3 Allen headed bolts at the top (like attached pic)? Is this the metal shim, the long piece in other pic?

I'm well aware of the differences between J4 & J4RS. I mentioned the RS BECAUSE if differed to yours and we were talking resonators.

* And BTW- your pic is of an XU9J4! :)

IMG_1505.JPG
IMG_1506.JPG
 
schlitzaugen, you're right in the fact it's before the filter, meaning air would have to travel back against the filter.

pgti6 - XU10J4RS is the gti6, where as the XU10J4 is the s16 - likely different induction setup due to ACAV. I know the intake manifold is quite
different.

I had thought of using a stiff plastic bottle, but really don't know the volume required as the previous part is MIA due to previous owner.

Just get a length of storm water drain pipe of the right diameter and another one that fits fest inside. Plug both ends and slide the inner tube in and out until you get the desired effect (whatever that is; this would be best run on a dyno, but on a convenient road with ups and downs might work too). You'd have to plumb it in somehow, but I am sure you can find a way. Once you find the volume you like, you can easily measure it and make something more permanent. If you use zinc plated steel you can just solder the join when you are satisfied and that way you also have the luxury of being able to solder tabs/brackets to it to attach it permanently and solidly wherever it fits.
 
HAHA you're right, that photo isn't my engine... and yes the exhaust gives it away. It's from a neat little video where I could get a pic of the whole thing easily to scribble on...


About the holes, I'll check - The car is at a different location from my house so will know in the next couple of days.


Does your cover have 2 or 3 Allen headed bolts at the top (like attached pic)? Is this the metal shim, the long piece in other pic?

I'm well aware of the differences between J4 & J4RS. I mentioned the RS BECAUSE if differed to yours and we were talking resonators.

* And BTW- your pic is of an XU9J4! :)
 
Yeah, sounds like a plan. I'm not entirely sure it will perceptible at the wheel, but a fun experiment to run nonetheless.

Just get a length of storm water drain pipe of the right diameter and another one that fits fest inside. Plug both ends and slide the inner tube in and out until you get the desired effect (whatever that is; this would be best run on a dyno, but on a convenient road with ups and downs might work too). You'd have to plumb it in somehow, but I am sure you can find a way. Once you find the volume you like, you can easily measure it and make something more permanent. If you use zinc plated steel you can just solder the join when you are satisfied and that way you also have the luxury of being able to solder tabs/brackets to it to attach it permanently and solidly wherever it fits.
 
Top