I did see that, weirdly though if I go to fit them to the correct side they don't fit properly. The part has been repaired at some point in the past so it's possible the mounting brackets aren't quite right anymore

You are using an out of date browser. It may not display this or other websites correctly.
You should upgrade or use an alternative browser.
You should upgrade or use an alternative browser.
Resurrecting a Goddess.......Twice
- Thread starter faulksy
- Start date
Just before christmas, the paint guys have managed to work a minor miracle. Having handed them a pile of burnt, bent and badly repaired panels the result is somewhat amazing.


The platinum blue paint looks great, can't wait to see it out in the sunlight.
Now I just have to remember where all the parts occupying my living room go and hunt up the last few pieces of pallas trim. Watch this space....
The platinum blue paint looks great, can't wait to see it out in the sunlight.
Now I just have to remember where all the parts occupying my living room go and hunt up the last few pieces of pallas trim. Watch this space....
That's just stunning
SpectacularIt certainly looks the same Paul. Perhapd some careful bending is needed to straighten the brackets on mine a little. In other news we have another exiting update from the paint shop


Just the bonnet and front wings to go. Then they will hang and align everything before sticking it onto a tow truck back to the workshop for final assembly
 Do you have the stress of remounting the panels without scratching them up ?
Foolishly the panel shop offered to rehang and align all the panels so all I have to do is fit the glass and lights
Platinum blue is about the only colour from the 1970 model year I like so it’s a happy coincidence that it’s the original colour.
Platinum blue is about the only colour from the 1970 model year I like so it’s a happy coincidence that it’s the original colour.
The glass and lights..... Michael there is soooo much more to do but call me when your ready and we will get the job doneFoolishly the panel shop offered to rehang and align all the panels so all I have to do is fit the glass and lights
Platinum blue is about the only colour from the 1970 model year I like so it’s a happy coincidence that it’s the original colour.
That is a beautiful colour for these cars, looks brilliant.
Now to finish the opus. Only another million years, but worth it.
Also, the shop seems to give a damn about your car and their work. I wouldn't touch that thing before the paint cures definitively.
Now to finish the opus. Only another million years, but worth it.
Also, the shop seems to give a damn about your car and their work. I wouldn't touch that thing before the paint cures definitively.
Last edited:
I did see that, weirdly though if I go to fit them to the correct side they don't fit properly. The part has been repaired at some point in the past so it's possible the mounting brackets aren't quite right anymore
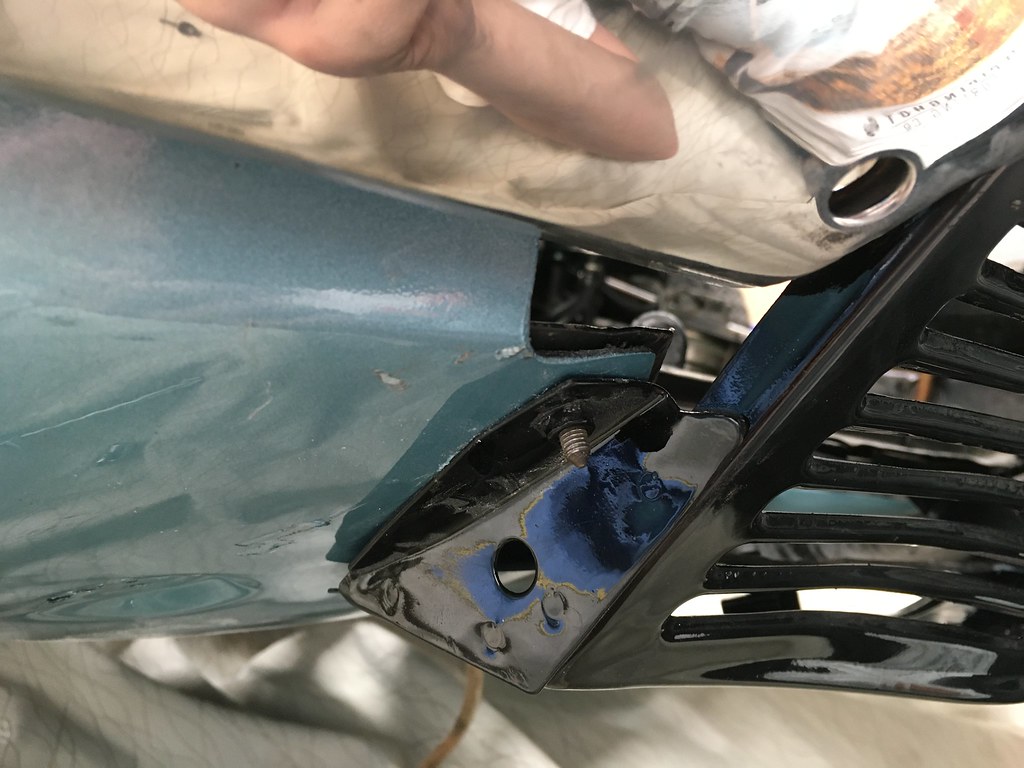
I was going to say, if you compare your pictures to the other guy's pictures, it looks like your brackets are offset down a tad. Can you deform them a bit to move the mounting holes where they should be? Or can you slot the holes and just use cap bolts or similar (I see one of the holes seems to have a captive nut).
The right way to do it would be to cut them off and re-weld in the right place (or weld the holes, drill, tap, so on).
The holes with captive nuts are used to bolt the whole panel to the back edge of the boot. Last time it was all together the panel lined up fine within the rear bumper.
The light units mount into the plain holes. I’ll have another go at tweaking them amd see how it goes. Cutting the parts off and welding seems a bit drastic
The light units mount into the plain holes. I’ll have another go at tweaking them amd see how it goes. Cutting the parts off and welding seems a bit drastic
I have a suspicion someone might have done it in the past hence the misalignment that is why I suggested it. But I guess slotting the holes works just a s well as long as you can reach around the back to bolt the lights on.
Ok campers, time for an update. A few things have happened before and after christmas the biggest of which is that the panel beater has delivered the car back to me! On the day of delivery, 07/01, I turned up at their shop to find him and the tow truck driver scratching their heads wondering what to attach the winch to. Turns out the front valance was only held on with cable ties so it was taken off and the front wishbones were used. That turned out to be but one of the many challenges that day.

The hard part now is knowing where to start. fitting the headlights seemed a safe bet anda nice way to ease into reassembly. Step one, remove a front wing. This proved to be a very bad idea.
This revealed many areas of the inner wing that hadn't been painted.


Hmm, not good. A quick phone call and some photos later and a time was arranged that day for the wings to be picked up and painted. The panel beater was as surprised as I was and both wings had the same problems.
Having hit a roadblock at the front I thought I'd change tack and go to the other end of the car to fit the boot lock and struts. The boot lock was no problem and the struts went in fine. All was going well till i tried to close the boot......
Some gentle pressure was applied to the back edge and suddenly one side became a lot more floppy. Turns out the right edge of the boot lid had bent and cracked as I tried to close it. Many colourful words later and the culprit was found. In a case of same same but not, Clever Clogs here had swapped the struts left to right. Instead of smoothly closing they hit a point and jammed. That in itself should't cause the boot lid to bend so further inspection was called upon and found the lid had bent at a weak point where the metal was very thin. The panel beater is going to touch up the paint and bond in some reinforcement to both sides.
I decided that is was definitely time to call it quits after that stunt having returned the boot lid and front wings to the panel beater.

The hard part now is knowing where to start. fitting the headlights seemed a safe bet anda nice way to ease into reassembly. Step one, remove a front wing. This proved to be a very bad idea.
This revealed many areas of the inner wing that hadn't been painted.
Hmm, not good. A quick phone call and some photos later and a time was arranged that day for the wings to be picked up and painted. The panel beater was as surprised as I was and both wings had the same problems.
Having hit a roadblock at the front I thought I'd change tack and go to the other end of the car to fit the boot lock and struts. The boot lock was no problem and the struts went in fine. All was going well till i tried to close the boot......
Some gentle pressure was applied to the back edge and suddenly one side became a lot more floppy. Turns out the right edge of the boot lid had bent and cracked as I tried to close it. Many colourful words later and the culprit was found. In a case of same same but not, Clever Clogs here had swapped the struts left to right. Instead of smoothly closing they hit a point and jammed. That in itself should't cause the boot lid to bend so further inspection was called upon and found the lid had bent at a weak point where the metal was very thin. The panel beater is going to touch up the paint and bond in some reinforcement to both sides.
I decided that is was definitely time to call it quits after that stunt having returned the boot lid and front wings to the panel beater.
Today was somewhat more successful than yesterday. The glass has been in storage for nearly 2 years so now seems like a good tim to dig it out and see whats what. The front 2 shattered in the heat of the fire but thats an easy fix. The rear 2 ended up with the most amazing smoked effect turning them completely opaque.

The coating is a mixture of soot and oils from the burning foam, vinyl and carpet. It does show how much of the glass remains inside the door, they were fully wound up at the time. Dishwashing liquid seemed like a good place to start and worked well. You can see just how dense the coating was.

Rummaging through all the boxes turned up the requisite parts to put the glass into the doors.

I got all the way through fitting the winder mechanism and glass to the front door before realising that panel beaters had fitted the locks, they had taken the pushrods off them. So, everything had to come out as there is no way to fit the rods with the lock in the door let alone with the glass in the way. In a moment of good luck this was no bad thing as they had also fitted the rear door lock to the front door and vice versa.

Spot the difference.......
With pushbutton doors, the front can only be locked from the outside and the rear from the inside. For that to work the rear door lock (bottom) has a notch cut into the lever that the pushrod attaches to, the front door lock (top) does not.

As they say, everything is quicker the second time around. The shiny silver inside the door is sound deadening to replace the bitumen mats that would normally be there but were lost to the paint stripping baths. It makes a HUGE difference to the drumming. I also added some offcuts to the backside of the inner panel.
If you happen to be looking at a pile of DS window glass you may well start wondering what is what. Front and rear are different shapes so that's straight forward but how to tell left from right as there are no part numbers on them. Looking at the steel band on the bottom edge you will notice a lip on one side. This needs to face the exterior of the door.

Another trap i fell into was a difference between a push button door and a lift up handle door. One of my original doors was in need of a lot of work. We ended up using two doors to make one using the structure of a lift up handle door and the skin of my push button door. The door handle pushrods must be slightly different on a lift up handle door as the inner panel was missing the mounting holes for the nylon block at the midpoint of the pushrod. Out with the drill then....

One hole was already there but needed enlarging and the other is new.
Getting the glass centred in the openings took some stuffing about. The glass has to come out every time a shim needs to be added. An hour later and all is looking good. The big danger is smashing a window whilst setting the max height and fore/aft position.
The final job for today is swapping over all the old aluminium strike plates for chrome pallas ones. I should have quite while I was ahead. What ensued was 3 hours of slamming doors.

Each one has to be adjusted differently to suit the door. If they aren't in EXACTLY the right position and angle then the door just bounces off the strickplate or will get to the first notch and jam. The last time I did this job all the windows were wound down. When they were wound up none of the doors would close anymore. Fortunately that problem didn't happen this time, the doors must be much stiffer this time having been pulled apart and welded back together.
Much frustration later and all 4 doors close and lock albeit requiring a bit more force than I'd like but at least they work.

Until tomorrow
The coating is a mixture of soot and oils from the burning foam, vinyl and carpet. It does show how much of the glass remains inside the door, they were fully wound up at the time. Dishwashing liquid seemed like a good place to start and worked well. You can see just how dense the coating was.
Rummaging through all the boxes turned up the requisite parts to put the glass into the doors.
I got all the way through fitting the winder mechanism and glass to the front door before realising that panel beaters had fitted the locks, they had taken the pushrods off them. So, everything had to come out as there is no way to fit the rods with the lock in the door let alone with the glass in the way. In a moment of good luck this was no bad thing as they had also fitted the rear door lock to the front door and vice versa.
Spot the difference.......
With pushbutton doors, the front can only be locked from the outside and the rear from the inside. For that to work the rear door lock (bottom) has a notch cut into the lever that the pushrod attaches to, the front door lock (top) does not.
As they say, everything is quicker the second time around. The shiny silver inside the door is sound deadening to replace the bitumen mats that would normally be there but were lost to the paint stripping baths. It makes a HUGE difference to the drumming. I also added some offcuts to the backside of the inner panel.
If you happen to be looking at a pile of DS window glass you may well start wondering what is what. Front and rear are different shapes so that's straight forward but how to tell left from right as there are no part numbers on them. Looking at the steel band on the bottom edge you will notice a lip on one side. This needs to face the exterior of the door.
Another trap i fell into was a difference between a push button door and a lift up handle door. One of my original doors was in need of a lot of work. We ended up using two doors to make one using the structure of a lift up handle door and the skin of my push button door. The door handle pushrods must be slightly different on a lift up handle door as the inner panel was missing the mounting holes for the nylon block at the midpoint of the pushrod. Out with the drill then....
One hole was already there but needed enlarging and the other is new.
Getting the glass centred in the openings took some stuffing about. The glass has to come out every time a shim needs to be added. An hour later and all is looking good. The big danger is smashing a window whilst setting the max height and fore/aft position.
The final job for today is swapping over all the old aluminium strike plates for chrome pallas ones. I should have quite while I was ahead. What ensued was 3 hours of slamming doors.
Each one has to be adjusted differently to suit the door. If they aren't in EXACTLY the right position and angle then the door just bounces off the strickplate or will get to the first notch and jam. The last time I did this job all the windows were wound down. When they were wound up none of the doors would close anymore. Fortunately that problem didn't happen this time, the doors must be much stiffer this time having been pulled apart and welded back together.
Much frustration later and all 4 doors close and lock albeit requiring a bit more force than I'd like but at least they work.
Until tomorrow
looks great good jobJust before christmas, the paint guys have managed to work a minor miracle. Having handed them a pile of burnt, bent and badly repaired panels the result is somewhat amazing.
The platinum blue paint looks great, can't wait to see it out in the sunlight.
Now I just have to remember where all the parts occupying my living room go and hunt up the last few pieces of pallas trim. Watch this space....
A minor update and a question. Fitted the exterior window seal and stainless trim along the top edge of the drivers side no problems.

I then went to fit the inner fuzzy window seal and have some up with a problem. Part of the seal covers the holes for the inner piece of stainless trim

The parts book doesn't show a different part number for pallas cars. Am I missing something really obvious or are the remanufactured fuzzy seals the wrong profile?
It does sit up from the top edge of the door so maybe the stainless trim will slide in underneath it.

I then went to fit the inner fuzzy window seal and have some up with a problem. Part of the seal covers the holes for the inner piece of stainless trim
The parts book doesn't show a different part number for pallas cars. Am I missing something really obvious or are the remanufactured fuzzy seals the wrong profile?
It does sit up from the top edge of the door so maybe the stainless trim will slide in underneath it.
Think I may have answered my own question. Just went to the Citroen Classics site and read the description for this part. From what they say, I've got the seal upside down in the pics above. The lip should be inside the door and hook in under the edge of the steel. I'm positive it didn't say that when i bought the seal 2 years ago....
Does that sound right to anyone?
Does that sound right to anyone?
My doors are off the car but I was able to check one. There is no room under the Pallas trim for the lip. It would all stand too proud. Also, the curved edge of the inner s/s finishing strip extends over the top of the door edge - meaning that the lip of the seal can't be folded over the top as it would get in the way of that lip. I think the photo on the Citroen Classics website shows the seal the correct way up.

Another day and more progress, it's nice to see parts going back on and empty boxes piling up. The front wings came back from being touched up so the time has come for headlights to be fitted.

Prior to fitting the stainless steel trim around the headlights, I filled the grove with grease. This has 2 purposes, firstly it makes it easier to fit them and secondly, the stainless trims have a bad habit of taking off chunks of paint while being fitted. The grease offers a modicum of protection to the bare steel.
The seal between the glass and wing is held in place with a few dabs of super glue before the glass is clamped in.

The seal between the plastic housing and the glass is bog standard draft seal from Bunnings.

All together and fitted back to the car. I realised after taking the photo that I'd forgotten the seal between the wing and bumper so it had to come off again. It was at this point the car decided to claim a chunk of my finger, the edges of all these panels is razor sharp!


An original set of stainless steel indicators is slowly making its way over from Italy and will be fitted in due course. For now the slightly yellowed plastic ones will do. Seeing as I was on a roll, the front license plate panel was fought into place. It would have been far easier to fit without the bumper in place but then where's the fun in that?

Final job for today was to fit the lower inner wheel arch panels to both sides. In theory we are now ready for the front valence to be bolted in. The lights were all working until I managed to lose the ground wire for the passenger side.......
DS electrics are fun. Without the ground wire, turning on the right indicator caused the left high beam to flash!

Prior to fitting the stainless steel trim around the headlights, I filled the grove with grease. This has 2 purposes, firstly it makes it easier to fit them and secondly, the stainless trims have a bad habit of taking off chunks of paint while being fitted. The grease offers a modicum of protection to the bare steel.
The seal between the glass and wing is held in place with a few dabs of super glue before the glass is clamped in.
The seal between the plastic housing and the glass is bog standard draft seal from Bunnings.
All together and fitted back to the car. I realised after taking the photo that I'd forgotten the seal between the wing and bumper so it had to come off again. It was at this point the car decided to claim a chunk of my finger, the edges of all these panels is razor sharp!
An original set of stainless steel indicators is slowly making its way over from Italy and will be fitted in due course. For now the slightly yellowed plastic ones will do. Seeing as I was on a roll, the front license plate panel was fought into place. It would have been far easier to fit without the bumper in place but then where's the fun in that?
Final job for today was to fit the lower inner wheel arch panels to both sides. In theory we are now ready for the front valence to be bolted in. The lights were all working until I managed to lose the ground wire for the passenger side.......
DS electrics are fun. Without the ground wire, turning on the right indicator caused the left high beam to flash!
Thanks for that image Paul. Based on that I'd say I was definitely trying to fit the seal upside down.My doors are off the car but I was able to check one. There is no room under the Pallas trim for the lip. It would all stand too proud. Also, the curved edge of the inner s/s finishing strip extends over the top of the door edge - meaning that the lip of the seal can't be folded over the top as it would get in the way of that lip. I think the photo on the Citroen Classics website shows the seal the correct way up.
View attachment 129225
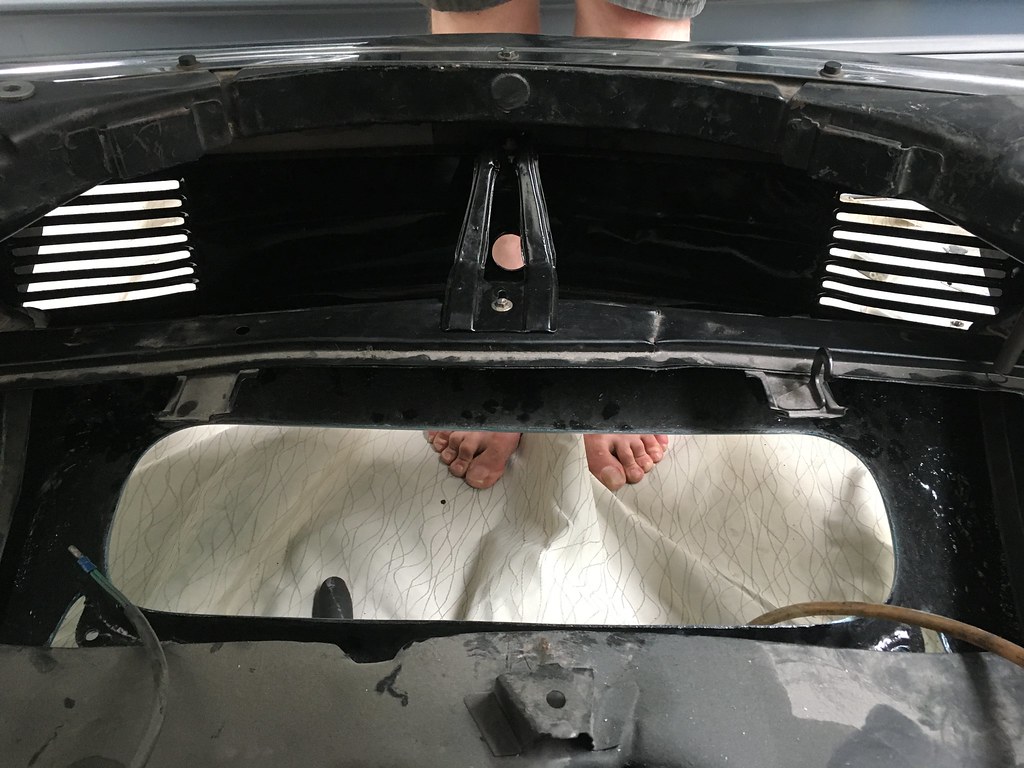
In a final fit of enthusiasm for the week, the front valance is now bolted in. What a fight that was.... Some of the bolts pass through several pieces and everything has to be attached in the right order otherwise none of it fits.
When the paint was stripped from the original valance it came back looking like a piece of lace. What steel was left was very thin and not suitable for welding. A second one was sourced with the idea of make one from 2 but that was in worse shape than the one I had. An email to Citroen Classics confirmed they were able to ship out a new fibreglass one so an order was placed and the part arrived at the panel beater in a just over a week!

Getting everything to line takes a couple of pairs of hands. The valance and number plate panel bolt through the front cross member and bumper brackets. Life is much easier without the bumper overriders in the way.
I think at some point this car has been hit at the front on the passenger side as the valance had to be bent slightly to line up all the bolt holes on the underside of the chassis legs. The car still drives fine and stays dead straight on the road so it may just be the very end of the chassis leg that is bent. You can see how the front brace is kinked just to the right of the bumper bar bracket. I gave up trying to get the 2 M7 bolts at the lower end of the overriders do up.

The front end is pretty much done so it's time to give my hands a week to heal. I'd forgotten how much skin you're likely to lose putting one of these back together.
When the paint was stripped from the original valance it came back looking like a piece of lace. What steel was left was very thin and not suitable for welding. A second one was sourced with the idea of make one from 2 but that was in worse shape than the one I had. An email to Citroen Classics confirmed they were able to ship out a new fibreglass one so an order was placed and the part arrived at the panel beater in a just over a week!
Getting everything to line takes a couple of pairs of hands. The valance and number plate panel bolt through the front cross member and bumper brackets. Life is much easier without the bumper overriders in the way.
I think at some point this car has been hit at the front on the passenger side as the valance had to be bent slightly to line up all the bolt holes on the underside of the chassis legs. The car still drives fine and stays dead straight on the road so it may just be the very end of the chassis leg that is bent. You can see how the front brace is kinked just to the right of the bumper bar bracket. I gave up trying to get the 2 M7 bolts at the lower end of the overriders do up.
The front end is pretty much done so it's time to give my hands a week to heal. I'd forgotten how much skin you're likely to lose putting one of these back together.