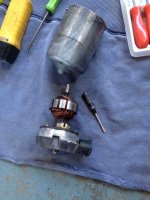
that fuel pump looks like 504ti fuel pump...... jimFunnily enough there was a slot in the rotor next to the pin, I assumed it was meant to be there as there nothing else was worn. I've got another pump and it would be interesting to see if it's the same. The only fix for worn out internal parts would be to live with it or replace as spare parts were never made. You can get brand new pumps from the Mercedes Benz Classic Center but be prepared to pay a lot for one. No issues with varnish gumming things up despite the car sitting for about 10 years and going through a flood. Varnish should clean off with carby cleaner or perhaps some metal polish.

You are using an out of date browser. It may not display this or other websites correctly.
You should upgrade or use an alternative browser.
You should upgrade or use an alternative browser.
Resurrecting a Goddess.......Twice
- Thread starter faulksy
- Start date


That is spectacular looking almost metal finished bodywork. That is a hell of a fabricator you have found there! I'm guessing this is NOT a budget paint job 
They certainly have done a great job Shane, I don't think they'll end up using any filler as all the dents were knocked out by hand. It would have bee great to see it before they took it all apart again but it looks like they managed to get pretty minimal gaps between the panels. The final cost will be roughly double the initial estimate but then they did only quote to respray a set of panels that looked pretty good. Stripping the paint away revealed a lot of problems. I should now have what all DS owners aspire to, a totally rust free DS.
In readiness for final assembly the weekend was taken over by repainting the rear light panel and yet more polishing. The light panel had been painted body colour by the previous owner instead of black.


The whole part needed to be sanded back to take out the runs and overspray

Some gloss black later and it's looking much better. The original plan was to use the same satin paint as the chassis but that had decided to set solid in the can, must have got some moisture in there at some point. Just to add to the fun, Melbourne's weather decided to get in on the act and start raining just after putting brush to panel. One quirk of this paint is that it's moisture cured so the can firmly instructs not to use it if relative humidity is aver 70%. Clearly painting in the rain wasn't ideal and a paint that normally takes hours to dry was dry in 15min! Some lights and a licence plate complete the piece.

The left lamp looks different only because it's reflector it still reflective. Weirdly I had to put the lamps upside down and swap them side to side. Fitting them properly resulted in most of the hole behind them being visible at the top edge of the lamps. Being an early '70 car it would probably have had the earlier style lamps from the factory, does anybody know if the metal panel was different?
Just for fun, the air intake duct was cleaned and polished

And finally the door handle lock barrels were replaced. Ages ago i found out that they were a bit past it when my Dad managed to unlock the boot using the petrol cap key...... Turns out that any object that would fit into the key slot could be used to operate the locks.

The handles all got a hit with some polish and are now ready to go back on. Digging through through the box of parts revealed the new set of rubber seals between the handle and door panel I'd ordered a while back had gone walkabout. I've just placed an order for some new ones with Citroen Classics so was rather surprised to find I'd already installed the previously ordered ones onto the handles.

In readiness for final assembly the weekend was taken over by repainting the rear light panel and yet more polishing. The light panel had been painted body colour by the previous owner instead of black.
The whole part needed to be sanded back to take out the runs and overspray
Some gloss black later and it's looking much better. The original plan was to use the same satin paint as the chassis but that had decided to set solid in the can, must have got some moisture in there at some point. Just to add to the fun, Melbourne's weather decided to get in on the act and start raining just after putting brush to panel. One quirk of this paint is that it's moisture cured so the can firmly instructs not to use it if relative humidity is aver 70%. Clearly painting in the rain wasn't ideal and a paint that normally takes hours to dry was dry in 15min! Some lights and a licence plate complete the piece.
The left lamp looks different only because it's reflector it still reflective. Weirdly I had to put the lamps upside down and swap them side to side. Fitting them properly resulted in most of the hole behind them being visible at the top edge of the lamps. Being an early '70 car it would probably have had the earlier style lamps from the factory, does anybody know if the metal panel was different?
Just for fun, the air intake duct was cleaned and polished
And finally the door handle lock barrels were replaced. Ages ago i found out that they were a bit past it when my Dad managed to unlock the boot using the petrol cap key...... Turns out that any object that would fit into the key slot could be used to operate the locks.
The handles all got a hit with some polish and are now ready to go back on. Digging through through the box of parts revealed the new set of rubber seals between the handle and door panel I'd ordered a while back had gone walkabout. I've just placed an order for some new ones with Citroen Classics so was rather surprised to find I'd already installed the previously ordered ones onto the handles.
Small update after visiting the paint shop yesterday. The panels are now in primer so it's full steam ahead on the paint job. Completely forgot to take any photos but life goes on. The real aim of heading down was to check all the holes for the trim clips were present and correct after all the patching and new metal work.
Just for fun the other day I chucked a compression tester onto the engine and came up with the following numbers no. 1 175psi, no. 2 180psi, no. 3 180psi and no. 4 185 psi. No idea what numbers I was expecting but that seems like a healthy set.
Just for fun the other day I chucked a compression tester onto the engine and came up with the following numbers no. 1 175psi, no. 2 180psi, no. 3 180psi and no. 4 185 psi. No idea what numbers I was expecting but that seems like a healthy set.
that's sounds perfect for a DS motor. There compression ratio isn't huge ") all the cylinders so close is pressure would mean a recent'ish rebuild wouldn't it ?
all the cylinders so close is pressure would mean a recent'ish rebuild wouldn't it ?
all the cylinders so close is pressure would mean a recent'ish rebuild wouldn't it ?The tech data book put the CR at 9:1 for a 21 EFI, I was thinking somewhere around 150psi would be good so 180 was a little surprising. I've got some receipts for work done at DS motors before the car was taken off the road some 15 years ago now and none seem to suggest a rebuild. Anything is possible though. That said, the cam followers have zero wear and the bores looked pretty good. No. 1 cylinder slowly lost pressure so maybe need to look at the valve clearances again. it's also about time to loosen and retorque the head bolts.

I'm starting to wonder if the stumble and rough running every now and then are down to worn timing components or maybe just air in the fuel line. I've yet to properly set the timing with a strobe. A pin in the bellhousing got it running and then the distributor was tweaked until the idle speed peaked and the engine revved easily.
I'm starting to wonder if the stumble and rough running every now and then are down to worn timing components or maybe just air in the fuel line. I've yet to properly set the timing with a strobe. A pin in the bellhousing got it running and then the distributor was tweaked until the idle speed peaked and the engine revved easily.
occasional? Something heat sensitive or vacuum leaks from all the hoses around the injection (that would effect the manifold pressure sensor). Does the throttle spindle swithc send the right signal (I've always assumed this switch basically emulated the accellerator pump on a carby car ... ). Its not a throttle position sensor like modern cars. it generates a square wave signal when moved if I'm remembering right
It's hard to describe but every now and then it seems to missfire and the whole engine rocks on it's mounts.
Throttle switch works fine. As you say, it just send extra injection pulses when the throttle is opened rather than telling the ECU how far open the throttle is.
Hoses are all new but it's possible there is still a vacuum leak somewhere.
Throttle switch works fine. As you say, it just send extra injection pulses when the throttle is opened rather than telling the ECU how far open the throttle is.
Hoses are all new but it's possible there is still a vacuum leak somewhere.
Is it dropping back to 2cylinders do you think ? (if so, the injection points in the bottom of the dizzie is where you look ).
).Feels more like it drops one cylinder rather than a pair. Perhaps it’s time to break out a timing light and see how stable the timing is. I may just be imagining things but something tells me the engine should run a bit smoother than it does. At idle you car see the whole car shake as the engine stumbles
hey faulksy,
this thread is great.
i've just read your bosch fuel pump part. I run a 74 vw porsche 914 that i just recommissioned after 16 years of storage.
L jetronic. same pump. (esoteric useless fact - 1974 914 1.8s ran L jetronic first in the world, the flow meter is a bosch part that ends in 001).
i think a saab might be 002. and USA beetles ran 004. porsche vw used it to beat the cali emission laws without needing smog pumps etc.
but back on track - the fuel pump bled to death from all orifices after being revived from its deep sleep. the verdict was (as you note) that they are unfixable, sealed unit etc.
we replaced it with a modern two port bosch pump but it has complicated the plumbing - the 3 ports have a very tidy arrangement all at one end. difficult to explain but 914s run the fuel pump under the engine off the chassis rail in a tight confined space. i believe it has also slightly compromised the pump position by pushing it that little bit closer to the hot exhausts also lurking in the same space.
thanks to this thread i am going to take the original apart and see if i too can achieve the impossible.
let you know how i go.
keep up your good work.
Last edited:
Dead plugs isn't a bad idea Peter, they haven't been changed since the fire and were't looking spectacular when I had them out the other week.
Nothing wrong with esoteric useless facts, Peter will attest that I'm full of them haha. Good to hear that post is useful as there is so little information out there about the D-jet parts. At least in english anyway.
In today's episode of random shiny bits of metal we have the pallas door handle pieces.


There are some fairly deep scratches on them from the door handles themselves but with some luck they won't be visible once installed. Worst comes to they can come off and go to a proper metal polisher.
Next up is the door mirrors. The passenger side only suffered minor smoke damage

The drivers side didn't get off quite so lightly. The grey plastic surround melted...

So a new mirror was ordered however the wrong mirror turned up in the mail. So begins an exercise in making one good mirror out of two. Fortunately they sent a mirror with the same size glass but the wrong length stalk.

The glass was carefully pried out of both mirrors (unsuccessfully in one case) and set aside. Some polish brought the fire damaged mirror back up to being nice and shiny.

The glass just pushes back into the metal backing. It's not the tightest fit which makes assembly easy but hopefully it doesn't rattle out when the car is on the road. Time will tell....

Finally, following a damn good clean and polish, the vinyl duct has been reunited with the crossbrace and aluminium duct.

The upstairs neighbour was temporarily blinded from the sun reflecting off the aluminium while taking this photo
Nothing wrong with esoteric useless facts, Peter will attest that I'm full of them haha. Good to hear that post is useful as there is so little information out there about the D-jet parts. At least in english anyway.
In today's episode of random shiny bits of metal we have the pallas door handle pieces.
There are some fairly deep scratches on them from the door handles themselves but with some luck they won't be visible once installed. Worst comes to they can come off and go to a proper metal polisher.
Next up is the door mirrors. The passenger side only suffered minor smoke damage
The drivers side didn't get off quite so lightly. The grey plastic surround melted...
So a new mirror was ordered however the wrong mirror turned up in the mail. So begins an exercise in making one good mirror out of two. Fortunately they sent a mirror with the same size glass but the wrong length stalk.
The glass was carefully pried out of both mirrors (unsuccessfully in one case) and set aside. Some polish brought the fire damaged mirror back up to being nice and shiny.
The glass just pushes back into the metal backing. It's not the tightest fit which makes assembly easy but hopefully it doesn't rattle out when the car is on the road. Time will tell....
Finally, following a damn good clean and polish, the vinyl duct has been reunited with the crossbrace and aluminium duct.
The upstairs neighbour was temporarily blinded from the sun reflecting off the aluminium while taking this photo
Hi Faulky
I'll take a photo of the rear numberplate plinth from my '68 with the old style lights. I will try to capture the same area as in you photo of your part sanded back.
I'll take a photo of the rear numberplate plinth from my '68 with the old style lights. I will try to capture the same area as in you photo of your part sanded back.
Here you go. Looks the same to me. the mounting holes for the light units are 95mm apart.


not wishing to sidetrack your beautiful story here.
faulksy - there is a bit of reasonable information on D-JET and L-JET fuel injection mysteries on VW or Porsche 914 forums in the USA.
additionally various small operators offer reconditioning of the pumps from a core for around $400.00 usd but they won't tell you the secrets of disassembly. there is a lot of new found enthusiasm for the D-JET and L-JET systems again there amongst restorers.
there are even rebuilders of the brains - the ECUs were always referred to as brains.
as an aside ......the capacity for 914s to burn to the ground is legendary (even when they were new). the fuel pump is located near the engine (mid engined). the cooling fan shrouding on a type 4 vw engine is magnesium. you can imagine what can happen, esp if some fire brigade guys rock up and put a water hose on the fire. no saving the car - as has not been your case. 914 owners are paranoid about fuel leaks.
when you get your ds running again its something you will be doing every time you stop or start the car having experienced the calamity.
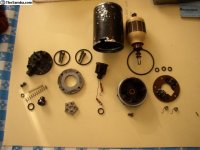
i got my bosch 3 port pump apart yesterday following your directions. interesting whats inside. it is a later pump than yours and they have dispensed with internal turbulence shrounds. i noticed from your photos your pump has only one turbulence shroud at one end of the motor. earlier VW pumps have turbulence shrouds at both ends of the motor. i attached a photo of an earlier fully shrouded internal motor for more useless esoteric information.
i have discovered i have to drive the pin out of the motor shaft on mine to get it further apart to deal with the electrical connection o-ring.
the plate that covers that area will not lift enough with manipulation to get into that area. we played around with the pin yesterday but its jewellery scale and we are going to have to get some punches small enough to get it off. its in tight and a tricky little part.
faulksy - there is a bit of reasonable information on D-JET and L-JET fuel injection mysteries on VW or Porsche 914 forums in the USA.
additionally various small operators offer reconditioning of the pumps from a core for around $400.00 usd but they won't tell you the secrets of disassembly. there is a lot of new found enthusiasm for the D-JET and L-JET systems again there amongst restorers.
there are even rebuilders of the brains - the ECUs were always referred to as brains.
as an aside ......the capacity for 914s to burn to the ground is legendary (even when they were new). the fuel pump is located near the engine (mid engined). the cooling fan shrouding on a type 4 vw engine is magnesium. you can imagine what can happen, esp if some fire brigade guys rock up and put a water hose on the fire. no saving the car - as has not been your case. 914 owners are paranoid about fuel leaks.
when you get your ds running again its something you will be doing every time you stop or start the car having experienced the calamity.
i got my bosch 3 port pump apart yesterday following your directions. interesting whats inside. it is a later pump than yours and they have dispensed with internal turbulence shrounds. i noticed from your photos your pump has only one turbulence shroud at one end of the motor. earlier VW pumps have turbulence shrouds at both ends of the motor. i attached a photo of an earlier fully shrouded internal motor for more useless esoteric information.
i have discovered i have to drive the pin out of the motor shaft on mine to get it further apart to deal with the electrical connection o-ring.
the plate that covers that area will not lift enough with manipulation to get into that area. we played around with the pin yesterday but its jewellery scale and we are going to have to get some punches small enough to get it off. its in tight and a tricky little part.
Attachments
It certainly looks the same Paul. Perhapd some careful bending is needed to straighten the brackets on mine a little. In other news we have another exiting update from the paint shop


Just the bonnet and front wings to go. Then they will hang and align everything before sticking it onto a tow truck back to the workshop for final assembly
Just the bonnet and front wings to go. Then they will hang and align everything before sticking it onto a tow truck back to the workshop for final assembly
the rear lamps are specifically labelled gauche and droit if that helps?