Orange GS Wagon

andrewj

Active member
Fellow Frogger
Joined
Jan 23, 2004
Messages
689
Location
australia
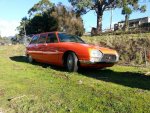
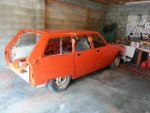
I thought I would share progress on my little orange wagon.

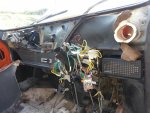
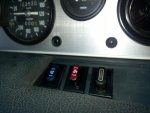
It was purchased as an unfinished restoration many years back, after being tracked down by Brett Rogers. The previous owner had passed away, after doing a lot of mechanical work in the engine bay, stripping the body down and applying a layer of white paint.

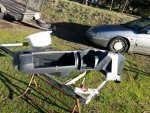
The car sat for a few years in the yard of a panel beater who was initially enthusiastic but never got started. This turned out to be a blessing in disguise in that the apparently solid paint over the body started to disintegrate- original thought was to rub back and paint over what we thought was a solid substrate.

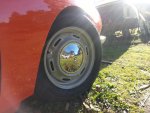
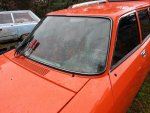
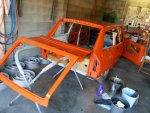
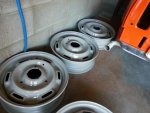
Fast forward a couple of years, and friend who is good with a paint gun and with a loves of ‘70s cars agreed to put some paint on it for me. Doors were sand blasted, roof and apertures paint stripped and panels sanded back to metal. A very sharp bonnet was selected from the parts stash and a set of early type wheels put together.

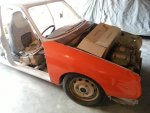
The aim is to end up with a very solid, sharp looking GS wagon that can be used as a daily driver…
 

Attachments

  • 20131113_184637.jpg
    20131113_184637.jpg
    95 KB · Views: 782
  • 20131117_153347.jpg
    20131117_153347.jpg
    96.6 KB · Views: 804
  • 20131117_153407.jpg
    20131117_153407.jpg
    90.7 KB · Views: 623
  • gs.jpg
    gs.jpg
    89.4 KB · Views: 1,130
You don't lend your mate out do you? I've decided I'm too old to start spray painting a car - trouble is I've already started the CX so have to finish it. Had a visit from an expert the other day who told me ... " it might have been better left as it was!"

Like the colour - is it AC437?
 
Hi Rmac,

It's actually Orange Ibiza AC 332 - originally an X1/X2/X3 colour. The wheels are of course Gris Rose AC 136.

Good luck finding a painter :) It certainly can be a struggle finding the right combination of aptitude and attitude...

Cheers,
Andrew
 
Looks great! What will the interior be?
Had mine out for a run again today - every time I take it on a club run I'm tempted to put it back on full registration so I can use it more.


Via the aussiefrogs App
 
Looks great! What will the interior be?
Had mine out for a run again today - every time I take it on a club run I'm tempted to put it back on full registration so I can use it more.


Via the aussiefrogs App

Hi Bruce,

Got enough of the original black textured vinyl to make up a almost perfect set. Thinking of using some early front seat with the cylinder head rests - not strictly correct, but I like them!

Glass is all out and off to get a metalized tint to protect the interior.

Cheers,
Andrew
 

Attachments

  • IMG_0225.jpg
    IMG_0225.jpg
    95.1 KB · Views: 493
Those headrests look so much the part, now all you need are some escargot door handles :)


Via the aussiefrogs App
 
Great stuff. That orange just suits GSs so well.

I see you've fitted the larger boxer engine. :roflmao:
 
more progresss

Those headrests look so much the part, now all you need are some escargot door handles :) Via the aussiefrogs App

Good idea Bruce- I think I might have a box of them somewhere!

More progress last weekend - bonnet and doors in place, once piece of side glass.

Glass has metalised tint that will hopefully help protect vinyl interior.

Did I mention how much I like role pins - sooo much easier than bolting and unbolting hinges!

20131208_182016.jpg20131208_182052.jpg20131208_182116.jpg
 
Good idea Bruce- I think I might have a box of them somewhere!

More progress last weekend - bonnet and doors in place, once piece of side glass.

Glass has metalised tint that will hopefully help protect vinyl interior.

Did I mention how much I like role pins - sooo much easier than bolting and unbolting hinges!

View attachment 50804View attachment 50805View attachment 50806

damn how many GS's can one own, love the colour especially on this wagon. looking forward to seeing the completed project. great work Andrew, wouldn't it be great to one time line up all the running GS's for a photo shoot !
 
Going back to stainless window surrounds, or for a sportier look with matt black? Please don't tell me you're going to leave them Special orange :)


Via the aussiefrogs App
 
Hi Lamoor,

Good question - how many GSes are too many??? I know I have too many to look after, that's for sure.
Love the idea of do a photo shoot of all GSes- seems the number on the road is increasing, not decreasing in numbers at the moment, which is great!
Perhaps we should start a "shiny GS" threat for all the new restorations??

Cheers,
Andrew
 
Hi Lamoor,

Good question - how many GSes are too many??? I know I have too many to look after, that's for sure.
Love the idea of do a photo shoot of all GSes- seems the number on the road is increasing, not decreasing in numbers at the moment, which is great!
Perhaps we should start a "shiny GS" threat for all the new restorations??


Cheers,
Andrew

Hi Andrew
sounds like a plan is being hatched !
 
Home for Chrismas!

The orange wagon has come home in time for Christmas:banana::banana::banana:Here are some shots of it travelling in style through Hobart.

Now comes the scrubbing, polishing and bolting back together...
20131222_152952[1].jpg20131222_163345[1].jpg
 
Last edited:
Shucks, and I was busy spotting a Renault Feugo at the Hobart showgrounds today when I could have been spotting two GS's. That steering wheel on the camera car looks good too.


Via the aussiefrogs App
 
Todays progress - window seals in - new scrapers from Chevronics - they are a very good thing! no more water pouring through the doors and rusting everything in sight:cheers:

20131227_203749[1].jpg

Reckon I spent 4hrs + getting the back windows in. A #### of a job until the right technique is worked out. Two person job- fit from the bottom and work up and lots of spray lanoline to lubricate the rubber. Any other approach will result in endless frustration - believe me, tried every other possible combination before finally getting it right.

Hi Bruce,

If you head further south you'll spot close on a dozen sitting in a paddock :crazy: there is a 1015 wagon that might even want to follow you home...
 
A little progress

Despite the cold and drizzly day, I decided to push on with the Orange Wagon today.

The rubber seals under the front guard where missing from the car when I got it, so off to the "GS graveyard" to extract some from a wreck.

All the ones I checked were very grimy and stiff, but after a long soak in sugar soap, a good scrub, rinse and wipe with lanolin, they came up very nicely. Put a coat of lanolin over the inside of the guard while I had it out.
20140504_153017[1].jpg

In fact, it seems the rubber used on GS seals actually lasts very well. Quite a few pieces that felt hard to start with really softened up after treatment with sugar soap. Seems that the "hardness" is caused by a thin layer on the surface, rather then the body of the seal deteriorating.

The front of the car is also starting to come together. Scored a perfect black honey comb grill off a wreck late last year, which looks great against the orange. The indicator lenses are new (Ebay specials!).
20140504_175453[1].jpg
Although the headlines look good, I managed to stuff up the silvering... They had a film of grease inside which I though I would rinse out with some diluted sugar soap. Seems the sugar soap dissolved the conductive paint under the silver, so there are now black patches. Has anyone tried re-silvering headlights them selves? I've had a look, and there are lots of kits around online.

Next big job is to take the dash out so I refit the wind screen wiper linkage- perfect job for a rainy day!
 
some more progress

Dash repainted and back in place...repainted wheels on, hubcaps polished and bling windscreen locking strip added! Next task is to de-rust and paint the floors.
 

Attachments

  • 20140510_124648.jpg
    20140510_124648.jpg
    97 KB · Views: 496
  • 20140524_130127.jpg
    20140524_130127.jpg
    93.8 KB · Views: 477
  • 20140524_130154.jpg
    20140524_130154.jpg
    93.9 KB · Views: 479
  • 20140524_130204.jpg
    20140524_130204.jpg
    91.9 KB · Views: 492
  • 20140524_133805.jpg
    20140524_133805.jpg
    100.9 KB · Views: 485
  • 20140525_094255.jpg
    20140525_094255.jpg
    100.6 KB · Views: 476
  • 20140525_094355.jpg
    20140525_094355.jpg
    101.1 KB · Views: 493
  • 20140525_094456.jpg
    20140525_094456.jpg
    98.6 KB · Views: 481
  • 20140525_095229.jpg
    20140525_095229.jpg
    99.4 KB · Views: 598
  • 20140525_101809.jpg
    20140525_101809.jpg
    98.1 KB · Views: 496
Hi Everyone,

Just realised it has been five months since the last post. It seems that I am now attacking the tasks that take many hours for little visible progress. I've lost count of the hours spent soaking, scrubbing and soaking lanolin into the vinyl interior. Dissolving the rust off the floors and repainting also took many, many days, but now it is done :banana:

Every GS I have had has had an erratic fuel gauge. I thought that was just how they where, but have a look at this...
20140615_115531.jpg
Float is absolutely sealed but full 30% full of fuel (checked by sinking in just off boiling water - no bubbles). Back to high school physics - looks like over time petrol diffuses through the plastic (looks like nylon). I made a tiny hold with a hot needle, drain the fuel out and sealed it over by heating the end of an awl with a butane torch and smearing over the hole.

Check out this roof liner - I always through GS roof liners where creamy yellow with a grey fleck, but no, after many hours soaking in sugar soap and scrubbing, it is revealed that they are actually white! There is still bit of staining where the edge of the door rubbers sat, but hopefully this will not be visible when the seals go back in...
20131124_185719.jpg
The back seatbelts where a bit faded, so I tried re-dying with RIT dye. Since I had a big pot of dye20141019_093625.jpg, So I thought I would experiment with faded switches and door handles. Here are the before and afters:

Seat belt - helped quite a bit, but had to finish of with a sharpie laundry pen to get them really black.20141019_090033.jpg

Switches - worked perfectly - where grey with white / yellow fading. After dying they are perfect dark black. Soaked in Lanoline and buffed with a micro fibre cloth to get them shiny like new. Also dribbled some singer oil into them so they are super smooth now...
20141019_104118.jpg

Door handles - The dyed one took the colour really well, but the plastic has started to disintegrate and the white flecks are glass fibre (ouch!) I've used Lanolin to replace the missing plasticizer, but I need something to seel the surface - might try shoe polish - this works wonders with old Bakelite radios, so perhaps it will trap the glass fibres and form a skin. The third photo shows the dyed handle next to a NOS one from Daniel in Germany. If anything, the dyed one matches the door card and armrest much better than the overly glossy new one.
20141019_085016.jpg20141019_104330.jpgo20141019_104618.jpg

Next few weeks will be finishing off the doors. Unfortunately some of the liners where missing, and the ones on in the GS graveyard had mould get into the Masonite cards, so they need to be opened up and new MDF backing cut and fitted.
 

Attachments

  • 20140504_103340.jpg
    20140504_103340.jpg
    97.6 KB · Views: 390
  • 20140504_103351.jpg
    20140504_103351.jpg
    98.6 KB · Views: 374
  • 20140504_103354.jpg
    20140504_103354.jpg
    102.6 KB · Views: 398
  • 20140504_103401.jpg
    20140504_103401.jpg
    94.7 KB · Views: 391
  • 20140504_105608.jpg
    20140504_105608.jpg
    101.6 KB · Views: 375
  • 20140510_124648.jpg
    20140510_124648.jpg
    97 KB · Views: 398
  • 20141019_104020.jpg
    20141019_104020.jpg
    87.9 KB · Views: 384
Top