My R12 POS Arrived!

COL I think you scanned page 1 twice and page two does not seem to have finished the explanation.

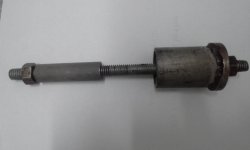
Either way, the idea is to measure the wear in the shaft and adjust shims accordingly such that there is some plunger pressure on the shaft even at the most worn point. I would suggest adjusting the shims to compensate for this wear can be done by simply trying different shim sizes. Yeah, not as accurate, but good enough. Shim stock is available in sizes from .05mm up. I think .05mm is quite fine, I would start with .1mm and when getting close I would switch to .05 to fine tune it. You will find a point where adding one more .1mm shim is too much, taking it out is too little. That is where I would add a .05mm shim instead. These numbers are just for example, you may find that you need to add so many .1mm sims, you might as well put a .5mm shim to begin with.

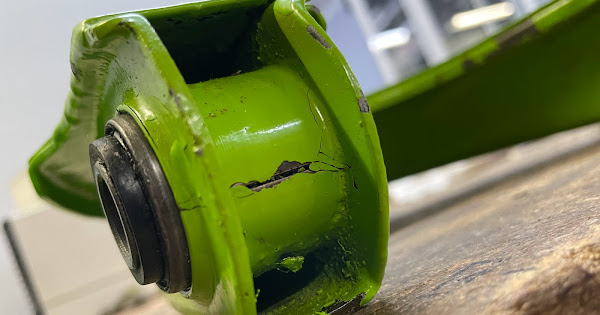
Alternatively, you can measure the rack diameter somewhere not worn at all (at the top of a tooth - the teeth tops do not wear because they never contact the pinion, so entire wear measured will be in the back of the rack where the plunger pushes against the rack) with a micrometer and compare with the worn section. That will at least give you some idea what shim thickness to start with. Take a few measurements along the rack. Only shortcoming of this method is that it does not account for wear in the pinion so you might end up with more shims than the numbers would suggest.
Thanks Schitz

I scanned all the pages but in the rush I uploaded page #1 twice, I have fixed it and uploaded the 3rd page to complete the explanation
 
And thanks for posting those references to those R18 tools. Does the manual speak to what torque I should apply when tightening them up?
 
CA6909C4-40FE-4F5F-A3E5-8D42C1A4C0F0.jpeg


Taadaaa!

Happy with those Supercheap colours I picked out, going to look a treat! :p

Unsure if I want to paint the entire rear beem green… I might mix it up and green the control arms in the rear, they are kinda low, we’ll see.

Oh! And someone mentioned the perfect name for this thing now, I might even christen a new thread for the time while this place remains if I get some more work done. It’s more to me now then a POS, and with aspiration, I think I shall call it a “Gornearly” :p
 
Last edited:
View attachment 138886

Taadaaa!

Happy with those Supercheap colours I picked out, going to look a treat! :p

Unsure if I want to paint the entire rear been green… I might mix it up and green the control arms in the rear, they are kinda low, we’ll see.

Oh! And someone mentioned the perfect name for this thing now, I might even christen a new thread for the time while this place remains if I get some more work done. It’s more to me now then a POS, and with aspiration, I think I shall call it a “Gornearly” :p
How about Bowie and his technicoloured car
 
Nah the car will still be white, the best white, Alpine White.

The rest of it however :party:

I can't help but think of suspension compents as undergerments. And who doesn't like novelty nickers and socks!
 
View attachment 138886

Taadaaa!

Happy with those Supercheap colours I picked out, going to look a treat! :p

Unsure if I want to paint the entire rear beem green… I might mix it up and green the control arms in the rear, they are kinda low, we’ll see.

Oh! And someone mentioned the perfect name for this thing now, I might even christen a new thread for the time while this place remains if I get some more work done. It’s more to me now then a POS, and with aspiration, I think I shall call it a “Gornearly” :p
My R10 Gordini supension will be "Bean Stalk" almost Kermie with yellow springs and red Konis. All under chassis is/and will be mid-grey industrial. Nice choise Dan.
 
My R10 Gordini supension will be "Bean Stalk" almost Kermie with yellow springs and red Konis. All under chassis is/and will be mid-grey industrial. Nice choise Dan.
Oooooh I like the mid grey idea, that would make everything stand out noicely!

And yes I feel the Koni red sort of decides the rest of the hue, and tha's ok :)
 
Bushes are dumb!

Which one of you warned me about cracking the bush housing. I did it twice


Oh well, something else to practice welding on.

Shiny new bush, broken crappy arms.

#fail.

Also I thought the upper control arm bushes were the same as the lower.. They certainly are not.. I'm sure I had a couple here...

#more fail.
 
Bushes are dumb!

Which one of you warned me about cracking the bush housing. I did it twice

[/URL]

[/URL]

Oh well, something else to practice welding on.

Shiny new bush, broken crappy arms.

#fail.

Also I thought the upper control arm bushes were the same as the lower.. They certainly are not.. I'm sure I had a couple here...

#more fail.
Did you crack the wishbone putting in the new bush or extracting the old bush?

I have never seen a wishbone crack there, I have managed to crush the wishbone getting out old bushes before I made up an extraction tool.
 
Cracked them putting the new bushes in.

To be fair I don’t think it was cracked prior, but it was covered in paint after all.

Tell me about this tool? I took plugs from a press and used them on a vice with a big bar over the handle. I was able to get the first ones in no trouble, not sure what happened to the second arm.
Are the new bushes slightly bigger in diameter than the old bushes? Its the only thing that I can think of that would crack the wishbones like that.
 
They weren't but, and the other arm was fine. I think these were left overs from my Yellow 12 and the owner was collecting bits from at least the late 80's. Does the rubber have a tendency to swell or shrink if left to the elements? there was a bit of surface rust I scratched away, coupled with removing the over spray from the inner of the arms, perhaps a combination of both left me with to much girth? "shrugs"

I think it's time I just drop some coin on PTFE lined M8 / M10 rose joints and do this properly.

I was looking at the Radical SR3's control arms at the rear again, guaranteed this sees more weight and force then the 12 ever does or would. Oh and their manual suggests they (rose joints) get changed every 80hours. That would be a real 3-4yrs for me.

Time to fkn weld Dan, It's Christmas.
 

Attachments

  • 2017QRshannons-1193-copy-630x420.jpg
    2017QRshannons-1193-copy-630x420.jpg
    102.4 KB · Views: 90
Last edited:
They weren't but, and the other arm was fine. I think these were left overs from my Yellow 12 and the owner was collecting bits from at least the late 80's. Does the rubber have a tendency to swell or shrink if left to the elements? there was a bit of surface rust I scratched away, coupled with removing the over spray from the inner of the arms, perhaps a combination of both left me with to much girth? "shrugs"
I don't know can't offer an explanation.
 
Dan, that large "crack" going along the the tube welded in the arm is not a crack. It is there from factory. The "tube" they use is just a piece of flat steel rolled into a cylinder. I would be more worried about the "welds". Which by the way, are not welds. The "tube" is brazed on the arm.

Key to successful bushing insertion is pressing against the end of the "tube" not against the arm around the tube. Pressing against the arm will easily rip off the brazing. I see your paint is cracked around there too, so I would suggest you take that nice shiny paint off and inspect very carefully for cracks in the brazing.

You can try to weld those "tubes" on, but I think between the factory brazing (welding over brazing is not easy they say) and heat soak of the welding process (distortion of everything everywhere) you're fighting an uphill battle.

I would advise you take it somewhere in a jig that would keep the arm as it is supposed to be and ask some well seasoned old timer to braze or weld those things for you.
 
Aaaaaaaaaaah ok that's makes sense. Ah. ok..

Back to plan C).
 
Bowie, I note you keep referring to welding as your go to solution. FYI, Brabham, Lotus F1 and numerous Le mans winning sports car chassis were all steel tube with Nickel Bronze, brazed joints. Into the 1980's, 90's and even to this day many of the suspension arms on sports prototypes sports sedans and some Radicals are brazed with Nickel Bronze.
Maybe learn to braze before buying an expensive welder. The "oxy shifter" may also minimise those impact injuries you occasionally suffer.

As to fitting bushes into those pressed steel arms, I generally use some anti seize on reassembly, partly so they slide in easily but mostly so they are easy to press out again if required. I also chuck the bushes in the freezer for a couple of hours and warm the arm with a heat gun to minimise any stress in the assembly process.

I also seem to recall that I suggested rose joints about 2 years ago when you were asking for advice on suspension.
 
Top