My R12 POS Arrived!

That tool you describe is very similar to one of the Renault tools (probably inspired by it). There are also many generic versions of it available on the market.

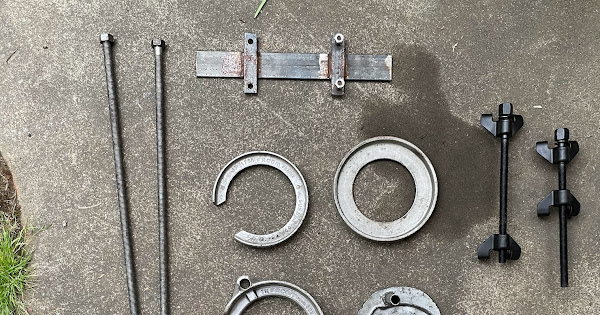
The other one is a saddle that goes around the bottom spring perch without interfering with the shock, and has two extension arms with a hole and a threaded rod on the side used as I explained above. The extension arms pivot around a bolt inserted through a hole in the shock tower about half way down. It is there from manufacture exactly for this purpose, I guess. As you wind the top nut on the threaded rod the tool is going to mimic the movement of the top suspension arm and compress the spring lifting the bottom spring perch off the shock body rest and leaving the shock alone. If you only want to replace the shock, you don't even need to compress the spring any more after it has lifted off the bottom rest a bit. It is the best tool for compressing these springs, and not exactly hard to make. Now that you have a welder, you can make one.

Here's one version and this one doesn't even need any welding

https://i.servimg.com/u/f12/09/02/29/15/sus50511.jpg
 
Last edited:
I must collate the various tools I've collected, I seem to have 3/4 of some of these :S
 
Would ya look at all this!


Most of this came from the friendly Romanian "George" when I picked up that yellow one in pieces which is now on a farm to a true franko, must check to see if its done yet?

So anyway, I think I'm ok, take the home made device on the bottom right, put it here;


Chuck the hooks form the McPherson compressors on the M10 rod, windy windy windy windy (after putting a nut back on the top of the shock)

As for all the other random bits. It seems I have one of those collars you mentioned Shultz.

Having said all this i think I'm just going to weld some coil over sleeve onto these Koni's and be done with all these random tools. Then I can get super dumb with custom springs rates.

VIV LA FRANCE!
 
You don't even need to weld anything because the R12 shocks have the spring perch support ring already there. You can index the coilover sleeve somehow to the ring so it doesn't spin when you do/undo the large collar nuts to adjust ride height. A little square tab at the bottom of the sleeve, file a matching square slot in the support ring to receive it and Bob's your bitch.
 
Yep, there are a couple of sleeve kits that do just that, rely on the existing spring seat and have little prods that screw into the shock body. but yeah, thats another weekend.
 
So I think I really will push this into the ocean.

The top drives side bolt securing the steering rack was spinning in it's thread.

This nut is not accessible. It must have been welded to the sheet metal prior to everything being folded. To gain access I'm going to have to cut into the chassis rail. At this stage sticking a finger in a drain plug near by, I can determine the nut is still attached to the sheet, it's just the bolt has been over tightened and has stripped it. If I can get the bolt out, maybe I can put a tap in there and clean it up.. but nah it probably needs to come out.

Anyway so I thought you know what, lets cut the head off, take the rack out of the way, I'll thread a couple of nuts down and try to buzz it out. Alas, these bolts are only threaded on the ends. I now have a M8 8.8 strength stud looking back at me.

Sans bolt head, winning right?

Sans rack, not winning right.

So.. If I whack it with a hammer I can probably dislodge the welded nut and remove the stud, but I'm still stuffed. I'll only be able to attach the rack via x3 bolts. The rack sits flush so If I say wanted to weld a nut on the outside, I'd have to space all the other points out, might be an option?

I'm going to have to cut into the chassis to remove it, and re weld it back, then re weld the chassis.

Talk about baptism of fire. What a way to learn.

VIV La go get F'ed!!
 
I have been told that the process is called "character building", you will learn, and you will be a better person after you have learnt something new. Cheers and just keep working at it.
 
Sans rack, not winning right.
[/URL][/URL]

So.. If I whack it with a hammer I can probably dislodge the welded nut and remove the stud, but I'm still stuffed. I'll only be able to attach the rack via x3 bolts. The rack sits flush so If I say wanted to weld a nut on the outside, I'd have to space all the other points out, might be an option?
So the shaft of the bolt turns and is frozen to the nut?
Is that correct?

My rule #1 - don't go at it like a bull at a gate......
 
Last edited:
so with the rack Dan, is it slotted where the bolts go through with a Cam on the top mount slot,usually the top bolts are over tightened by some people to stop the Cam rotating if that's the set up...jim
 
@dacia4x4, It appears to have cams on the bottom fasteners, that are both grimed into position of grit and old oil. The top on the rack are elongated to accommodate the change in height. I didn't take a photo of the rack, but you can see the cam'd retainers in position here
https://photos.app.goo.gl/d18Nqgz3rAGPHigQ7,

Actually this ebay add has a picture of the rack where you can see the elongated top eyelets.

And Yes @85Fuego, the shaft of the bolt turns within the nut, it turns around and around and moves not in nor out :( As the bolt was stamped 8.8 grade, assuming it's eaten the thread of the captive nut, which is just so great. It hasn't eaten it to the point where i can yank it out, there is still resistance half way through a turn, but as mentioned, worried if I tap it i'll knock the captive nut out of the weld and ruin it more so.

@Bustamif, mumble mumble grumble mumble! :p

Actually, I suppose I could just blast it all out, then get a longer bolt, drill out the cross member to allow it pass, and secure it from the outside?
 
Last edited:
You're going to get multiple methods of solving this issue.
It's up to you to choose one you're comfortable with - have appropriate tools for.

Do you have a welder?

Bolting thru without a bush will collapse the member.
 
I suggest:
Weld a nut to a 5 or 6mm plate and weld in nut/plate.

Or, get a scrap of 10mm plate cut to suitable size to fill hole you have cut to extract saddle and tap hole and weld in.
 
So I think I really will push this into the ocean.

The top drives side bolt securing the steering rack was spinning in it's thread.

This nut is not accessible. It must have been welded to the sheet metal prior to everything being folded. To gain access I'm going to have to cut into the chassis rail. At this stage sticking a finger in a drain plug near by, I can determine the nut is still attached to the sheet, it's just the bolt has been over tightened and has stripped it. If I can get the bolt out, maybe I can put a tap in there and clean it up.. but nah it probably needs to come out.

Anyway so I thought you know what, lets cut the head off, take the rack out of the way, I'll thread a couple of nuts down and try to buzz it out. Alas, these bolts are only threaded on the ends. I now have a M8 8.8 strength stud looking back at me.

Sans bolt head, winning right?

Sans rack, not winning right.

So.. If I whack it with a hammer I can probably dislodge the welded nut and remove the stud, but I'm still stuffed. I'll only be able to attach the rack via x3 bolts. The rack sits flush so If I say wanted to weld a nut on the outside, I'd have to space all the other points out, might be an option?

I'm going to have to cut into the chassis to remove it, and re weld it back, then re weld the chassis.

Talk about baptism of fire. What a way to learn.

VIV La go get F'ed!!
Bugger. Thats a bit of bad luck there Bowie. Not sure what to suggest to fix this. There is only about 6 inches between the cross member and the fire wall so not much room to get a drill in there to drill out the nut. Might have to sleep on it for a few nights.
 
It is possible to buy new insert nuts. Check the internet. There are a number of types. Another posibility is drill it then fill it with epoxy metal and retap the thread. Glad it is not me though.
 
  • Like
Reactions: COL
if you have vice grips Dan locate them on bolt shaft with gap just wide enough to fit large open end spanner, may need decent flat washer between spanner and vice grips, and rotate vice grips in undoing direction while levering on spanner to put load on stripped nut to try and get it to bite and undo. ...jim
 
I posted as much on the vic reno page and Peter Rasmussen educated me. Those drain plugs I was referencing, are actually where access to those nuts is allowed..

maybe.jpg

He offered the gearbox might need to come out but should be able to get in there. I've tried to get a socket in there already but the orientation is way off, the top bolt shares the same plane as the bottom you can see, still... I must get a big light and have another look before I start cutting.

If you are here Peter, Thank you!
 
if you have vice grips Dan locate them on bolt shaft with gap just wide enough to fit large open end spanner, may need decent flat washer between spanner and vice grips, and rotate vice grips in undoing direction while levering on spanner to put load on stripped nut to try and get it to bite and undo. ...jim
I posted as much on the vic reno page and Peter Rasmussen educated me. Those drain plugs I was referencing, are actually where access to those nuts is allowed..

View attachment 137673

He offered the gearbox might need to come out but should be able to get in there. I've tried to get a socket in there already but the orientation is way off, the top bolt shares the same plane as the bottom you can see, still... I must get a big light and have another look before I start cutting.

If you are here Peter, Thank you!
I would be trying Jim's suggestion before cutting into a structural part of the car, I have found that method to work in the past.

Also squirting a little lubricant around the thread on the bolt may help.
 
Okay, so the bolt doesn't want to come up.

Can you push it down?

I mean if you thin the shank somehow, do you think it could push all the way through the nut to get it out that way? You don't need to thin the entire length sticking out, just enough and then cut it above the thin section. The base where it sticks out is the problem if there is any length hidden inside before it gets to the nut, you may not be able to thin that part.

If you have a dremel you can thin down the shank with a cutoff wheel or five or with a sanding drum.

A right angle attachment for the drill would help you here or one of those drills with a right angle head. Cut the bolt flush and drill a bit off centre so the bolt doesn't spin inside. Start with a small bit and enlarge progressively.

I think however after you get the bolt out you will have to find a way to get a nut in there. I would not rely on a nutsert (kinda like a pop rivet with a threaded hole) They have the bad habit of starting to spin and they also sit proud of the surface. Not to mention you probably need a M7 and I haven't seen those. M6 is too small for the job and M8 will need the mother of all nutsert tools to rivet it in place and Schwarzenegger to pop it.

If all of that isn't possible I would try to work out where the bolt is pointing at on the underside and enlarge a bit that access hole in the crossmember so I can see things from below. It shouldn't need much enlargement so it won't hurt the structure. Once you can see the nut/bolt from underneath you may even be able to squeeze in a dremel cutoff disc and chop off the bolt end. Or drill it from underneath. At least this way you will be able to put some vice grips on the bolt inside the engine bay to make sure it doesn't spin.
 
Last edited:
The bolt is still stuck just spinning around a single thread in what ever is left of the fastener, so yeah I think I have spend some time with the vice grips and try to wedge it back on track somehow.

And yes I'd need a right angle attachment if I end up drilling it out, the firewall is all to close.

And of course from the engine side the bell housing is in the road, but yes I should be able to get the little dremel in there to eat out the "access" point a little.

I had to mow the stinking lawn today on top of extra surprise chores so I've run out of play time and motivation today, but thank you for the suggestions everyone, you have given me a couple of ways to attack this.

Salute!
 
Last edited:
  • Like
Reactions: COL
Top