Hi Frans,nice to see,that the parts arrive you safely without any damage in the parcel.The indicator works in the foglamps (french version,yellow light),for export versions are separated indicators from BOSCH (orange lights).Regards,Gerald

You are using an out of date browser. It may not display this or other websites correctly.
You should upgrade or use an alternative browser.
You should upgrade or use an alternative browser.
Matra Jet 6 restoration.
- Thread starter Frans
- Start date
I'm not at all sure I'd drive the Matra in that sort of Auckland traffic at all. You could be run over by anything! Maybe with a safety wand and an orange flag?
One feature of driving the (LHD) Djet in traffic is that it facilitates "What is it?" questions from drivers of RHD vehicles in the lane on one's left.
cheers! Peter
Well done!! Now the real work begin
True true. Just a quick update. A lot have been going on behind the scenes. So far permanently fitted: The radiator is in, electric fan is in, front grille is in, fuel tank is in with sender unit and connected wiring and fuel lines, Brake and clutch reservoirs are in and connected, front head lights in and working, taillights and number plate lights are in, rear crossmembers are in, handbrake mechanism is in except for the cable to the lever which turned out to be too long, speedo cable is in and connected, battery is in and connected, 2 earth bars are in. I can't think of anything else.
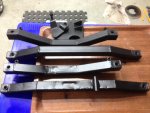
Replacement crossmembers that I made because the old ones where a bit abused with time.
Head lights on.
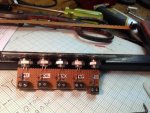
We don't have any of these Gordini warning lights and the Matra uses 5 of them so I am making them. This is the fist one as a trial and it works with a LED. All will have LEDs fitted. Luckily all the colours are available in LEDs as well.
That is all I have pictures of but the rest is true:wink2:
Regards,
Frans.
Attachments
Last edited:
Excellent work as usual, also good use of safety footwear.:headbang:
I just have to brag a bit more with the warning lights. They are available on Ebay for 50.00 Euros each multiply by 5. Home made it cost $20.00 for all 5. I found a new dash plate from Europe and completed the lot. It is now an easy fit with all the LEDs in place and by varying the resistors I could adjust the intensity of the lights. The high beam and fog lights are dim so that they won't be a bother at night. The oil, water and indicators are super bright and you won't miss it, guaranteed.
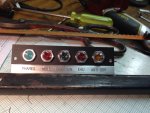
This is from the back view.

And the front view.

Frans
This is from the back view.
And the front view.
Frans
Excellent work as usual, also good use of safety footwear.:headbang:
Nothing wrong with Irish safety boots is there?
") They've got the broad strap across the top after all.
They've got the broad strap across the top after all.Those cross members separate your standards from my lower ones! I'm sure I'd have used the old ones.
I'm really looking forward to seeing this complete.
I'm really looking forward to seeing this complete.
I just have to brag a bit more with the warning lights. They are available on Ebay for 50.00 Euros each multiply by 5. Home made it cost $20.00 for all 5. I found a new dash plate from Europe and completed the lot. It is now an easy fit with all the LEDs in place and by varying the resistors I could adjust the intensity of the lights. The high beam and fog lights are dim so that they won't be a bother at night. The oil, water and indicators are super bright and you won't miss it, guaranteed. Frans
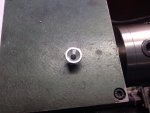
Lovely work, made even better by the detail of the hex nuts being parallel. This car will be superb. I presume they are LEDs?
Lovely work, made even better by the detail of the hex nuts being parallel. This car will be superb. I presume they are LEDs?
That's a tradesman's touch..

I just have to brag a bit more with the warning lights. They are available on Ebay for 50.00 Euros each multiply by 5. Home made it cost $20.00 for all 5. I found a new dash plate from Europe and completed the lot. It is now an easy fit with all the LEDs in place and by varying the resistors I could adjust the intensity of the lights. The high beam and fog lights are dim so that they won't be a bother at night. The oil, water and indicators are super bright and you won't miss it, guaranteed.
This is from the back view.
And the front view.
Frans
The lights (LED's) look great Frans and I like the idea of varying the resistors to get the right intensity for the lights.
The only thing that worries me is the weight of the vero board hanging from the wires of the LED's and vibration may cause the wires at the back of the LED's to weaken and break. May need some sort of a bracket to support the vero board.
An Update!!!
A lot have been going on behind the curtains. First the driveshafts. I never fitted them with the body off because at that stage we were too keen to get the body and chassis mated. I didn't worry much because it only takes 4 bolts on the flanges each side of the g/box and 4 bolts at the wheel ends. What can go wrong? Or how hard could that be? Three days of my annual leave, that's how hard. First I stripped them and pressed the u-joints out, wire brushed them cleaned and sprayed them. Then pressed new u-joints on, 4 of them because there is no CV joints. The side ways movement is taken care of by a sliding spline. Fitting them I started on the LH sideand jacked the car up. 4 bolts on the gearbox side, now 4 bolts on the wheel side. All good but the wheel does not turn. The u-joints bind against there bodies. The problem? too much travel in the rear suspension. Why I don't know. If it was like that I don't know either because it only happens with the suspension travel out to max. It could work like that but not to my liking. I then made up special shock mounts to lessen the travel. 13mm was enough to give free rotation. Now these mounts need to be 4 off because there are double springs and shocks on each wheel. That done the LH side was fine. Now the RH side. I fitted the new shock mounts and started on the shafts. That brought the next problem. The shaft can't reach the wheel end because it lies on the chassis before the bolts at the wheel end aligns. To solve that problem I had to fit a 9mm spacer where the cross member bolts to the block. So the engine is slightly higher on the mount on the RH side. At last that was enough and now the shaft fitted, but only the one way. The thinner way to the gearbox side. So Murphy stepped in once more and yes the LH side one was fitted differently. Although it didn't matter I didn't like it so out with the LH side shaft and turn it around so that they look the same. I don't know who would have ever noticed it but that is why I am my own worst enemy.
Now the wiring started. I sorted all the wires as far as possible by starting from the front earths. I moved away from standard and mounted 3 earth bars (brass blocks with plenty holes and screws) in the front middle and rear and made sure that they each had a decent earth with a heavy gauge wire because of the fiber glass body. Then I started at the head lights dim, bright and parks, electric fan, fog lights, fuel gauge windscreen wiper washers. Then the dash got its turn and eventually the engine compartment. Now we have the majority working. Outstanding in the electrical side is the Rev counter, no spark if it is connected, oil temp gauge (need to remove the sump and weld a bung on to it because I forgot that when I did the engine), Fuel gauge is not working. Mounting the windscreen washer and fitting horns. Wiring for that is complete. Even the cab light is working on its own switch and on the door switch. It is the round ones that were used in the Dauphines.
Still to be done? Plenty. All glass can now be done, brakes, accelerator and cable, cubby hole and lid, interior vent system etc. :crazy:
The clutch is bled and works fine. Happy with that because I had to make the assembly from a picture.
Today I completed the cooling system, bled it and left the engine to run a while until the fan came on and went off again. All good. Now I can attend to the alternator connection and go to bed early tonight.
Frans.
Frans,
I know what you mean, there's always something that don't fit as expected. But with your experience, ability and attitude, I would always put money on you finding a solution.
Henry
I know what you mean, there's always something that don't fit as expected. But with your experience, ability and attitude, I would always put money on you finding a solution.
Henry
An Update!!!
Fuel gauge is not working. All good. Now I can attend to the alternator connection and go to bed early tonight.
Frans.
Fuel gauge is now working and alternator charging!!
Frans
Frans,
See my post above.
Henry
See my post above.
Henry
Fixing problems caused by other people is so much fun! Good to hear progress Frans.
Funny about the rear suspension travel. You'll know that there are two different shocker lengths for the front of the R8, with two different mounts to match.
Despite your modesty, I think you can be quite proud of "own worst enemy"!
Do you now have spark AND rev counter?
Cheers
Funny about the rear suspension travel. You'll know that there are two different shocker lengths for the front of the R8, with two different mounts to match.
Despite your modesty, I think you can be quite proud of "own worst enemy"!
Do you now have spark AND rev counter?
Cheers
Hi All,
The Matra has reached a milestone today. From tracing all previous owners, right to the guy that bought it new, and tracing the travels of the Matra I am almost sure that today was the first day in 36 years that it moved on its own power!!
I could get in start it and drive it out of my garage. This doesn't mean that it is almost complete, there are plenty still to do.
I will post pictures again when there is significant changes in the appearance.
Regards, Frans.
Now look at the pics! Finally everything is operational. The car was idling with the water bled and controlling at thermostat temperature with the fan coming on and off.
The sump was removed and I welded a bung into it (same as those used by PitStop to replace the O2 sensors when they remove Cats.) and the oil temp is now working as well.
Finally managed to repair one of two rev counters, so that is working as well.
Next step is to bleed the brakes. At the moment I can drive it out of my garage which is steep uphill, to return it I put it in reverse and then slip the clutch to stop. Windows are high on the list now as well and we have the new windscreen and a new Lexan scratch resistant rear was made for us as well. Then carpets and thats that.


Regards, Frans.
The sump was removed and I welded a bung into it (same as those used by PitStop to replace the O2 sensors when they remove Cats.) and the oil temp is now working as well.
Finally managed to repair one of two rev counters, so that is working as well.
Next step is to bleed the brakes. At the moment I can drive it out of my garage which is steep uphill, to return it I put it in reverse and then slip the clutch to stop. Windows are high on the list now as well and we have the new windscreen and a new Lexan scratch resistant rear was made for us as well. Then carpets and thats that.
Regards, Frans.
Hi All,
A milestone has been reached on Saturday. The Matra was taken out on the road and driven around the block. First my son took it out with me as passenger and on return the smile on his face was limited by his ears, or else it would've gone right around. It pulls really strong. He lost traction going to second and yes I know it is old and hard 15" tyres, but it was without trying hard.
Then I took it out and he took a video of it. Apart from grating the gears going to second (damn lefthand gearboxes) I was just as pleased. Thinking back, I realised that the engine is running with a substantially higher compression than my Gordini and the car is 200kg lighter than my car. No wonder it gives you a kick in the back.
All that said, it is not what the car was built for. It is supposed to be a nice driving car to take out on weekends and to shows etc. All that is left to do is the interior and side windows. Some fine tuning on the carbs, valve clearances and so on.
I will tell him to put the video on YouTube and post the link. He did put it on Face Book and we were honored with good luck wishes by no other than Rene Bonnet himself (designer and builder of the Jet).
Regards, Frans.
Great news Frans! And a message from M. Bonnet too. We've been away or I'd have responded sooner.
Best wishes
Best wishes
Hi Al,
Another milestone has been reached, in fact a 44 mile milestone. Being a public holiday here by us and the show on Sunday, my son decided that it will be driven there this time.
With 5 new tyres, fitted and balanced we took to the open road that turned into a country road eventually and he drove it to a specific coffee shop some 22 miles away. We had a coffee and exchanged some info (I followed in another car for incase) and then I drove it home again. It pulls like a stubborn mule with a Cancer Rose under its tail and all temps and pressures are fine. Slowing down for traffic and cruising behind them is a pleasure with plenty of torque at revs as low as 2k in top gear. Obviously there hasn't been any tuning done yet and it is just as I assembled it for first time start up. The car is very pleasant on the road with a soft but firm feel to it and hobbles and ditches are amazingly and pleasantly absorbed. It is stable and very directional and with the characteristic light steering you feel at ease. I had it up to 75mph and felt no different as the 50 mph. It outdrags my Holden Cruze with ease.
It is a pleasant relieve for me because the car was in a thousand and plenty pieces and for its maiden run there were only the stop lights that didn't work. That is now fixed with 2 new lugs crimped to the stop light pressure switch.
The wheels are standard at this stage with 5 new 165/65 r15s on and he will keep it that way for a while because there is still work in future to do before he gets the alloys from MecaParts or similar suppliers. Even with the thin 15" wheels you can see that the wheels are sitting at the outer edges of the body. So Rene Bonnet used all the width that was available to give the car the fitting look with no unnecessary body overhang.


Regards, frans.
Another milestone has been reached, in fact a 44 mile milestone. Being a public holiday here by us and the show on Sunday, my son decided that it will be driven there this time.
With 5 new tyres, fitted and balanced we took to the open road that turned into a country road eventually and he drove it to a specific coffee shop some 22 miles away. We had a coffee and exchanged some info (I followed in another car for incase) and then I drove it home again. It pulls like a stubborn mule with a Cancer Rose under its tail and all temps and pressures are fine. Slowing down for traffic and cruising behind them is a pleasure with plenty of torque at revs as low as 2k in top gear. Obviously there hasn't been any tuning done yet and it is just as I assembled it for first time start up. The car is very pleasant on the road with a soft but firm feel to it and hobbles and ditches are amazingly and pleasantly absorbed. It is stable and very directional and with the characteristic light steering you feel at ease. I had it up to 75mph and felt no different as the 50 mph. It outdrags my Holden Cruze with ease.
It is a pleasant relieve for me because the car was in a thousand and plenty pieces and for its maiden run there were only the stop lights that didn't work. That is now fixed with 2 new lugs crimped to the stop light pressure switch.
The wheels are standard at this stage with 5 new 165/65 r15s on and he will keep it that way for a while because there is still work in future to do before he gets the alloys from MecaParts or similar suppliers. Even with the thin 15" wheels you can see that the wheels are sitting at the outer edges of the body. So Rene Bonnet used all the width that was available to give the car the fitting look with no unnecessary body overhang.
Regards, frans.
Last edited: