Matra Jet 6 restoration.

Frans

Well-known member
VIP Paid Subscriber
1000+ Posts
Fellow Frogger
Joined
Sep 24, 2001
Messages
1,943
Location
Auckland
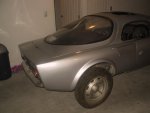
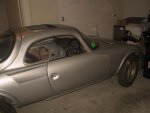
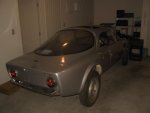
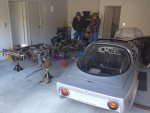
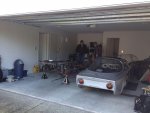
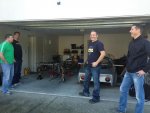
As mentioned previously the Matra has arrived here in NZ and most of the stuff have been unpacked. There are a few things missing and I will list it again as we progress through the resto.

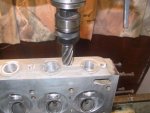
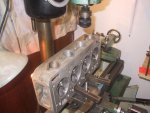
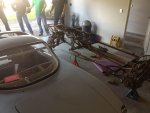
For a start, the engine is in my stand and stripped. There were a few things that surprised me in the assembly by others. The head was very loose. I could undo the headbolts with a short spanner without much effort. The flywheel bolts could hardly be loosened with a long strong arm on the 1/2" square drive socket set etc.

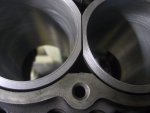
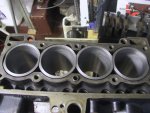
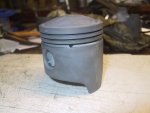
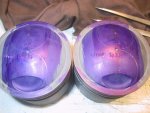
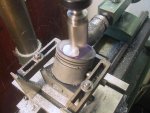
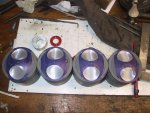
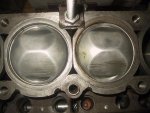
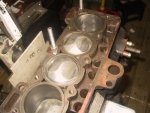
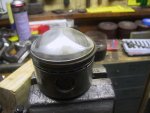
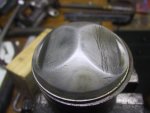
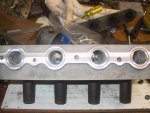
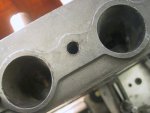
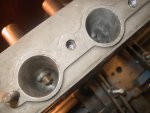
When I took the head off I saw the pistons were of the "Alpine" type. I would like if someone can confirm this for me. I saw them on pictures from Mecaparts (I think). They have a huge dome and can be seen in the pics. They might even be forged pistons. it has a 78mm bore x 77mm stroke. That makes it a 1470cc.

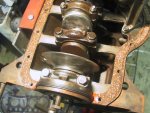
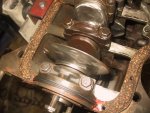
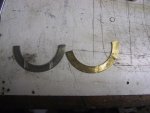
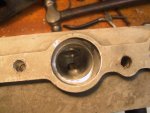
I removed the sump and saw the crank was knife edged and lightened. The cam shaft is the very famous RA5 cam as used by almost everybody in ZA.

So all in all it is not a bad deal because all this can be used for another race engine and I can put together a good fresh, closer to stock motor for good driveability.

So if someone can identify the pistons for me, that would be great.
 

Attachments

  • IMG_0206.jpg
    IMG_0206.jpg
    97.2 KB · Views: 815
  • IMG_0204.jpg
    IMG_0204.jpg
    93.9 KB · Views: 1,014
  • IMG_0219.jpg
    IMG_0219.jpg
    58.7 KB · Views: 761
  • IMG_0218.jpg
    IMG_0218.jpg
    70 KB · Views: 795
  • IMG_0217.jpg
    IMG_0217.jpg
    68.6 KB · Views: 788
  • IMG_0212.jpg
    IMG_0212.jpg
    96.1 KB · Views: 771
  • IMG_0209.jpg
    IMG_0209.jpg
    97.7 KB · Views: 1,021
  • IMG_0208.jpg
    IMG_0208.jpg
    94.8 KB · Views: 845
The body isn't that bad either. It is very small. I was thinking to myself if I would like to be in it at a
130 mph which is what it could do those days. Maybe it is very stable because of the aerodynamics but we will see. With the 15" wheels and no engine and box it is still very low.

I will attach a few pics and my opinion is that the RHD conversion is badly done. It looks like the rest of the reconditioned stuff is good. That is carpets,upholstery window rubbers.

The updates will follow as we get along.

Regards
Frans.
 

Attachments

  • IMG_0184.jpg
    IMG_0184.jpg
    52.2 KB · Views: 910
  • IMG_0185.jpg
    IMG_0185.jpg
    57.1 KB · Views: 989
  • IMG_0186.jpg
    IMG_0186.jpg
    47.9 KB · Views: 850
  • IMG_0187.jpg
    IMG_0187.jpg
    40.3 KB · Views: 862
  • IMG_0189.jpg
    IMG_0189.jpg
    94.4 KB · Views: 1,001
  • IMG_0190.jpg
    IMG_0190.jpg
    79.3 KB · Views: 845
  • IMG_0191.jpg
    IMG_0191.jpg
    63.9 KB · Views: 797
  • IMG_0199.jpg
    IMG_0199.jpg
    48.7 KB · Views: 997
Looks like a nice little project. How long do you anticipate taking before getting it registered for kiwi roads? Are you intending this to be purely a road car?
 
Looks like a nice little project. How long do you anticipate taking before getting it registered for kiwi roads? Are you intending this to be purely a road car?

I think a reasonable time period would be around 2 years but as you should know that could change in an instant. Keep in mind that we will have to deal with NZTA. Do you have any tips for me on rego and compliance?

It will be a road car because the condition is to good to turn it into a race car. The value is very high as well. There was one for sale on an auction house in Europe last week for 56000 Euros. It is gone now so I don't know if it was sold or just withdrawn. It was a good looking one in white.

Regards
Frans
 
Last edited:
I think a reasonable time period would be around 2 years but as you should know that could change in an instant. Keep in mind that we will have to deal with NZTA. Do you have any tips for me on rego and compliance?

.......

Regards
Frans

Get some pills now, and one of those special jackets with very long sleeves that do up behind your back :crazy: I've had therapy now, so have consigned most of the emotional damage to the dim dark past.

Find someone who has done this before and who has a good relationship with a decent certifier (or whatever they call themselves). Make sure you get them (the certifier) involved from the start, show them everything and explain everything. Get everything in writing, document everything and take heaps of photos. Get agreement on what they want, do as they want, then get it checked again. Let them think they are in charge, while managing and guiding them.

You could give Mike a ring at The Surgery, he may know someone up your way.
 
Last edited:
, In certing the A110 I had no major dramas other than those I created myself. I will find someone good and handy to you Frans, North Shore or your side? I had only one visit.
 
<snip>
With the 15" wheels
<snip>

Regards
Frans.

What is your thinking about wheels/tyres frans?

A previous owner of mine fitted 155-15 all round (V had 145 front and 155 rear and curiously the 1108 R8G motored VS had 145 all round). The tyres are shit Vredestein Sprint Classics and operate at huge slip angles. I put the car on Matra's VS pressure recommendations at 26F & 28R & it had poor turn in & understeer. I played with pressures to get the balance I wanted & ended up with 36F & 32R (note the way around). It's now deliciously responsive, neutral & everything the contemporary (& later) road testers speak of (including easy adjustability at the limit & tolerance of throttle-off in the wet without snappiness - despite the pressure imbalance). But they're still shit tyres, especially in the wet, even if the balance is now right. So, something will change, but what?

I could fit something better on the standard rims (4x15, no safety ridges for tubeless tyres) but what? The are two main options:
1. 145/65-15 Continental EcoContact EP (Smart fronts). I'd fit these without tubes for reasons explained elsewhere (see my posts in 'cheap Michelins from UK' thread in Froggy Chat). 0.D. is the same as a 115/80-15 & they are a nice enough tyre. I use them as spares on my 4CV & R8 (same O.D. as my 185/60-14 rears) & have once had them both on the front of the R8 (with two normal fronts, 165/65-14, on the rear) while I was having a wheel repaired & they worked well - not as grippy as the usual combination but still full of feel. (This was on my usual 35psi allround - at which they have the balance I want.)
2. 155-15 Michelin Xas. I had these (155-13) an an M.G. Midget in the mid 70s when they were a brand new type & have fondish memories of them. Crisp but a bit snappy in the wet. Mind you, the tyre on offer is the FF version of this and it is a soft compound originally meant for single seater racing (& a slightly lower 78 profile if I recall aright).

Or: I could find some 4.5x15 R8G (or R8S, or Aussie R10S) rims which would allow me to fit 170/65-15 Michelin TB15 tyres (which are splendid even by today's standards) It would be even better if I could get some of the late R10S wheels made by ROH in Australia as these have the safety ridges & would be better for tubeless tyres. I have one & am hunting for more.

Or: I could get some 5 or 5.5 X 15 alloy wheels made with an offset identical to the originals (one reason I rule out 13" wheels is that I resist the extra -ve offset they entail). That way I could use175/65-15 modern tyres or, again, the TB15.

Or: I could go down the 14" rate I chose with the 4CV & R8. In their cases, I used 4.5 front, & 5.5 rears with standard offset (I could go in & out equally without any clearance issues). However, given the neutrality of the Djet, I would size them the same front & rear. I have some 14" rims commissioned by a previous owner (16TX fancy centres and its 4.5 rims shifted to get R8 offset). I'd put 175/70-14 tyres (same O.D. as 135/80-15) on these & can get two very good wet tyres (the Continental EcoContact 5 & the PremiumContact 2) in that size (from Northern Ireland). Both tubeless types & it's a pity that the rims do not have the ridges but... .

My current thinking is 14". The setup on my 4CV & R8 is exquisite & I have no desire for larger tyre fitments (I like enjoying the adhesion limits on public roads & I like delicate fingertips "feel"). 175/70-14 should be nice on a neutral car like the Djet - grippier but still able to be exploited to the full. And yet, and yet, I still like the idea of the TB15s. Easiest route (or least expensive) is some standard 4.5x15 rims (preferably with ridges).

Which backgrounds my point here. In the photos it looks to me as if I can see the concavity of a tubeless rim safety ridge & I was wondering what width & type of 15" rims you have &, if they are 4.5 and ridged, would you like to sell them? (Depending on what you want to do about rims & tyres).

cheers! Peter
 
4cvg,

Could you explain the concavity ridge. I will look amongst the other rims I have. If I don't have these specials that you have mentioned, I will email you and we can talk.

Regards

Frans.
 
4cvg,

Could you explain the concavity ridge. I will look amongst the other rims I have. If I don't have these specials that you have mentioned, I will email you and we can talk.

Regards

Frans.

some rims designed for tubeless tyres come with a hump in the inside of the rim just inboard of where the bead seats. Sometime there's only one on one side & sometimes the are two, one for each bead. The idea is that if one has a flat tyre to the point where the beads are tending to fall into the well in the middle of the rim then these two circumferential ridges retain the beads in place. They are just pressed or rolled into the rim & thus a ridge on the inside shows on the outside as a depression or concave trough all the way around the rim close to the bead area. In one of your photos of the Jet a wheel seems to have these.
cheers! Peter
 
Further Investigation

I am rough because I'm a backyard mechanic, but you get the others that are RUFF. This ruff guy got hold of the head and he increased the size of the exhaust valves to be the same as the intakes. Now that is dumb. Normally the exhaust gases take care of themselves in leaving the cylinder chamber because when the exhaust valve opens, the piston is still on its way down after the ignition stroke and there is a lot of pressure in the cylinder. So the majority escapes under pressure and then the piston comes up on its exhaust stroke and simply pushes the remainder out. The intake is hard because you require suction and the air is stretchable which could mean less air etc.

The port on the outlet has been increased (picture) from 32mm to 38mm. If the extractor (32mm) is bolted on there is a step that is created the wrong way and actually blocks the exhaust gases. In the process he also altered the alignment of the ports with the mounting position. ie. he increased the size more to one side than the other. So I had to fix this before anything else. I machined the ports to a 36mm parallel port (picture) and with an offset which actually resets the ports to align with the extractor again. Then I made 36mm inserts with a 32mm ID to bring everything back to standard (picture). I pressed them into the newly made parallel ports and then milled the whole flange area to make a new skimmed surface.(picture).

Look at the thrust washers that came out of the crank! They aren't that expensive and they are available on Ebay. Why do this on a "race engine" because that was what they attempted to do if you look at the knife edged crank, "bigger ports" etc.

In any case there we have a usable head and the ports are back to normal. The big exhaust valve will have to remain and we will see if it has any negative effects when driving time comes. Now back to trying to fix the 3 out of 5 holes that they stripped for the studs.

Regards
Frans.
 

Attachments

  • IMG_0245.jpg
    IMG_0245.jpg
    90.7 KB · Views: 661
  • IMG_0244.jpg
    IMG_0244.jpg
    89.5 KB · Views: 673
  • IMG_0238.jpg
    IMG_0238.jpg
    84.9 KB · Views: 734
  • IMG_0233.jpg
    IMG_0233.jpg
    94.3 KB · Views: 661
  • IMG_0222.jpg
    IMG_0222.jpg
    88.4 KB · Views: 747
  • IMG_0221.jpg
    IMG_0221.jpg
    82.4 KB · Views: 672
  • IMG_0220.jpg
    IMG_0220.jpg
    88.5 KB · Views: 693
  • IMG_0224.jpg
    IMG_0224.jpg
    82.8 KB · Views: 665
The Body Works.

As mentioned before, the dashboard mods are bad. After we stripped the outer skin you can see what has been done to the base. The cubby hole on the right will have to be reconstructed to stabilize the and make the base a one piece again. That is not that hard to do.

Then we started to loosen all auxiliaries and hoses and links etc in preparation for the body lift off. We found all the mounting points and I noted that all the nuts were lock nuts. Not Nylocks but the ones with a split in them like some cars have on the extractors. (heat resistant lock nuts). Each of them were a bastard to undo and several were twisted off. After all was done Jacques got some man power by rounding up a few mates. It took six of us to lift the body clear and high enough to go over the high parts of the chassis. It could have been done by 4 men but I preferred to spread the forces more evenly and we had 2 guys doing the center of the body.

Later on we started stripping the front suspension and the complete unit, wishbones, stub axles, rack and pinion including the front cross-member is from a R8/R10. I noticed that the upper wishbone is that from the Gordini with the re-inforcing plate welded over the top. To strip the front suspension became hard work. Each and every part on the front suspension, the wishbones, the shock absorber brackets, the anti-roll bar, the brass manifold for the brake fluid distribution, the rack and pinion mounting brackets, was assembled with these all steel lock nuts AND Loctite. I started noticing it when quite a few of these bolts sheared off instead of turning. Every bolt and nut had this white hardened stuff in the threads. What a pain but what a decent assembly.

When I took the gear linkage out I was pleasantly surprised by its quality as well. A complete cast alloy piece with all moving parts being rose joints. Not a millimeter play in the joints. See the picture.

Whats left? The rear end needs stripping and then the bare chassis can go for sand blasting.

Question....what type of medium should be used to sand blast a chassis. There are so many different types but one of them should be the ideal.

The plan was to galvanize the chassis but apparently that's a no-no. The heat can warp the chassis. We are thinking of spraying the cleaned chassis with Zink-it as a base/under coat and then spray a top quality Rust-guard 2 pack over it to get it back to black. Any ideas are welcomed.

I am surprised by Jacques'Renault in the USA. I am placing an order for a left-hand drive rack and pinion. The cost for a reconditioned unit is US$195.00 with a refundable US$120 when you send the old one back. That I think is dirt cheap. Postage will have to be paid in all cases.

A few pictures are attached to show the progress.

Regards
Frans.
 

Attachments

  • IMG_1048.jpg
    IMG_1048.jpg
    98.7 KB · Views: 730
  • IMG_1052.jpg
    IMG_1052.jpg
    99 KB · Views: 771
  • IMG_1049.jpg
    IMG_1049.jpg
    99.9 KB · Views: 745
  • IMG_1022.jpg
    IMG_1022.jpg
    97.9 KB · Views: 853
  • IMG_1021.jpg
    IMG_1021.jpg
    94.5 KB · Views: 724
  • IMG_1020.jpg
    IMG_1020.jpg
    101.7 KB · Views: 744
  • IMG_1019.jpg
    IMG_1019.jpg
    89.1 KB · Views: 710
  • IMG_1015.jpg
    IMG_1015.jpg
    97.5 KB · Views: 739
  • IMG_0951.jpg
    IMG_0951.jpg
    100 KB · Views: 748
Painting the chassis

Do you have access to POR15 in NZ?
Its a single pot rust preventative paint which wont chip or allow moisture to get to the metal. A 3 step process which includes cleaning the metal using "Marine Clean" then rust converting using "Metal Ready". When the metal is dry you simply brush on 2 coats of POR15 hammer tough paint and it dries to a very hard spray gun type finish. I have no affiliation with POR15 but have used it for some years and in my opinion is the best available. I use it inside doors, on chassis and suspension parts. It now comes in various colours including grey, black and clear. go to-
http://www.ppcco.com.au/

http://www.permanentpaintedcoatings.co.nz/por15/
 
Last edited:
frans, check what rack you have before you send it to jacques
mine on the djetV is the 17:1 3.3 turns standard r8g one and you wouldn't want to exchange that for a 3.7 standard r10 one!

cheers! peter
 
small

you mentioned earlier that it was very small ,sure looks small behind those big guys ,and the width of the dashboard is amazing reminds me of my 4 cv .PUGS
 
you mentioned earlier that it was very small ,sure looks small behind those big guys ,and the width of the dashboard is amazing reminds me of my 4 cv .PUGS

Yep, they're small - 1.5m wide, 4.2m long & 1.2m high & only 620kg (actually, the 6 is a bit heavier - around 650). The 4CV is higher & shorter but about the same width. The big difference I find in driving my 4CV & my Djet lies, in part, with the wheelbase. Being mid-engined, the latter is quite long there & that helps make it extremely benign when playing around on the limit. My 4CV is wildly modified & very chuckable but requires more care. Peter
 
That looks really nicely designed. The gearshift mechanism alone looks like a work of art. I'm off to google that that car as I have no idea what it is :) Is that a 16 TS motor it runs ?

If you get it sand blasted, I'd go with whatever media the blasting company suggests. It is after all solid metal not car panels. They cant really hurt it (unless they drop it or something horrible like that).

If your going to sandblast it, the best option appears to be a good quality epoxy primer followed by a chassis coat of your choosing (the epoxy is the protection). If your going to try and clean it up yourself, the moisture cured urethanes ( POR, Rust bullet etc....) I think are brilliant. There just not a "magic cure" for rust like people seem to think.

failures in the coating aren't unknown (you can't see how these people applied it though), you can however just scrape it off and re-brush some on even 5years down the track without much problem. I'm going to use the moisture cured urethanes on the old ID's hull i'm stripping back at the moment.

seeya,
Shane L.
 
I do know of a couple of people the have used POR, and while they were pleased initially, after a few years they were less than impressed. However, I've no idea if it was their preparation or some other issue that caused the problems.

The stripper / blaster will tell you the best material to use. As long as the preparation is good, then a decent epoxy primer and suitable top coat should be sufficient. You can then wax coat or fisholene any remaining tubes or hollow sections. This is how my Dyane chassis was done back in the mid nineties, and in spite of Wellington's finest weather, it still looks very clean underneath.

They are lovely little cars, almost looking like a 2/3 scale model !
 
PaulT.... Yes we have POR15 and that is the way we are thinking.

4cvg..... The rack that I removed is a quick rack RHD. That will go to the race car. The LHD one will be a normal ratio one for now. I will upgrade it later. A G rack is in excess of 400 Euros. A bit high if all the bushes and balljoints has to be replaced as well. 16 bushes on the rear 8 in front. It all adds up.

Shane ....it runs a Gordini motor.

Frans.
 
Meanwhile...back home

In the meantime when I am at home I work on the engine resto.

With the head now almost usable The rest of the parts were prepared.

I had the sleeves bored out to the new pistons sizes and the gudgeon pin size increased from 20mm to 22mm. Then I put the sleeves in the lathe and did my usual trimming on top. That is to get the little ridge that squeezes itself into the head gasket to ensure a more durable and proper seal. See the pictures.

Then it was the piston's turn. The whole bottom is shortened and made smaller (narrower). After this I mark the valve centers on the pistons and take care that the pistons has their dedicated position from now on. The reason for this is that the G head has the valves sitting at an offset from one cylinder to the other. Cylinder 1 & 3 is the same offset to one side and 2 & 4 to the other side. That offset is 1.2mm from the center of the pistons. Years ago with all genuine parts the sleeves were sitting center. With the pistons set up in the milling machine it is just a matter of cutting the pockets for the valves to open. With the known combustion chamber cc's I might make them a little deeper to get to a decent compression ratio.

The pistons, conrods, crank and flywheel can now go of to the engine balancer. While waiting for him I will do some sump mods. Not as radical as the race car sump but just an improvement to keep the oil closer to the pick-up.

This motor will just be a fresh motor but still driveable. It could could end up in the region of 120-125 hp. The Matra will move along very well with its 650kg.

Regards
Frans.
 

Attachments

  • IMG_0281.JPG
    IMG_0281.JPG
    82.2 KB · Views: 626
  • IMG_0282.jpg
    IMG_0282.jpg
    91.8 KB · Views: 610
  • IMG_0266.JPG
    IMG_0266.JPG
    85.5 KB · Views: 594
  • IMG_0271.JPG
    IMG_0271.JPG
    85.2 KB · Views: 598
  • IMG_0274.jpg
    IMG_0274.jpg
    87 KB · Views: 626
  • IMG_0277.jpg
    IMG_0277.jpg
    93.8 KB · Views: 617
  • IMG_0279.jpg
    IMG_0279.jpg
    97.2 KB · Views: 651
Top