Finally ... Repairing a traction gearbox.

And now for the million and one pictures .... in the hope that I'll be able to figure out how the hell it goes back together in 3months time when we get back to it :clown: :rolleyes:

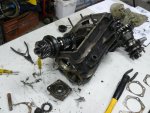
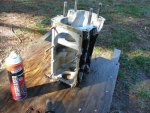
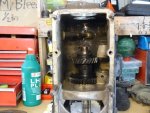
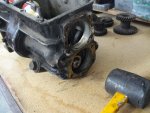
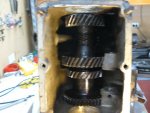
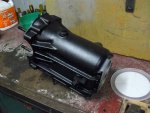
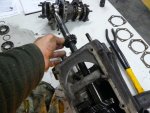
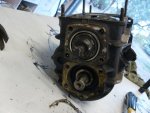
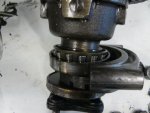
It's already removed from the car, the top cover is off, and the front lower nut cover ( removed ages ago to tighten up the big nut with big bars to see if that solved the noise in the gearbox).

81747d1457919175-finally-repairing-traction-gearbox-p1180347.jpg


81748d1457919175-finally-repairing-traction-gearbox-p1180345.jpg


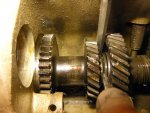
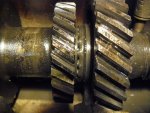
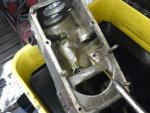
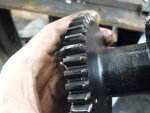
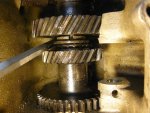
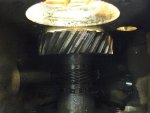
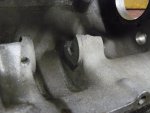
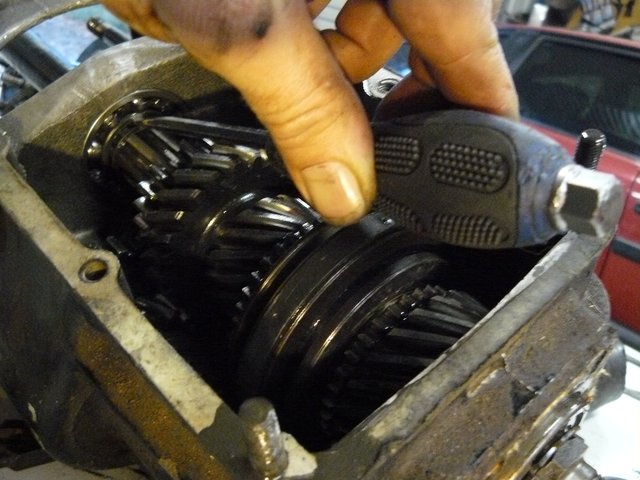
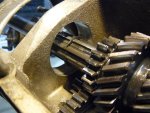
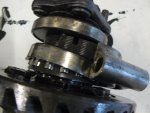
My concern is why was there broken teeth on a gear in there. I hadn't realised when my father bought the car, it had trashed a driveshaft. So no doubt a shock load went through the gearbox and chipped the teeth ( phew, that's one question solved).

attachment.php


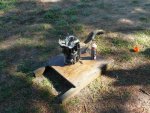
I whipped front lower cover off .... and being very lazy hooked the massive 3/4" rattle gun to the lower nut and spun it off.
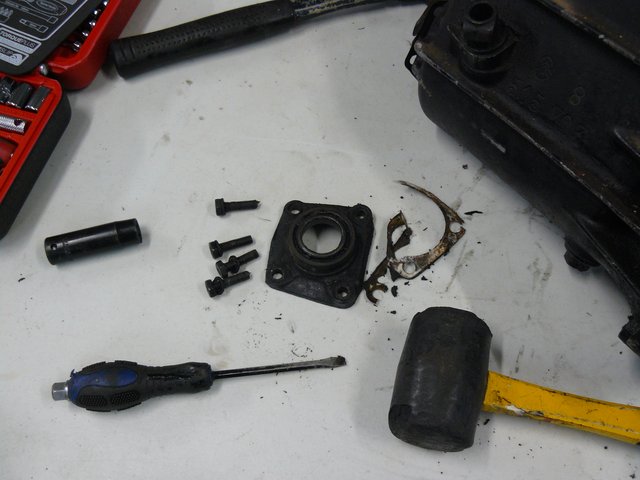
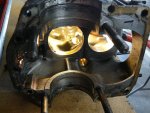
attachment.php


The top cover.

attachment.php


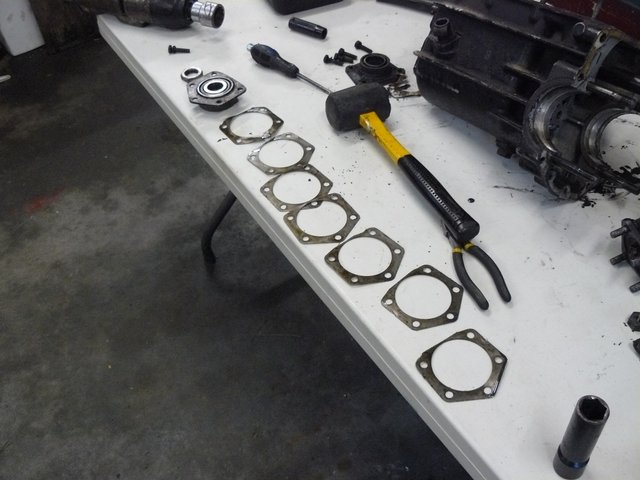
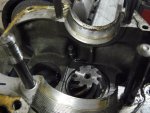
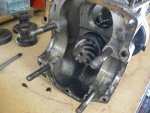
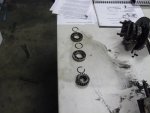
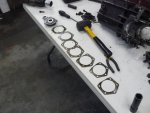
Checkout the number of shims behind the bottom front plate/bearing holder :eek:

attachment.php


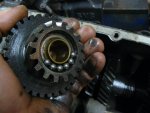
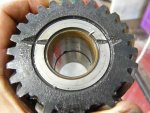
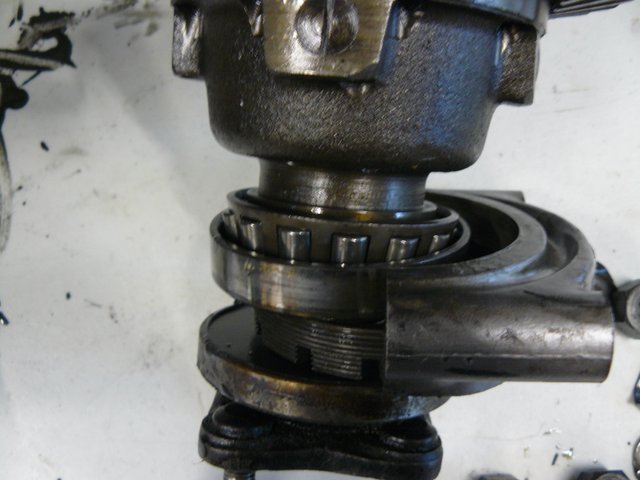
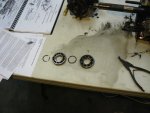
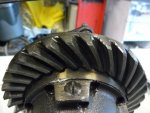
Someone has been here before. The tabs that you bend back are damaged from previously being bent. I just gave each output shaft a couple of gentle taps with a rubber mallet and it pinion came away.

attachment.php


attachment.php


attachment.php


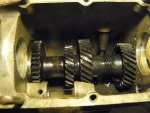
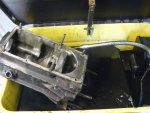
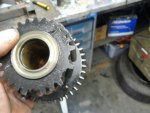
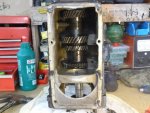
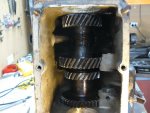
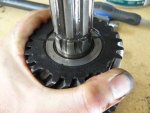
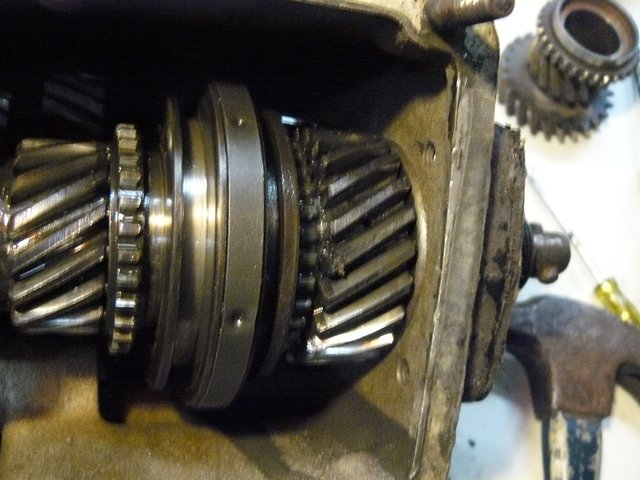
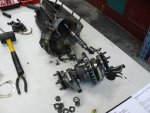
To my very unprofessional, incompetent eyes, this all looks extremely good, including the bearings. I won't pull it apart unless I find a good reason (if it all bolts back together within factory specs). I can already hear all boo'ing and hissing from people reading this :)

attachment.php


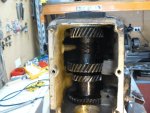
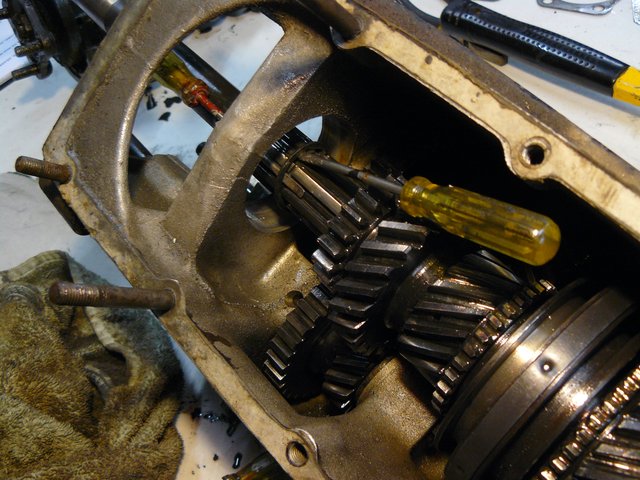
A quick look convinces ... damn, you can't just slide either of the shafts out. Things look pretty sad when you actually see me with a manual open beside what I"m trying to dismantle :eek:

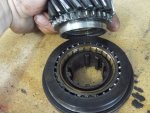
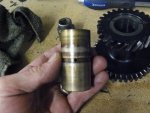
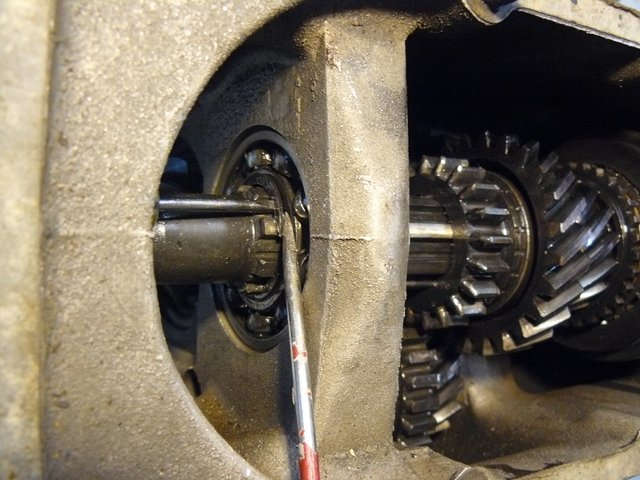
Now if I'm reading the manual right, I need to strip the back off the top shaft. .... I hate snap rings and these bloody spring clips you can't grab with normal circlip pliers. I managed to work it off with 3 small screwdrivers without damage (I'm sure there is a special tool for these rings, but I don't own it!).

attachment.php


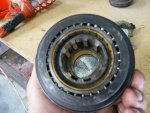
It's two seperate bearings, I found they will readily tap back through if gently tapped back through the housing. If the 2nd bearing stops dead, make sure the washer between them hasn't grabbed the circlip groove.

attachment.php


attachment.php


This clip readily slides down the slide as you can lift and pry it forward at the same time quite easily.

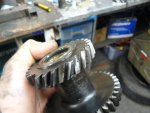
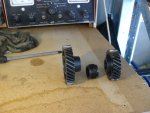
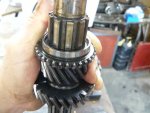
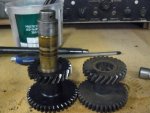
The gear the engages the reverse idler then slides down the shaft and off.

attachment.php


attachment.php


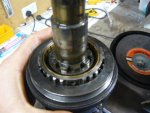
the manual seems to think I can move the top shaft down and to the side and it'll slide out forward. I reckon I'll need to remove the nut and bearing off the front of it first. I'll hopefully get outside later tonight and try this. That synchro hub will certianly need to come off first. And likely so will those big gears,, I can't see how they can fit through the gearbox housing.

seeya,
Shane L.
 

Attachments

  • P1180529.JPG
    P1180529.JPG
    79.7 KB · Views: 827
  • P1180528.JPG
    P1180528.JPG
    76 KB · Views: 855
  • P1180525.JPG
    P1180525.JPG
    80.2 KB · Views: 256
  • P1180526.JPG
    P1180526.JPG
    63.7 KB · Views: 835
  • P1180524.JPG
    P1180524.JPG
    95.9 KB · Views: 824
  • P1180523.JPG
    P1180523.JPG
    69.3 KB · Views: 236
  • P1180522.JPG
    P1180522.JPG
    85.2 KB · Views: 825
  • P1180520.JPG
    P1180520.JPG
    79.5 KB · Views: 808
  • P1180518.JPG
    P1180518.JPG
    85.5 KB · Views: 7,768
  • P1180516.JPG
    P1180516.JPG
    71.3 KB · Views: 240
  • P1180515.JPG
    P1180515.JPG
    68.2 KB · Views: 818
  • P1180514.JPG
    P1180514.JPG
    60.3 KB · Views: 860
  • P1180512.JPG
    P1180512.JPG
    72.8 KB · Views: 810
  • P1180509.JPG
    P1180509.JPG
    62 KB · Views: 854
  • P1180507.JPG
    P1180507.JPG
    59.5 KB · Views: 831
  • P1180506.JPG
    P1180506.JPG
    74.8 KB · Views: 857
  • P1180508.JPG
    P1180508.JPG
    74.5 KB · Views: 886
Oh yeah... I'm wondering if this hasn't been apart in the past to fit a higher geared crown and pinion. I can't imagine why there is so many markings on this otherwise :confused:

83444d1461400663-finally-repairing-traction-gearbox-p1180512.jpg
 
attachment.php


Yeah, thought so, whip the nut and bearing off the front, slide the shaft back then up and out the top.

attachment.php


Wow, glad I read the manual... "remove bolt holding reverse shaft" .... I hadn't even spotted that was there.

attachment.php


As suggested by Richard in that article I drove the plug back into the gearbox. It readily moves and isn't crazy tight like most things you come across.

attachment.php


The plug came out with metal fragments behind it.

attachment.php


Manual ... "Knock out shaft towards front of box" .... yeah, hilarious aren't they. There is no way to get onto that shaft to drive it anywhere. Anyway, it's not tight, I dropped that alan key bit down into the recess and sat a socket extension against the edge of it ... the tiniest tap with a hammer had it moving. So I just pushed the shaft through with my finger. Things can't be this easy ..... I'm guessing getting it back together will be the drama.

attachment.php


Big CAPITAL letters in the manual. "WHEN REMOVING THE PINION TAKE CARE NOT TO DISPERSE THE STEEL BEARING BALLS" ............................................ Or in other words the manuals writers were rolling on the floor in fits of laughter meaning "You will be retrieving the balls and shims from the bottom of the gearbox if you manage to get it apart"

attachment.php


It's no big drama really. I can see the "excitement" involved in trying to refit this gear without filling the bottom of the gearbox with bearings you can't readily retrieve though.

attachment.php


attachment.php


Manual states: "Part the second speed pinion 11 from first and reverse idler gear (23) so as to provide clearance for the removal of half collars (13)" ...................

83413d1461331174-finally-repairing-traction-gearbox-diag1.jpg.jpg


There taking the piss right ?? There's no way I can seperate that to get to collar 13. It appears 41 is an inner bearing race, so I first need to get the bearings out of the way (which aren't shown in that diagram, I wonder if this is a later/earlier/different gearbox).

seeya,
Shane L,
 

Attachments

  • P1180541.JPG
    P1180541.JPG
    96.5 KB · Views: 234
  • P1180540.JPG
    P1180540.JPG
    92.4 KB · Views: 772
  • P1180538.JPG
    P1180538.JPG
    88.2 KB · Views: 888
  • P1180537.JPG
    P1180537.JPG
    66.4 KB · Views: 803
  • P1180536.JPG
    P1180536.JPG
    67.5 KB · Views: 836
  • P1180535.JPG
    P1180535.JPG
    85.1 KB · Views: 798
  • P1180534.JPG
    P1180534.JPG
    71.5 KB · Views: 803
  • P1180532.JPG
    P1180532.JPG
    69.1 KB · Views: 811
  • P1180531.JPG
    P1180531.JPG
    72.3 KB · Views: 764
  • P1180530.JPG
    P1180530.JPG
    86.3 KB · Views: 749
Last edited:
Knock back the pinion shaft towards the rear as much as possible. Slide 43, 42 and 11 along the shaft and collars 13 are easily accessed! There probably will not be a part 51. Post war boxes did not have it next to the speedo drive.
It helps to stand the box vertically with the bevel pinion at the lowest point and to use a large screw driver to lever the gear 11 upwards. The collars 13 will then flick out with the aid of a small screw driver. I stand the box in a 100mm vice on the bench.

That's hilarious ... I wonder if I would have ever been game enough to do that without you suggesting it. I stood the gearbox on it's end and gave the end of the shaft a few heavy whacks with a rubber mallet.

attachment.php


attachment.php


Look how much space opened up at the top of the shaft :banana:

attachment.php


There is the C clips there, as Gerry suggests, very easy to get out.

attachment.php


attachment.php


The manual says to drive the shaft back through the back .....

attachment.php


So I tipped it vertical and tried to remove the shaft, lifting off each gear and washer in order.

attachment.php


Gerry is right again, the extra spacer isn't there.

attachment.php


Typical, the very, very last thing to be removed is the gear I'm intersted in.

attachment.php


attachment.php


missing teeth.

attachment.php


I noticed when I was rolling it over trying to figure out how it worked .... the gear that engages the reverse idler shaft, can move all the way back and engage this. the edge of the teeth is worn down as that gear has been touching in normal use right ?? It must be linkage adjustments on the box that need to prevent this.

attachment.php


I can see the casing is broken around the reverse idler shaft, this must have been taken out when the teeth were damaged. Fortunately it doesn't appear to interfere with the shaft at all.

attachment.php


attachment.php


I bought one of those parts washers about 10years ago when they appeared really cheap on the market..... You know, I've found them not much use at all. I broke the cobwebs away from above it and plugged it in. I had to tilt the side of it up as a lot of the solvent has evaporated over the years. I wanted to wash the muck out of the bottom of the gearbox, but make sure it was all caught, incase there was bearings or anything in it I needed (there must be broken teeth there somewhere at a minimum. It actually worked quite well for this.

I was itching to try putting the gearbox casing in the dishwasher while my wife wasn't home. But I figured the kids would dob me in as soon as she got home :rolleyes:

attachment.php


This is why I've never really used the parts washer. A pressure washer with a $2.00 tin of degreaser works miracles. I even stripped half the paint and paper gaskets off it is so effective.

seeya
Shane L.
PS: I can now see why no-one is ever keen to rebuild these gearboxes. I assumed I'd be whiipping out to shafts and re-doing them and re-installing. Not actually having to fit it all together "inside' the housing. This shouldn't be difficult, but it'll be really fiddly, time consuming and frustrating as it'll all need to be assembled/dis-assembled multiple times inside the housings to the the measurements right.
 

Attachments

  • P1180562.jpg
    P1180562.jpg
    72.4 KB · Views: 221
  • P1180561.jpg
    P1180561.jpg
    78 KB · Views: 613
  • P1180560.JPG
    P1180560.JPG
    86.7 KB · Views: 666
  • P1180559.JPG
    P1180559.JPG
    72.1 KB · Views: 665
  • P1180558.JPG
    P1180558.JPG
    88.7 KB · Views: 647
  • P1180556.JPG
    P1180556.JPG
    62.3 KB · Views: 638
  • P1180554.JPG
    P1180554.JPG
    67.2 KB · Views: 954
  • P1180553.JPG
    P1180553.JPG
    64.8 KB · Views: 630
  • P1180552.JPG
    P1180552.JPG
    91.3 KB · Views: 615
  • P1180550.JPG
    P1180550.JPG
    78.5 KB · Views: 636
  • P1180549.JPG
    P1180549.JPG
    87.7 KB · Views: 665
  • P1180548.JPG
    P1180548.JPG
    86.9 KB · Views: 667
  • P1180547.JPG
    P1180547.JPG
    86.1 KB · Views: 627
  • P1180546.JPG
    P1180546.JPG
    98.1 KB · Views: 676
  • P1180544.JPG
    P1180544.JPG
    83.4 KB · Views: 664
  • P1180545.JPG
    P1180545.JPG
    83.7 KB · Views: 240
  • P1180543.JPG
    P1180543.JPG
    70.1 KB · Views: 197
  • P1180542.JPG
    P1180542.JPG
    67.5 KB · Views: 633
ok, now is where stuff gets interesting, and my severe lack of experience shows up :)


barely any slop in the broken gear on the lower shaft...

attachment.php


it's so tight over the splines of the shaft, see the bronze fragment on top where it has actually marked the bushes. I'm assuming I can just move these bushes to the replacement gear. New bushes can't be any tighter if I have to tap this gear on with a rubber mallet.

attachment.php


The bearing all roll so smoothly and quietly. This one I can "rock" if that makes sense. I'll see how much a replacement bearing is (and if it is available).


This bush on the top shaft I think will need replacing.

attachment.php


attachment.php


These funny little balk/synchro mesh (what are they called on these early gears). Appear to grab remarkably tightly when I try them. They can go straight back in.

fun and games right ?

seeya
Shane L
 

Attachments

  • P1180571.JPG
    P1180571.JPG
    65.6 KB · Views: 601
  • P1180569.JPG
    P1180569.JPG
    70.6 KB · Views: 629
  • P1180568.JPG
    P1180568.JPG
    60.4 KB · Views: 212
  • P1180565.JPG
    P1180565.JPG
    87.1 KB · Views: 619
  • P1180564.JPG
    P1180564.JPG
    75.7 KB · Views: 596
  • P1180563.JPG
    P1180563.JPG
    60.9 KB · Views: 228
'it's so tight over the splines of the shaft, see the bronze fragment on top where it has actually marked the bushes. I'm assuming I can just move these bushes to the replacement gear. New bushes can't be any tighter if I have to tap this gear on with a rubber mallet.'

Yes!

'The bearing all roll so smoothly and quietly. This one I can "rock" if that makes sense. I'll see how much a replacement bearing is (and if it is available).'

They rarely give any trouble and a slight rocking is permissible. It is a roller race and only carries loads diametrically!

'I can see the casing is broken around the reverse idler shaft, this must have been taken out when the teeth were damaged. Fortunately it doesn't appear to interfere with the shaft at all.'

I have a spare casing if you wish to use it!

'These funny little balk/synchro mesh (what are they called on these early gears). Appear to grab remarkably tightly when I try them. They can go straight back in.
fun and games right ?'

I have the fixture to dismantle and reassemble the six balls in the synchro hub. Rock the outer into the first click position either side of centre. This will allow you to assess the condition of the splines where they lock onto the Dog gear of each synchro cone. If the wear is parallel to the axis of the main shaft and not too severe you should be able to reuse the synchro hub.
 
Thanks for the incredibly generous offer. I really do think this case should be ok.

attachment.php


attachment.php


It looks bad in "up close" photography. But reality is it's barely even touching the area the shaft runs in (as the area is "open" beside the break to clear the top shaft in the gearbox).

attachment.php


I thought I'd waste hours/days finding/fabricating the press tool. measuring the bush OD gave 34.3mm.... It's only about 1mm thick. So I'd need to turn down the ***exact*** sized press tool. Imagine my surprise to find I had the bush in my hand 3minutes later. A couple of year back when I bought the land rover I found it was a PITA as random fasteners were A/F (even in the 90's :nownow: ). Anyway I bought a big well used dufor socket set for next to nothing at the market. The 1" socket in it was exactly 34mm OD. This sort of stuff usually never happens.

attachment.php


I was expecting 2 bushes? I seem to recall you saying that in the past. There is one big bush with an oiling groove in it.

attachment.php


The only real wear I can find here is the main splines onto the shaft.


The should give some really lovely on/off throttle driveline lash right? I think you must have bought one of these up for me too? ( I can't think where else it would have come from :) )... I tried it, it about the same wear wise onto the main shaft for slop, but there is a small amount of slop on the splines the outer selector part slides on, that isn't on the one currently in the gearbox.

seeya,
Shane L.
 

Attachments

  • P1180577.JPG
    P1180577.JPG
    60.5 KB · Views: 635
  • P1180575.JPG
    P1180575.JPG
    69.2 KB · Views: 574
  • P1180574.JPG
    P1180574.JPG
    81.1 KB · Views: 568
  • P1180573.JPG
    P1180573.JPG
    77.2 KB · Views: 598
  • P1180572.JPG
    P1180572.JPG
    72.3 KB · Views: 552
'I thought I'd waste hours/days finding/fabricating the press tool. measuring the bush OD gave 34.3mm.... It's only about 1mm thick. So I'd need to turn down the ***exact*** sized press tool. Imagine my surprise to find I had the bush in my hand 3minutes later. A couple of year back when I bought the land rover I found it was a PITA as random fasteners were A/F (even in the 90's :nownow: ). Anyway I bought a big well used dufor socket set for next to nothing at the market. The 1" socket in it was exactly 34mm OD. This sort of stuff usually never happens.'

Yes those things are floating bush and never really wear much at all.

I'll be interested to see what you find when you open up the diff top hat!

'I was expecting 2 bushes? I seem to recall you saying that in the past. There is one big bush with an oiling groove in it.'

No that is in the second synchro gear idler on the main shaft. I have turned down those floating bushes to replace the two separate bushes of the second synchro gear.

'The only real wear I can find here is the main splines onto the shaft.'

There is never dangerous wear on the main shaft splines. The ones I was talking about are the splines on the inner part of the outer ring of the synchro. If they are badly worn the car will jump out of gear. These splines lock over the dog teeth on the second and top gear synchro idler gears.

I can't open the video!!
 
A Couple of points!
Do you have the dowel key that goes in between the splines on the mainshaft to peg the thrust washers for the second and third idlers?
I have a selection of "Celeron" washers to choose from when setting the end play of the mainshaft gears.
Once the pinion shaft has been disturbed it will need to be reset with shims. It is NEVER good enough to just put it back with the same shims as came out.
I also have a large selection of spare pinion shaft shims to choose from!
Do not use paper gaskets to seal the front bearing carrier to the gearbox case! Use Silastic 732 RTV or similar instead! Paper gaskets squash and mess up the pinion depth setting.
Front bearings are 3305 s and are fairly common. They are not split row as per the original but that is not important.
Do not under any circumstances use the bend over star washer to lock up the pinion nut in front of the 3305 bearing. Use Loctite instead.
I have a tool to turn the ring nut adjusters of the Timken tapered roller bearings for the diff/crown wheel assembly. It is a bit roughly made but works well enough!

Now there is some stuff for me to digest :) ... I haven't seen any dowel keys at all. I'll need to see if it's still sitting in place. It appears 3305 bearing is still readily available. you would buy it from the local bearing store, not ebay though :)

SKF 3305 A C3 Double ROW Ball Bearing | eBay

Why don't I use that bend over star washer? I'm glad you mentioned don't use gaskets as I'd probably have sourced/cut new ones.

seeya,
Shane L,
 
They used to be really cheap at the bearing services. But I have not bought any for about 10 years, so that may have changed. At least the Ebay is a Buy it now price and the added advantage is that they are SKF. I would say go for it!
 
Last edited:
Now that's interesting. The gearbox bushes are very cheap. There is the celeron washers Gerry speaks of too (google celeron washers and nothing comes back). If you google "celeron washers shim", you get this thread on this forum returned.

Gearbox pinions, shafts and forks Products Citroën Traction Avant

But those gears :eek: :eek: :eek:

Gerry, those gears of yours here... They are worth $400+ each :eek:

seeya,
Shane L.
 
Very interesting. For my benefit as a traction gearbox ignoramus, why use Celeron?
 
Yes, timing gears look like fabric impregnated with some sort of 1930s-40s resin product and then machined up. They're Celeron I think.

It was used for the top thrust washers on Renault 750 kingpins too, I think. I presume in a gearbox the idea is that it wears in preference to other things. But usually it is all steel shims and bronze.

Seems odd, but it works.

Cheers
 
There is a major fault with Tractions gearboxes that Gerry may be able to explain better than me. But one of CCOCA's members, Bernie Hadaway ( also recently deceased ) had observed that one of the gears ( second I think ) has a sharp edge when being cut which was a modification by Citroen engineers made on the assembly line - but this undercut creates a stress point and eventually creates a weak point. Bernie had a solution which added another bronze bearing to this area which solved the design problem. I will try and find this article from CCOCA records and post it here. With the gearbox apart it would be worth considering the modification. There is also the Jack weaver strengthening plate which can be fitted internally to stop the gearbox casing cracking from within. Details of these are still available.

Over to Gerry for his thought.
Hawk
(Ted Cross)
 
Top