DS Rear Suspension Boot Questions

GreenBlood

Administrator
Staff member
Administrator
VIP Paid Subscriber
Fellow Frogger
Joined
Mar 17, 2001
Messages
8,570
Location
Brisbane
OK, I've not changed a rear suspension boot before so be kind :clown:

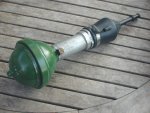
So, cleaned the area around the boot/ sphere, removed sphere, undid the high pressure line, removed return line, removed pin. Removed and cleaned the cylinder/ram, removed split boot.

I paid attention to the way the boot had been fitted.

I drew this diagram to show how the boot was fitted to the rod/ram, previously, and how I fitted mine. Easier than trying to explain.

attachment.php


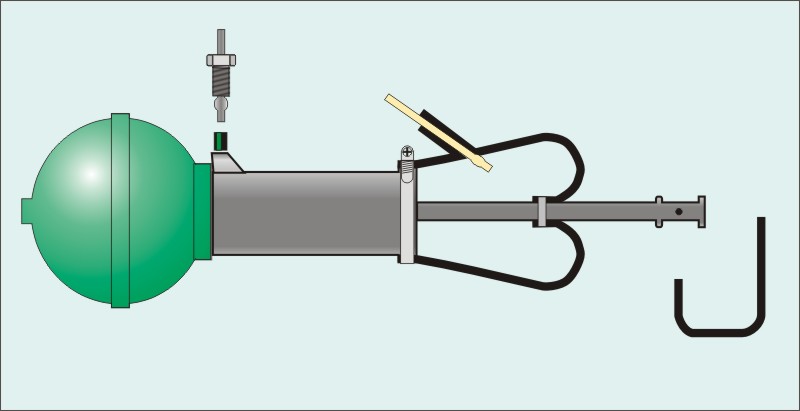
Do the gurus agree that this is correct?

I had to turn the boot inside out, and slide the small opening of the boot over ball end of the rod, over the flange and down onto the ribbed part of the rod - seems like there must be an easy way to do this, special tool?

Then fit ligerex clamp and pull the boot back over the clamped end.

attachment.php


First attempt I neglected to ensure the orientation of the hole in the rod was at 90 degrees to the high pressure line and return line on the boot, good practice for using ligarex and an obvious trap.

Now here's a few questions...

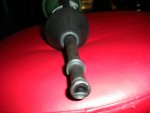
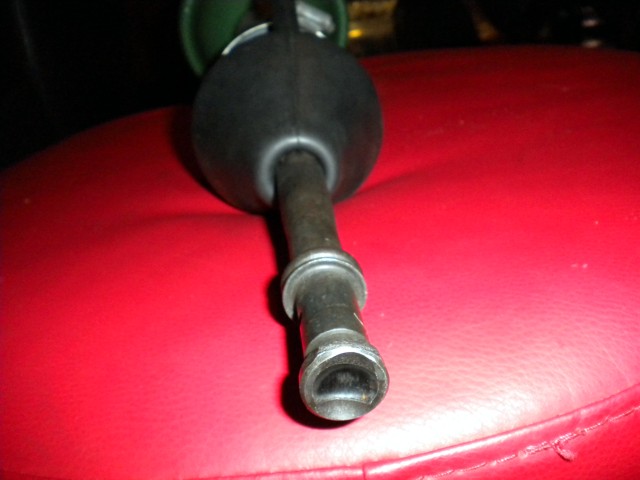
How do I tell if there is too much wear on the rod end?
Why does the wear appear to be horizontal when the rods movement would be vertical?
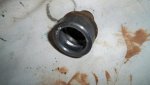
What grease is recommended when packing the ball cup?

attachment.php


Cheers
Chris
 

Attachments

  • Suspension boot diagram.jpg
    Suspension boot diagram.jpg
    30.7 KB · Views: 6,616
  • Suspension cylinder boot.jpg
    Suspension cylinder boot.jpg
    93.6 KB · Views: 8,416
  • Rod end.jpg
    Rod end.jpg
    86.2 KB · Views: 3,033
Did you change the piston seals while you were that dismantled? Well worth doing.

Did you fold the ligarex on the inside over so it can't spike anything?

Do you have good bump stops? A bad stop wil let the ram move too far and potentially tear your new boot.

I've never done much with the groove in the rod but I know others do. I often change for a new ball though as mine have always seemed pitted.

Clean the sand and crud out of the cradle it all sits through while apart. So much mud gets in there!
 
Nothing worse than some wear on your rod end. A bit of grease helps it slide through.

And mr smarty pants "I drew a diagram".......:rolleyes:

I think you are doing OK so far, but it's late and I'm not going to the garage. However your outer ligarex strap seems to be unusual.:nownow:
 
Looks like you did it right to me ... Yeah you fit the boot inside out :) Did you have the extra "rubber band" to protect the rubber under the clamp?

Don't you have a ligarex tool there? I fear the hidden end will puncture the new boot if you haven't used ligarex there ... hmmm....

seeya,
Shane L.
 
Did you change the piston seals while you were that dismantled? Well worth doing.

Did you fold the ligarex on the inside over so it can't spike anything?

Do you have good bump stops? A bad stop wil let the ram move too far and potentially tear your new boot.

I've never done much with the groove in the rod but I know others do. I often change for a new ball though as mine have always seemed pitted.

Clean the sand and crud out of the cradle it all sits through while apart. So much mud gets in there!

No, I haven't changed the seals, is that a straight forward job?

I did my best ever ligerex clamp on this one, tucked the cut end back under - beautiful :approve:

I plan on changing the bump stops this weekend, they are not bad but now's the time.

The ball on this one looks as good as new, but that groove on the rod seems a bit deep, I can feel a small ledge running my finger across it?

The whole under guard area is getting the treatment, did I say clean :wink2:

....but, but, why is the rod groove horizontal :confused:


*Nothing worse than some wear on your rod end. A bit of grease helps it slide through.

And mr smarty pants "I drew a diagram".......:rolleyes:

I think you are doing OK so far, but it's late and I'm not going to the garage. However your outer ligarex strap seems to be unusual.:nownow:

*Save that one for the caption comp ...

Honestly guv, it was easier to draw a pictca' than explain :clown:

Now, the outer clamp thing is interesting, I had a boot kit I bought must be 20+ years ago form Maxim Motors - sealed in original Citroen packing, the boot is/was supplied with ligearex, new pin, and the clamp?

Oh yeah. Don't use a crappy worm drive clamp. Those things chew up rubber. Do it properly with ligarex.

As above, but if it is recommended to use ligarex who am I to argue :wink2:

Looks like you did it right to me ... Yeah you fit the boot inside out :) Did you have the extra "rubber band" to protect the rubber under the clamp?

Don't you have a ligarex tool there? I fear the hidden end will puncture the new boot if you haven't used ligarex there ... hmmm....

seeya,
Shane L.

Yes, to rubber band, yes to ligarex. yes to 'tool' :D

It's a bit late but I'll get a pic of the inside of the boot for the benefit of others, nice and tidy - no way it can rip the boot.

Cheers
Chris
 
Chris,

They show that wear pattern because that is the contact point with the ball bearing. That bearing's diameter is the same as the rod ends interior width. So the rod end would show the same wear pattern regardless of the rod's movement.

Steve
 
Chris,

They show that wear pattern because that is the contact point with the ball bearing. That bearing's diameter is the same as the rod ends interior width. So the rod end would show the same wear pattern regardless of the rod's movement.

Steve

Thanks Steve, good answer and now makes sense to me... would I be right then in saying that groove on mine is fairly normal if compared to a new part.

If so I'll grease the ball socket and re-fit to the car :wink2:

Cheers
Chris
 
Hi Chris

are you replacing the cups that hold the balls?? Mine had very deep grooves in them when I changed mine recently.. and were responsible for the "clicking" when the car would rise.

Matthew

PS AS Richo will confirm.. the process you have completed with the new boot is correctly referred to as invagination. :)
http://www.flickr.com/photos/daviddb/3392337858/
 

Attachments

  • 100_0518.jpg
    100_0518.jpg
    88.5 KB · Views: 842
Hi Chris

are you replacing the cups that hold the balls?? Mine had very deep grooves in them when I changed mine recently.. and were responsible for the "clicking" when the car would rise.

Matthew

PS AS Richo will confirm.. the process you have completed with the new boot is correctly referred to as invagination. :)
http://www.flickr.com/photos/daviddb/3392337858/

Matthew, the ball cups on mine look like new, no wear whatsoever, so they will be re-fitted :wink2:

That's a nice word - invagination - must have been coined just for DS Citroen folk, I'm a more visual kind of guy and a picture tells a thousand words in my world :D

BTW, is that a Polish Linen Tea Towel in your pic :nownow:

Cheers
Chris
 
GreenBlood said:
That's a nice word - invagination - must have been coined just for DS Citroen folk, I'm a more visual kind of guy and a picture tells a thousand words in my world :D

Cheers
Chris

Ummmm..I can't help you on the visual...:wink2: But I do understand.. I'm a very visual person! as you may have gathered from my posts.:wink2:

Matthew
 
Great thread. Used it today as reference for my own first go at replacing torn rear suspension boots etc. everything dismantled and cleaned. Next job to rebuild and put it all back in.
 
Gosh this brings back memories.......

If you have a dremel or die grinder with a carbide burr, you can grind the lips of the groove in the rod end away.

The original shape in the rod end was a smooth curve, with very small contact line on the ball. As it wears the groove gets wider and greatly increases the contact area, such that grease is excluded from the ball/rod interface and the rod forces the ball to rotate with it..... causing the clicking. if this is allowed to continue it can transmit a bending moment to the rod..... which can actually break the rod (usually at the clip hole).

By grinding the lips away, you reduce the contact area, and encourage grease to re-enter the joint as it works.

As it is a hardened steel surface, only carbide burrs will cut it. The smaller you make the contact area the better.

Good EP grease is fine

Bob

Edit: PS: i notice in your beautiful drawing that you show the drain tube inserted until the bulge is inside the boot.
This is wrong, the bulge should be within the rubber neck of the boot, with none of the tube inside the boot.
 
Another tip... I pull the boot onto the rod right way out. Then turn it inside out while on the rod. Poke the end of the small end with a blunt tool to encourage it to turn inside out. Then pull it along to the knurled section where it is clamped with ligarex.

I find it a lot easier to pull it onto the rod, instead of pushing it.

Bob
 
Rear suspension rebuilt and reinstalled yesterday, as per the guidance above. Pretty straightforward job, in the end. The back is now nice and soft, plus no leaks!

As to the front end (different saga), a different story. After much fiddling, height corrector rebuilt, and exhaust line cleared (or so I thought). But still rising too high and increasingly firm with use. I am confident it is not the HC, but the return line.

And after all that, there's now a knocking sound under acceleration. Drive shafts? Sigh...

AM
 
Could be big end bearings? That turns into a monstrous shudder! Hope its not that! Drive shafts fortunately are not that difficult to swap. Check for water in your oil. Bloody Citroens!
 
Rear suspension rebuilt and reinstalled yesterday, as per the guidance above. Pretty straightforward job, in the end. The back is now nice and soft, plus no leaks!

As to the front end (different saga), a different story. After much fiddling, height corrector rebuilt, and exhaust line cleared (or so I thought). But still rising too high and increasingly firm with use. I am confident it is not the HC, but the return line.

And after all that, there's now a knocking sound under acceleration. Drive shafts? Sigh...

AM

Anti roll bar bushings. Inexpensive and easy to replace. Also, the anti roll bar "talks" to the height corrector. Inspect the bushings.
 
Rear suspension rebuilt and reinstalled yesterday, as per the guidance above. Pretty straightforward job, in the end. The back is now nice and soft, plus no leaks!

As to the front end (different saga), a different story. After much fiddling, height corrector rebuilt, and exhaust line cleared (or so I thought). But still rising too high and increasingly firm with use. I am confident it is not the HC, but the return line.

And after all that, there's now a knocking sound under acceleration. Drive shafts? Sigh...

AM


As Wally mentioned, do double check the condition of those plastic anti-rattle bushings on the roll bar. If worn can cause all kinds of little problems and noises. OTOH heavy/moderate vibration on acceleration or during light to moderate braking is typically the result of fairly sever wear indentations in the Tri-ax housing channels caused by the balls located on the Tri Ax. As the axles of of unequal length, switching the Tri Ax housings left to right not only puts those indentations in a bit different orientation but also puts them on the braking side of the Tri-Ax instead of the acceleration side. If that 'fixes' the problem, well and good. The alternative is to replace. It is to bad that the steel models of the Tri-ax did not have replaceable sleeves that the factory used for the Al Tri-ax housings.
 
Top