DS Front Guard and Headlight Bucket Reassembly

cresco750

Member
Fellow Frogger
Joined
Nov 3, 2010
Messages
160
Location
Auckland, NZ
Hi all
I will apologise in advance, as I know that this topic has been discussed in the past but I don't seem to be able to find the thread now.

Shortly, I will be reassembling the front guards of my newly repainted '69 DS20. Due to a number of factors, this restoration project is now entering its seventh year, during which time I have moved house twice. As a result, my boxes of DS parts have somewhat been mixed up and I now need to sort out the necessary bits of each component, ie headlight parts from door parts, etc.
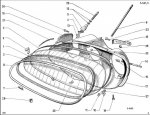
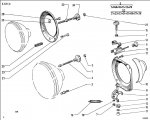
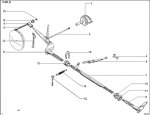
Can anyone please point me in the direction of a pictorial parts breakdown and reassembly guide for the headlights and front guards in general, including headlight levelling / turning mechanisms?

When reinstalling the headlight glass into the guard, what sort of sealant, or sealing foam should be used?

Also, the plastic headlight buckets need to be repainted as they have been painted in the past and it is now cracking / flaking and looks unsightly. Can someone suggest the best / safest way to remove the old paint without affecting the plastic, and then respraying? What is the appropriate paint colour for these?

Many thanks

Neil
 
Neil,

PDF 648 volume 1 has all the diagrams and parts listed you should need. Look at the sub titles under the Electrical heading.

There is a repro seal available that sits between the glass and the inner guard, but you may find something similar at Clark Rubber.

The plastic headlight buckets having been re-painted previously would be best to hand sand (wet sand starting with 400 and move to finer grades), don't use any solvent. Not knowing what paint system had been used means you really need to remove all evidence of paint - I used Anchor brand lacquer aerosol, a plastic primer then 2 top coats, I selected Moss Vale Sands as a close match to the original colour.

Initially have a good look at the exploded diagrams in 648 and set the required parts aside, there is a special M7 nut used on each side, square rather than hex make sure you still have these.

I show the dismantling of the headlight assembly in my resto thread (link in my signature) you may find some of the images helpful.

Cheers
Chris
 
Bingo, just what I was after, thanks Chris. I had looked through your rebuild thread previously but for some reason I must have skipped that page and missed the bit about the front guards?

cheers
 
Bingo, just what I was after, thanks Chris. I had looked through your rebuild thread previously but for some reason I must have skipped that page and missed the bit about the front guards?

cheers

I'm happy that the images are of some use to you, but you really can't go past the workshop manuals, there are 3 or 4 excellent exploded diagrams illustrating the compete assemblies - very useful when setting up the head light turning/leveling etc.

Look forward to hearing your progress, 7 years you must be busting to get back in the drivers seat ;)

attachment.php


attachment.php


attachment.php


attachment.php


Cheers
Chris
 

Attachments

  • Headlight directional control.JPG
    Headlight directional control.JPG
    61.9 KB · Views: 2,821
  • 1Headlight glass.jpg
    1Headlight glass.jpg
    97.7 KB · Views: 2,815
  • Headlight securing.JPG
    Headlight securing.JPG
    83.2 KB · Views: 2,357
  • Self levellig device.JPG
    Self levellig device.JPG
    58.8 KB · Views: 2,827
Neil,

PDF 648 volume 1 has all the diagrams and parts listed you should need. Look at the sub titles under the Electrical heading.

There is a repro seal available that sits between the glass and the inner guard, but you may find something similar at Clark Rubber.

The plastic headlight buckets having been re-painted previously would be best to hand sand (wet sand starting with 400 and move to finer grades), don't use any solvent. Not knowing what paint system had been used means you really need to remove all evidence of paint - I used Anchor brand lacquer aerosol, a plastic primer then 2 top coats, I selected Moss Vale Sands as a close match to the original colour.

Initially have a good look at the exploded diagrams in 648 and set the required parts aside, there is a special M7 nut used on each side, square rather than hex make sure you still have these.

I show the dismantling of the headlight assembly in my resto thread (link in my signature) you may find some of the images helpful.

Cheers

Chris

Hi Chris,

I'm very interested in the restoration of the buckets as the the next job I'll be tackling is the replacement of the headlights and of course it would be appropriate to restore the buckets at the same time.

Mine appear to be untouched previously - that is, no paint. Question. Can they be cleaned or is the plastic actually discoloured and painting is the only alternative from replacement?

John

They appear to discolour unevenly so even after a good cleaning they won't look like new. I guess sun damage over 40 years would cause some porosity which holds grime which stains.

I would still see painting as a last resort, if they are not too bad I would probably prefer using a plastic polish and seeing the imperfection as earned patina. Mine were too far gone so painting was the only option short of buying repro replacements.

As a footnote, the paint I used has really keyed well to the plastic and cannot readily be scratched through, I'm hoping for another 40 years of service with an occasional polish ;)

Cheers
Chris

Thanks Chris.

Agreed that painting will be a last resort subject to how they clean up. I too do not mind well earned patina.

Great that the Anchor paints worked (are performing) well. May I trouble you as to who stocks it - is it readily available?

John
 
Thanks Chris.

Agreed that painting will be a last resort subject to how they clean up. I too do not mind well earned patina.

Great that the Anchor paints worked (are performing) well. May I trouble you as to who stocks it - is it readily available?

John

My auto paint supplier had it on the shelves, so I would imagine it should be readily available.
The wholesalers are in WA but not too much info on their website for contacting resellers :confused:
Anchor Paint

Cheers
Chris
 
Chris, I think you mentioned that you used a foam seal that you bought from Whitworths for the HL bucket/glass seal? I don't suppose you can recall which one it was from their catalog? I'll be heading to Whitworths next time in in Melbourne for boat bits and I could pick some up while I'm there.
 
Chris, I think you mentioned that you used a foam seal that you bought from Whitworths for the HL bucket/glass seal? I don't suppose you can recall which one it was from their catalog? I'll be heading to Whitworths next time in in Melbourne for boat bits and I could pick some up while I'm there.

I'm pretty sure this is what I purchased.

https://www.whitworths.com.au/main_itemdetail.asp?item=85502&search123=foam+rubber&intAbsolutePage=1

You need to cut it down to around 5-6mm strips, when adhering to the bucket careful not to stretch, just lay it in position.

Cheers
Chris
 
Ok, finally just about ready to reassemble the front guards; new chrome plastic headlight surrounds and sealing foam arrived from Citroworld, and headlight buckets have been painted using an aerosol enamel especially colour matched and made up by an automotive paint supplier.
a couple of questions before I start the reassembly, does the guard-to-headlight glass sealing foam get glued to the guard or the glass (when I disassembled the guards they only has some silicon sealant in place), and does the plastic chrome trim surround need to be glued in or is it a clip on fit?

cheers
 
Stick the foam to the inner of the guard and the trim clips in place - it should have a closing piece that connect the two ends together.
 
Thanks Craig. Yes, I do also have the joiners for the chrome plastic trim. I was half expecting the glass sealing foam to have a self adhesive strip but I guess a bit of weatherstrip adhesive will be ok.
 
Then once it is all neatly back together liberally dribble rest preventive into the stiffening pressings below the "eye holes". These front wings rust from the inside out. there is a lot of surface area to funnel water and dust that travel by gravity and gather in the pressings.

In recent times I have been impressed by the Lanotec spray products. It sprays on and creeps then congeals and dries after a few days in the style of the petroleum based Tectyl product .. and I suspect will be kinder to the foam and plastics.
 
I'll chime in here. Paint as an absolute last resort. If they are discoloured I think you will find that the discolouration will wet sand out. I used 180 to start and worked down to 1200. It's plenty of work but, I think it's worth it. The result is hard to imitate with paint. Figure on 20 hours sanding and a few blisters, but they come up like new if you try hard enough. Otherwise, I have some brand new repro headlight buckets that you can have for 1/2 price! I think that's about $200.00
I didn't like them myself, but I'm sure they would be fine for someone doing a simple resto.

BTW, the foam seal gets fixed to the headlight bucket and the rubber seal should be fixed to the inner head light apature of the front guard, this seal is meant to prevent water getting to the double skin of the front guard below the headlights.


mb
 
Last edited:
I'll admit that I hadn't considered wet sanding and polishing, but they're all painted now and I'm happy with the results. The colour match for the paint was professionally tinted and so is an extremely close match to the original plastic, as opposed to an off the shelf colour (which I couldn't find anything even close).

regarding rust prevention, I have a tin of Lanox lanolin based oil which I plan on spraying liberally throughout the entire structure.

cheers
 
Top