Note. This thread is a resubmission of one I did early 2010 which was lost in the AF crash.
This article refers to another thread which was submitted by GibGib regarding the detailed removal of a Comm2000 unit from a Citroen Berlingo. This thread , it appears, was also lost in the crash.
This sticky is for those brave souls who wish to dissect their Com2000 unit. This unit is used in (from what I can ascertain) 1st generation multiplexed PSA vehicles.
Some problems point towards mechanical faults, such as LH indicator goes on when car comes out of a RH turn. Other problems indicate faults with the printed circuit board (PCB). PCB faults would be nigh on impossible to fix due to the delicate nature of the PCB tracking, components are all surface mount devices (smd) barring a few discrete capacitors. The large scale integrated circuits would be proprietary which means they are not available off the shelf. And of course we don’t have a schematic diagram. This puts repair of the pcb beyond the normal tinkerer.
The photos for this thread were taken when I delved into the Com2000 unit from my 406 D9 which had the indicator problem. Unfortunately the car was stolen and destroyed before I could check if my fix was successful.
I did not photograph getting the airbag and steering wheel off but this thread by GibGib shows removal and refitting a Berlingo Com2000 unit.
http://www.aussiefrogs.com/forum/showthread.php?t=52961
Basically.... to get the Com2000 unit off a 406 you have to disconnect battery and wait an hour to ensure the airbag power supply has drained.
Disconnect airbag control unit which in the 406 is next to the handbrake.
Remove airbag by inserting medium sized flat bladed screwdriver into hole in bottom of steering wheel hub. Ensure screwdriver blade is in line with steering column shaft. Push screwdriver up till you feel resistance (hopefully you have touched the spring. Push screwdriver up hard as you have to overcome spring tension. The spring when pushed up at the bottom, it drags inwards the remainder of the spring which allows the airbag to become unclipped and therefore can be removed.
Refer pictures 7 & 8 in Gibgib’s thread which shows the spring (actually it acts more like a circlip)
The 406 has a similar but slightly different type of spring.
It does take a bit of jiggling to get the airbag free especially when you are grabbing the airbag with both hands as you keep pressure on the screwdriver with your knee. This part can be a hassle.
Once airbag is free.. disconnect by removing blue and green plugs from the airbag sides by firstly lifting up the yellow locking flaps before pulling the plugs out. Remove horn connector.
Remove steering wheel after marking wheel and shaft, or in my case as wheels were pointing ahead I just put the steering wheel back on straight.
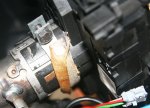
Undo bolt, then depress brown detent/s to allow com2000 unit to slide off the column.


2 views of the culprit. Cruise control and Radio control arms unclip then slide off.
Note how the pins are in the two 2 pin sockets are. I had trouble getting this correct when reassembling as some pins went behind the little metal tensioning strips in the socket
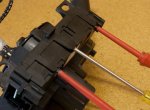
It takes 3 screwdrivers to get tabs on bottom of unit released

I used tile spacers to hold covers apart so that tabs wouldn’t re engage
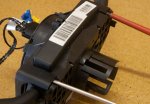
Now release bottom tabs
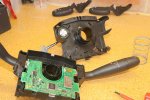
Unit is now apart. Note where the spring sits and where the plastic sleeve sits. (In the picture I have it removed which wasn’t necessary.) The c/control and radio arms can be seen in the background.
The circular disk on the back of the front cover is the transducer which gives the indicator noise which is electronically generated. There is no old type indicator flasher unit. The transducer has two spring loaded arms which make contact with the pcb when the unit is assembled.
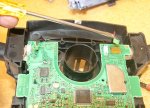
Carefully remove the two connectors
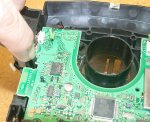
Flex the detents in which hold the pcb onto the rear section.
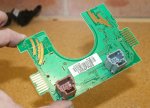
Rear of pcb. This shows the rear of the pcb. On the top left hand side you can see the circuit board tracking that the wiper arm moves across according to the wiper arm position.
The tracking on the rhs side is for the light/indicator arm.
The lower protrusions of the circuit board with the parallel tracking are for the radio and cruise control arms.
For some reason I didn’t photo the arm mechanisms, but I remember the indicator position holding/self cancelling mechanism being fairly involved. I think the problems with this part of the com2000 unit are in the design and/or molding of the mechanism. I could see no scope for adjustment.
REASSEMBLY
When you rejoin the covers… make sure the two 2 pin connectors are correct. I used a small screwdriver to hold the metal strips back so the pins wouldn’t end up behind the strips.
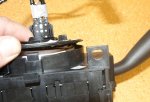
I have opened the cover slightly to show the coiled conductor ribbon. This conductor is for the air bag and horn. It is driven by the plastic sleeve, and if you have moved the sleeve or not sure you have put it back correctly you may have to re align it. Get it wrong and steering wheel won’t go to full lock on one side.
To re align… turn plastic sleeve clockwise till resistance felt (conductor ribbon goes taut) then turn sleeve counter clockwise 2 to 2 and a half turns. Exact position will depend on where the sleeve protrusions are. See next photo

This shows the plastic sleeve and its spring. Note the sleeve has a large and a small protusion on it.
These align with their respective indents on the rear of the steering wheel.
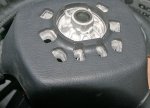
This shows the indent in the steering boss casting for the small plastic sleeve protrusion.
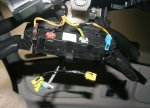
When unit is back on the steering column connect up.
Note the green airbag connector. The green part gets pushed fully into the airbag connector, then the yellow locking tab gets pushed in and this secures the connection. The blue connector is similar. If one of these isn’t in properly the dash airbag light will stay on.
This article refers to another thread which was submitted by GibGib regarding the detailed removal of a Comm2000 unit from a Citroen Berlingo. This thread , it appears, was also lost in the crash.
This sticky is for those brave souls who wish to dissect their Com2000 unit. This unit is used in (from what I can ascertain) 1st generation multiplexed PSA vehicles.
Some problems point towards mechanical faults, such as LH indicator goes on when car comes out of a RH turn. Other problems indicate faults with the printed circuit board (PCB). PCB faults would be nigh on impossible to fix due to the delicate nature of the PCB tracking, components are all surface mount devices (smd) barring a few discrete capacitors. The large scale integrated circuits would be proprietary which means they are not available off the shelf. And of course we don’t have a schematic diagram. This puts repair of the pcb beyond the normal tinkerer.
The photos for this thread were taken when I delved into the Com2000 unit from my 406 D9 which had the indicator problem. Unfortunately the car was stolen and destroyed before I could check if my fix was successful.
I did not photograph getting the airbag and steering wheel off but this thread by GibGib shows removal and refitting a Berlingo Com2000 unit.
http://www.aussiefrogs.com/forum/showthread.php?t=52961
Basically.... to get the Com2000 unit off a 406 you have to disconnect battery and wait an hour to ensure the airbag power supply has drained.
Disconnect airbag control unit which in the 406 is next to the handbrake.
Remove airbag by inserting medium sized flat bladed screwdriver into hole in bottom of steering wheel hub. Ensure screwdriver blade is in line with steering column shaft. Push screwdriver up till you feel resistance (hopefully you have touched the spring. Push screwdriver up hard as you have to overcome spring tension. The spring when pushed up at the bottom, it drags inwards the remainder of the spring which allows the airbag to become unclipped and therefore can be removed.
Refer pictures 7 & 8 in Gibgib’s thread which shows the spring (actually it acts more like a circlip)
The 406 has a similar but slightly different type of spring.
It does take a bit of jiggling to get the airbag free especially when you are grabbing the airbag with both hands as you keep pressure on the screwdriver with your knee. This part can be a hassle.
Once airbag is free.. disconnect by removing blue and green plugs from the airbag sides by firstly lifting up the yellow locking flaps before pulling the plugs out. Remove horn connector.
Remove steering wheel after marking wheel and shaft, or in my case as wheels were pointing ahead I just put the steering wheel back on straight.

Undo bolt, then depress brown detent/s to allow com2000 unit to slide off the column.


2 views of the culprit. Cruise control and Radio control arms unclip then slide off.
Note how the pins are in the two 2 pin sockets are. I had trouble getting this correct when reassembling as some pins went behind the little metal tensioning strips in the socket

It takes 3 screwdrivers to get tabs on bottom of unit released

I used tile spacers to hold covers apart so that tabs wouldn’t re engage

Now release bottom tabs

Unit is now apart. Note where the spring sits and where the plastic sleeve sits. (In the picture I have it removed which wasn’t necessary.) The c/control and radio arms can be seen in the background.
The circular disk on the back of the front cover is the transducer which gives the indicator noise which is electronically generated. There is no old type indicator flasher unit. The transducer has two spring loaded arms which make contact with the pcb when the unit is assembled.

Carefully remove the two connectors

Flex the detents in which hold the pcb onto the rear section.

Rear of pcb. This shows the rear of the pcb. On the top left hand side you can see the circuit board tracking that the wiper arm moves across according to the wiper arm position.
The tracking on the rhs side is for the light/indicator arm.
The lower protrusions of the circuit board with the parallel tracking are for the radio and cruise control arms.
For some reason I didn’t photo the arm mechanisms, but I remember the indicator position holding/self cancelling mechanism being fairly involved. I think the problems with this part of the com2000 unit are in the design and/or molding of the mechanism. I could see no scope for adjustment.
REASSEMBLY
When you rejoin the covers… make sure the two 2 pin connectors are correct. I used a small screwdriver to hold the metal strips back so the pins wouldn’t end up behind the strips.

I have opened the cover slightly to show the coiled conductor ribbon. This conductor is for the air bag and horn. It is driven by the plastic sleeve, and if you have moved the sleeve or not sure you have put it back correctly you may have to re align it. Get it wrong and steering wheel won’t go to full lock on one side.
To re align… turn plastic sleeve clockwise till resistance felt (conductor ribbon goes taut) then turn sleeve counter clockwise 2 to 2 and a half turns. Exact position will depend on where the sleeve protrusions are. See next photo

This shows the plastic sleeve and its spring. Note the sleeve has a large and a small protusion on it.
These align with their respective indents on the rear of the steering wheel.

This shows the indent in the steering boss casting for the small plastic sleeve protrusion.

When unit is back on the steering column connect up.
Note the green airbag connector. The green part gets pushed fully into the airbag connector, then the yellow locking tab gets pushed in and this secures the connection. The blue connector is similar. If one of these isn’t in properly the dash airbag light will stay on.
