Christian's R10S

Frans, does the bolt go through that rubber or is it the type with a stud on either side bonded to the rubber?

Sent from my Nexus 6P using aussiefrogs mobile app

Studs bonded at either. Proper universal mounting for sound isolation.

Brett, I appreciate your dedication to originality :approve: but after a while they will sit on the safety overrider stops permanently.

Frans.
 
Rear engine mounts completed. Just needs a little more tidying and a coat of paint.

7f12ad1708bcdd0cb5a3825f43c665c5.jpg
42a4d461e9baae67c88c61f35596cb40.jpg
43aeca3fecc25d5ce94774e822ee4229.jpg


Sent from my Nexus 6P using aussiefrogs mobile app
 
Rear engine mounts completed. Just needs a little more tidying and a coat of paint.

7f12ad1708bcdd0cb5a3825f43c665c5.jpg
42a4d461e9baae67c88c61f35596cb40.jpg
43aeca3fecc25d5ce94774e822ee4229.jpg


Sent from my Nexus 6P using aussiefrogs mobile app

Like your work Christian, just a quick question before you pain that cross member. What are doing for an exhaust system? The reason I ask is that the Alpine boys put the muffler across the back of the car and it is supported off that cross member and the exhaust moves with the engine. Just save you painting it twice if you was going down that route.
 
I hadn't really given too much thought to what was going to hold the muffler up, hanging it off the cross member is a good idea but it is going to end up canter levered a bit as the back of the car is some distance out the back on 10's. I'll have to run a cat as well being a modern engine.
 
I hadn't really given too much thought to what was going to hold the muffler up, hanging it off the cross member is a good idea but it is going to end up canter levered a bit as the back of the car is some distance out the back on 10's. I'll have to run a cat as well being a modern engine.

Sorry Chris, but I must have missed it earlier, but what modern engine are you planning to run in the R10?
 
Who doesn't like a nice smooth rear end. The corners were the hard bit. Good use of my latest sheet metal tool, a shrinker/stretcher.

f0165ae1c8b90ec0671add33fd300fac.jpg


On another note I'm looking at the possibility to a 4 stud conversion. Not that I haven't dropped money on my current brake setup which I could hopefully reuse. Mitsubishi Lancer hubs for the front, or something I can make work, sleeve the stub axles to accept larger bearings. Rears would need to be custom, the expensive part, but not in bulk. I haven't dropped the projected $2.5k on wheels yet, so this may work out cheaper as 4x100 wheels are plentiful. More research and cad modelling required.

Sent from my Nexus 6P using aussiefrogs mobile app
 
And the modern handbrake lever to go with the modern rear brakes.

65a8decc2dad57773e70a186fee82235.jpg


I also put a jog in the gear linkage shaft to I can hang the gear stick out further from the pivot to shorten the gear throw.

Sent from my Nexus 6P using aussiefrogs mobile app
 
More detail on the handbrake please. I’ll need something custom to run the cables around to pull from behind on the FIAT calipers.
 
Handbrake lever came from rally designs in the UK, part number RD6901. I was buying brake calipers at the same time. New ones even, from a mk4 golf. Only 38mm pistons but can run rotors upto 270mm. I'm aiming for for 265 ish.

Handbrake cable is a wilwood, 330-9371.

Black bracket is a nut plate I made that holds it down. You could just as easily just put nuts on the bottom. Had to drill some additional holes in the floor.

One picture shows the cable stops under the floor, the other shows the new holes.

094c026a8b4b795fb2acedcdd8b7faf4.jpg


377b7fd445489b85ec348146f614e44d.jpg


1ab3096b679348403f229e4e7a31a357.jpg


I thought I get a comment about my 4 bolt hubs first.

Sent from my Nexus 6P using aussiefrogs mobile app
 
A little CAD (cardboard aided design), fuel tank. Transferred the design to the other sort of CAD, comes out at just over 40 litres. Next step, get it quoted for manufacture, can't make this one myself, then take orders.
22e03ce03b9499e9579316e5a0595f42.jpg


To the point now I should stop making small changes and just send it to a panel beater to get it clean up and sprayed. I just really didn't want to do that until I'd finished drilling holes in it.

Sent from my Nexus 6P using aussiefrogs mobile app
 
Great build @c.lees... its going to be amazing!

2 questions though

>>why not use the Clio 2 litre twin cam 16 valve from the Clio 182? (so cheap now!!)
>>and how will you handle all this power through the pissy 10 gear box?

Keep up the excellent work!

Sam
 
Great build @c.lees... its going to be amazing!

2 questions though

>>why not use the Clio 2 litre twin cam 16 valve from the Clio 182? (so cheap now!!)
>>and how will you handle all this power through the pissy 10 gear box?

Keep up the excellent work!

Sam
I wasn't sure if the gearbox would take the power of an F4R but I have found out that it is a conversation that is done in France. You use a R16 bell housing and an adaptor plate.

In hindsight the flywheel issues may have been easier to solve. But it could be the same story, like the use of parts from cars that were never imported into Australia.


My gearbox has R16 internals, should handle the K4M just fine, even it I do decide to put a turbo on it.
Sent from my Nexus 6P using aussiefrogs mobile app
 
Last edited:
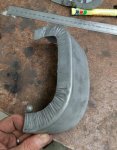
On another note. I've been fixing up some body work, I had fixed the drivers side head light housing but it looked to be holding the front guard out a little at the bottom. So I have remade the offending part. This time I had a shrinker so I could make it from one piece

IMG_20180227_145237.jpg

Now with this part in place the headlight hole is snug compared to the other side. The question is, are the two side meant to be the same, I ask as I wouldn't put it past the French to do something like this. Or does the guard need a little massage, it is possibly the only good panel on the car.

New rear brake pictures to come.
 
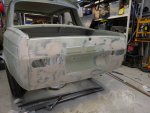
Not a great deal of exciting work going on. I have done some work on the fish mouth panel.

On striping the remaining paint I discovered one side was completely caved in. I knocked it back out with liberal application on heat and percussive force. I should have taken a before picture. Here is an after with some filling.

c20a77f9ab3660b9bcd3656754fd6c80.jpg


Sent from my Nexus 6P using Tapatalk
 
That be success body filler there.

It's gonna be great :)
 
Yep, that's a lot of filler. There has been quite a bit of additional metal work on the front. Not sure which war this car was in, it was not straight. When I had it stripped they commented how much filler was on it, I now hope it's less.

I've had to reattack it with a cut off wheel, welder and even an oxy torch. I cut a large piece our when I just couldn't get it the right shape, so I remade it.

Now it's symmetrical. A little more filler will be required and a tap here and there to push down any high spots. The filler is no thicker then 3mm, much less then that for the majority of the panel.
68e66a76b0941271a3371e57f6fcdb5e.jpg


Sent from my Nexus 6P using Tapatalk
 
Ah man it will be worth it no doubt. And look! your filler is sticking to stuff, there must be metal under it ;)
 
If your initial thought is "that's a lot of filler" then you'd be correct. I do believe it's less then what was on the car when I started. I have toyed with the idea of ditching the aluminium panel on the rear and smoothing out the bumps but it would involve getting it much smoother above the tail lights.

One more small application of filler for the couple of remaining low spots, a quick skim with glazing filler and it should be ready for high build primer. The primer will need to be rolled on as I can't spray 2k at home.

There is a little more to do the on the front then it's time to find a spray painter to give it some colour.
1532852612469.jpg

Sent from my Nexus 6P using aussiefrogs mobile app
 
Last edited:
Top