Great thread Chris! I'd watch your punctuation though mate it can be a bit hard to follow.
Appreciate the feedback... I think?
Cheers
Chris

Great thread Chris! I'd watch your punctuation though mate it can be a bit hard to follow.
I could live with that, a little closer to the left boundary
I found myself looking at hoists today - the bubble burst, I'll have to content myself with my Supercheap Tyvek shed for a while longer
...but don't think I don't appreciate your trouble, even Mrs GB has had a giggle :headbang:
Cheers
Chris
If you are half serious about the four post hoist, check the following link out:headbang:
http://www.graysonline.com/sale/700...-post-vehicle-hoists-brisbane-pickup?spr=true


hahha, you're a very naughty frog, you'll get me into serious trouble at home, Mrs GB would use that as a device of torture
On a practical note, no shed (my dream has been vetoed :nownow: ) no 3 phase
I have to content myself with car ramps and my 'you beaut' tyvek shed :headbang:
In all seriousness, there are not too many tasks on a D that require a hoist.
What I would like to find in the near future is a spray booth for weekend hire, we had one right here in Morningside but it has closed down...
Cheers
Chris
You could run the hoist using a phase converter or 240volt single phase motor. The best bit is you could park a 2nd car beneath it , :roflmao:You could get a double height tyvek shed, stick the hoist into that ....
seeya,
Shane L.
Re:- Paint booth hire
Curtain rods in the garage ceiling, around the area where the car will be, heavy duty plastic, water the concrete floor..... and send Mrs GB to Sydney for weekend shopping trip, she will never know..
There was one at Rocklea, I believe they did not reopen after floods
Apparently these people did hire theirs out couple of years back, not sure if they still do. Expensive, but huge booth:-
http://australianmastermarine.com.au/
With the pool gone, I've no shortage of space to store cars, I was doing donuts in the D on the weekend :roflmao:
...
Isn't the dash paint often refered to as "Harley Crinkle finish"
That looks spectacular too. the problem with doing one particular thing well is always how bad the rest looks beside it
seeya,
Shane L.
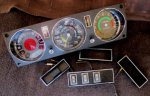
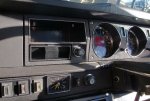
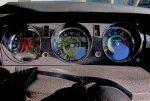
Looks fantastic! I bet you had to hold your tongue just right to get those on straight!
I got some great instructions on how to remove the dash recently. If I can locate the info (it is in my head somewhere) I will send it to you, unless someone else beats me to it.
" ). If you want it to seem my boggling, laughably simple, pull the dash from modern PSA junk first Before you pull it out, you could try to lift the original crinkle finish using something like Forever Black. Removing the dash isn't as hard as you might think, but be very sure to free the plastic end vents where they sit against the tar insulation at the sides of the scuttle BEFORE you start tugging at the dash. The vent vanes will snap very easily if you aren't careful. Really, if you don't need to remove it, don't.
If your going to pull the dashboard, whip out the 'screen too (the dash isn't hard, once you start you'll have it out in no time thinking ..... "Wow that was easy
The reason for pulling the screen ?? If you find any rust in the lower channels, you can patch it up while the dash isn't in the way.
seeya,
Shane L.
Time for me to add my 2 centimes worth.
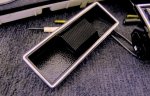
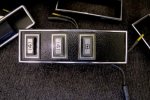
To remove the rubberised dash first remove the instrument binacle, behind which you'll see an 8mm nut connection the dash to the base of the w/screen. Next, remove the radio speaker cover and radio cavity box, behind which you'll see an 8mm nut, next open the glove box and locate on the inside upper left a plastic cover - remove it and you'll see an 8mm nut. On the extreme l and r of the dash there is a black philips screw into the base of the a pillar remove them. Under the wrinkle dash there are several screws (self-tappers?) holding vertically onto the inner structure - remove them. Remove all switches and clock from the dash fascia.
by now the dash should be able to be wriggled out - proceed carefully.
I may have skipped a nut/screw or 2 - but this is essentially the attachments.
Remember that at the factory a man put it in so a man can do the reverse.
from where may I obtain the set of instrument "chrome" stickers?
RegarDS
Lou
NOUKPUT SYDHCQF
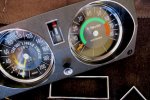
I can see that I'm going to have to pull the dash out and get it refinished, it just looks so daggy compared with the rest of the interior now. I can't readily see how to remove, I'll have to drop the aircon vents out of the way - anyone have any tips, where are the fixings etc.
Once out, the plan is to get it powdercoated in a finish as close to original as is available here in Brisbane, any recommended suppliers?