505 power steering control valve removal

nisspug2

Member
VIP Paid Subscriber
Fellow Frogger
Joined
Jul 5, 2003
Messages
169
Location
Melbourne
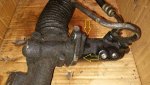
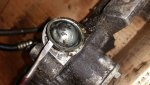
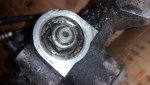
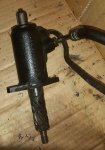
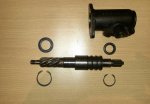
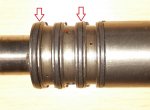
I'm trying to remove the 'control valve' from a spare 505 power steering rack I have. I've removed the two bolts that appear to hold it to the rack (arrowed) but although it seperates a little it's not coming off as it seems to be catching on something. Any ideas?

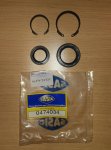
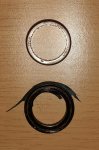
Also how hard is it to replace the seals in the control valve and also the ram? I've seen a few videos on youtube for other makes but not 505 which may be a bit (or a lot) different.
 

Attachments

  • 505 steering control valve arrowed copy.jpg
    505 steering control valve arrowed copy.jpg
    102.8 KB · Views: 218
I was once told that this job is best left to a professional. Those seals are really touchy and very easy to damage.

You've got the thing out....spend a bit of money. It can't be much now.
 
Thanks Beano. That may be but I've rebuilt a couple of motors and a gearbox so close tolerances etc don't scare me. I have to admit knowing very little about these valves but this is helpful:

https://www.youtube.com/watch?v=kflK40LN2XI

Doesn't look too difficult. The rack is a spare so it was already off the car and the plan is to take the valve off and replace the leaking valve on the car. Would be nice to put new seals into it before I have it put on the car which is already going to cost me money :wink2:

I'll keep trying to get the spare valve off but if anyone has any expereience with these please let me know.
 
Last edited:
Hi
I've done this job numerous times, apart from the bolts you mentioned, you need to remove a domed cap on the underside of the rack at the opposite side to the valve, I usually use a thin blade to ease it off, this will expose a nut which you will need to undo, once that's done the valve will slide out and you can then dismantle the valve by removing the circlips at each end. Mark the position of everything carefully as otherwise you can alter the position of the steering flector relative to the rack position, I've never had trouble sourcing seal kits and have replaced the bearings by purchasing through local bearing supplier.
Regards
Neil
 
Hi
I also meant to meant to mention that as far as I know the ram is not serviceable and you will need to replace it with a new one.
Regards
Neil
 
Let us know how you go, Nisspug.
I forgot to mention...I was told that the internal seals are special O-rings and are quite expensive (and these are the ones that are easily damaged), though the seal at the top which stops the oil leaking out is probably the same price as any other seal.
 
Your quite right Beano, however I've never had to worry about the "O" Rings, just replaced the end oil; seals and all is well, in any case I've never been able to work out how to replace the "O" rings as they are made of some nylon looking material and won't stretch.
Regards
Neil
 
Thanks for the info on the end cap Neil. Initially I didn't see that the cap has an external lip and I tried to dig the cap out from the recess but after a bit of WD40 and scraping away of muck I suddenly saw the lip and was able to get a small screwdriver under it. I was able to remove the nut and withdraw the valve (see pics). That nut was tight though -around 70lb/ft!!! I also have a spare ram which I'll install as is, if it isn't rebuildable.

Thank you both for the info on the seals too. Will let you know how I go.
 

Attachments

  • prying cover off copy.jpg
    prying cover off copy.jpg
    102 KB · Views: 239
  • nut exposed copy.jpg
    nut exposed copy.jpg
    97.8 KB · Views: 215
  • valve removed copy.jpg
    valve removed copy.jpg
    68.3 KB · Views: 232
I finally found the time to disassemble the valve. I had to buy a smaller pair of circlip pliers as the holes in the circlips are around 2mm ID so it needs pliers with 1.85mm ends. Once the circips on either end were removed I gave the shaft a wack with a wooden mallet and it came out. The whole assembly seems simpler than I expected.

I marked the bottom of the shaft and the rack before removing the valve body from the rack but there seems to be nothing to mark before taking the shaft out of the housing as the shaft just turns freely in the housing and doesn't engage in or reference any particular place.

I bought a repair kit for $35 which includes 2 seals and 2 circlips. I'll install these soon. The only puzzles are the 4 black 'piston ring' type rings around the shaft which seem to be made of plastic or ceramic and new ones didn't come in the kit. I don't know how important it is to replace these. The other thing is the roller bearing behind the top seal. Again a replacement didn't come with the kit and I don't know if these need replacing - you'd think it would be a good idea.
 

Attachments

  • PS valve 8.jpg
    PS valve 8.jpg
    98.5 KB · Views: 182
  • PS valve 3.jpg
    PS valve 3.jpg
    96.7 KB · Views: 210
  • PS valve 1b.jpg
    PS valve 1b.jpg
    67.8 KB · Views: 176
  • PS valve 2.jpg
    PS valve 2.jpg
    94.5 KB · Views: 205
Last edited:
I just re-read the earlier posts here and looks like what I call 'piston rings' TassieExec and Beano refer to as 'o-rings'. These rings feel hard now but maybe when they are new they have enough give to fit them over the shaft. Also TassieExec mentions replacing the bearings although I can see only one. When I get it out I'll try to match the bearing at a bearing shop.
 
Yes...those 4 rings in your third photo are the ones that are supposed to be easily damaged. That is all I can tell you.
 
Thanks Beano. Not sure if I will try to have these replaced or just leave them.

I did manage to get the roller bearing out of the housing using a 17mm long socket and extension bar as a drift from inside the valve cover and hitting outward. The markings on the bearing say "USA INA SCE146" and it has an OD of 28.65mm and an ID across the peaks of the rollers of 22.60mm (or 23mm ID of the bearing casing ignoring the rollers). The pinion shaft where the roller sits against it is 22.20mm OD.

Bearing and old end-seal below.
 

Attachments

  • PS valve pinion bearing 1.jpg
    PS valve pinion bearing 1.jpg
    74.8 KB · Views: 176
I just remembered why my mechanic friend left mine unreplaced. He said they were REALLY (he emphasized that word) expensive, and that if undamaged they were OK to re-use. He wouldn't let me touch them or take them out, and I stripped everything else.
 
Thats good to know. I also just found the 2nd bearing - its in the rack housing! Held in with another circlip. Will take this out soon.
 
HI
The part numbers for the bearings are as follows:-
The roller bearing is 6201
The needle roller bearing is SCE146
Regards
Neil
 
I have an idea that those aforementioned seals are some kind of compound which contains graphite.....soft but long-lasting and self-lubricating.. Re-use them if you must, but have a REALLY good look at them.
I hate it when I have to do a job twice. But me being a bit of a fathead, there have been a number of times...
 
Thanks for the nrs Neil and I'll check the rings carefully Beano. Thanks for the tip.
 
Hi
Although they are available, I've never replaced the rings as I've never been able to figure out how to get them of and replace them if the new ones are just as stiff, be keen to hear if you or someone else figures out a way to do this job. Having said that I haven't had any problems after not replacing them.
Regards
Neil
 
Well I didn't replace the rings Neil as they seemed in good condition. The valve's new top bearing tapped in with the help of a socket used as a drift and the new rubber seals pressed in with finger pressure. Took the rebuilt valve and spare ram along to my mechanic to get the fluid leak diagnosed and fixed. Well ironically he rang to say its leaking from one of the ram-to-valve pipe ends and tightening didn't help so he replaced the pipe and leak is fixed. So didn't end up needing the rebuilt valve or ram after all! (The bearings I bought were Torrington S B146 and NSK 6201VVCM.)
 
Top