2003 Peugeot 307 XSE 2.0 ltr EW10J4 heater leak

tazfrog

Member
Fellow Frogger
Joined
Nov 24, 2011
Messages
162
Location
Burnie/Tasmania
Well chaps, I guess it had to happen sooner or later....a heater core leak.
I was vacuuming out the car today and noticed a wet slimy patch in the
passenger footwell carpet.
After placing some toilet paper there to absorb it, I took a sniff and sure enough
coolant!....damn bugger and blast!
OK...where was it coming from??
Obviously I will have to do a pressure test to determine if there is a leak and
start tracking it down.
Using a bright torch, I scoured the engine bay and underneath....no sign of a leak.
So, it's obviously internal and is leaking some where higher and dribbling down under the carpet.
My guess is either one of the heater hoses or the matrix itself.
After reading the trusty Haynes manual, it wasn't really clear on the fact whether the
matrix/core is accessible from inside the car or from the engine bay side.
Any help with this will be appreciated.
This is the first cooling system problem I have experienced in 15 years ownership
and 187,000klm.
 
Can it be done in situ? What does research tell you?

If its anything like the 306 its dash and airbox out I think?
 
Last edited:
Have just ben doing a bit of trawling and it seems it's doable with dash in place.
It's a matter of removing glove box and left side panel of centre console.
It seems the most common cause for coolant in the footwell is the aging of the
'O' ring seals on the pipes attached to the matrix....warrants further investigation methinks.
 
I thought that might be doable that way, have fun. Get good orings next time too! a good elastomer is warrented.
 
I thought that might be doable that way, have fun. Get good orings next time too! a good elastomer is warrented.

Hello Mathew....yes, it seems quite a straight forward process....as long as the leak is not detected
in the heater matrix itself....different can o' worms!
Wwas trawling through You-Tube vids last night and it's a not uncommon problem it seems
as these cars age, it's to be expected I guess.
I have already had that side oif the fascia off and glove box out to deal with the BSI maladies
we were plagued with a few months ago.
According to the vids, access is pretty straight forward and there is no deed to move the matrix
if it's not leaking.
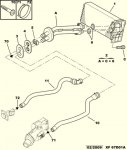
The rigid pipes that go from bulkhead/firewall to matrix have 'O' rings at each end and apparently
the kit you can buy comes with replacement pipes and gaskets which I think is a waste.
I will be able to have a proper look on Monday and perform a pressure test first to give me
some idea of where the leak emanates from.
I think a trip to Bearing Services is in order to procure some new 'O' rings ;o)) 307 heater matrix-001a.jpg307 heater matrix-002.jpg307 heater matrix-003a.jpg307 heater matrix-004a.jpg
 
Last edited:
mmm mine is now 14 years young, wonder if I will be afflicted one day too?

Have fun, simliar to the 306, 205 is vastly easier.
 
Morning tazfrog, Not a hard task at all. You've probably spent more time writing this thread than it will take. Replaced the 'o' rings in a 2 litre petrol 307 in Sept 2016 and there is a thread in aus frogs that should help y'all. I was dreading a 405 SRDT type task, and found the 307 to be a short 'walk in the park.' Enjoy.
 
Thanks kelpiebat for that helpful encouragement ;o))
I know my way around a 307 pretty well after 15 years
but there is always surprises somewhere.
Could you guide me to this thread please?
 
Yes. Look at Sept 2016. About the middle of the month from memory.

Right...discovered your little write up and now the car has finally arrived (3 hours late!)I will investigate
with a pressure test first.
I'll remove glove box and side panel as a matter of course and go from there.
I'll pop down to the hydraulic place and see if I can lay my hands on some Viton rubber 'O' rings which will be
a bit fatter and seal better than the originals I reckon....but hey, anything will let go after 15 years and hot/cold cycles ;o))
 
I have just confirmed my suspicions...there is a very slow pressure loss after pumping to 17 psi
followed by 20 psi.
Dryzabone under the bonnet.....inside is a different matter!
Left footwell is satched this time and running my finers under the edge of the centre console
reveals coolant!
I'm going to make life easier for this 70 year old fart and remove the seat and then cut the carpet
under the seat to be able to remove the front section as this carpet is fitted as a one piece unit....
unless somebody tells me different ;o)
I'll blast the carpet section and the mat with suds from my pressure cleaner and let dry in th sun
when it pops out ;o)
Then I can get a clear run at it.....stay tuned ;o))
 
Last edited:
Removing the seat may help a little and along with all the other bits would probably qualify as occupational therapy and a good way to fill in a day or two. Very handy for mother-child type bonding too.
 
Removing the seat may help a little and along with all the other bits would probably qualify as occupational therapy and a good way to fill in a day or two. Very handy for mother-child type bonding too.


Heheee....yeah....getting the matrix out and pipes separated was a doddle and is very easy on the 307 compared to many cars that require so much dash dismantling.
All I had to do was remove glove box (7 T20 screws) disconnect the light socket, remove one side panel of
the left side of under dash with three T20 screws and the leak was exposed.
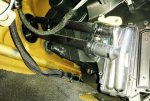
Sure enough it was dribbling from the flange that joins the two heater pipes to the matrix.
Four T35 screws saw the seat undone and just tilted back saving having to unplug airbag and seat belt plugs.
Because these cars are built with a one piece moulded carpet, I had to get out the trusty industrial scissors and snip a line under the seat and remove the left door sill plastic inner cover and a couple of strategic cuts to allow this section of carpet to be removed sodden with coolant, exposing
the 1" thick underlay also sodden.
These were taken out to the driveway and hit with a high pressure sprayer and hung up to dry out

Now to attend to the job at hand.....three T20 screws removed from pipe bracket, pipe flange mounting and one from the matrix mounting....gently pull matrix out tot he left about and inch
which allows you to wedge out the pipes as you continue to remove the matrix straight gently,
not bending delicate fins everywhere, allowing the coolant to drain into a dish placed strategically under the car where I had removed two bungs in the floor....the inner one uncovering
the A/C drain which conveniently led to the dish.
With the pressure cap screwed on, very little coolant was lost.

Placed news papers under the back edge of the moulded insulation to soak away the coolant that had soaked into the foam.
Rest of the day was spent chasing 'O' rings to see what would fit the best.
I settled on 25mm outside dia.rings with a cross section of 2.65mm and made of VITON rubber as these will handle the coolant better than ordinary Nitrile rubber ones.
After 15 years and 190,000klm worth of heat/cold cycles, the original rings had shrunk and formed rectangular in cross section.

Tomorrow is reassembly day hopefully and i will be using a little bit of Silastic silicone to smear
the rings and flange joint as it all goes back together and will leave it to cure for 24 hrs before refilling coolant and testing.
The longest bit will be getting the underlay and moulded carpet dry enough to put back in position and lay around a few papers and some desiccant balls to absorb moisture and have the heater
do a few hot cycles to the footwells to help with drying out
and removing coolant residual smells.
I have also given Peppi an engine oil change (Penrite HPR10) and sucked out and replaced the
power steering fluid with Penrite LDAS PSF.

I will be putting up a picture gallery once I have edited and cropped pics into some semblance of order....stay tuned. ;o))
 
Last edited:
Phase one is now complete.
We aquired some VITON rubber 'O' rings this morning 25mmx 2.67mm
which fitted perfectly and an application of Silastic on the mounting flange,
Slip the matrix back in it's slot and gently wiggle the pipes into position as you firmly push the matrix home in it's cubby hole and the pipes slipped home.
Give the matrix a final thump to engage it properly with the little clips and re install the locating screw.
This was followed by the bolt and captive nut that clamps the mounting flange.
The 'O' rings are subjected to compression from two angles to effect a proper seal
but a little application of Silastic on the mounting flange will ensure an effective seal.
I will leave it all for about two hours before I start refilling the cooling system
and brig it fully up to temperature and test for any leakage.
Then I will replace insulation and carpeting which by now has fully dried out followed
by the plastic panels and glove box and finally replace the passenger seat back on it's mountings.
I will still have a thick layer of paper on top of the carpet, then the mat and more
paper for a week or so and run the heater at maximum to footwells to fully dry the
entire area....stay tuned ;o))
 
Top