2.0l HDi 307 top engine mount temp fix

Tim-HJ61

Member
Fellow Frogger
Joined
Jun 26, 2014
Messages
55
Location
Perth
First posting - thanks to the group for the useful information for a Peugeot newbie.

Problem:
18yo daughter. Dad - "there's a new noise from the car". 307 HDi 263,000km, 6 speed manual, 2006 facelift. New to us a few months ago. Impressed that daughter noticed new noise, I sprung into action.

Diagnosis:
Vibration and noise felt with hand on gearbox. Check AussieFrogs. Must be Dual Mass Clutch. Gave daughter hard time for not using handbrake on hill starts.

Solution:
Source Single Mass Flywheel kit from Valeo via the UK and installed it.
Throwout bearing clearly noisy but the clutch and flywheel unit itself 'seemed' okay. Slightly embarrassed father, me, but overall an interesting project and one to start the relationship building with the vehicle.

The good side was that the vibration from the gearbox was clearly gone, but unfortunately there was still a really rough vibration coming through to car.

Problem #2
Diagnosis - more AussieFrogs searching:
Engine mount.
Sure enough, the top engine mount was cactus.
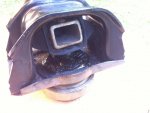
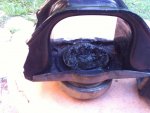
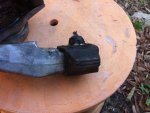
IMG_1943.jpgIMG_1944.jpgIMG_1947.jpg

The liquid comes from a vibration dampening device built into the mount. Clever, but once pierced the mount is on it's way out.

A temporary fix was needed ensure this REALLY was the source of the vibration.

SOLUTION:
Borrow a nylon cutting board from the kitchen, add a new one to the shopping list in case she notices one gone, and fashion a shape.
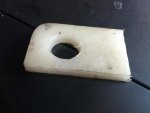
IMG_1932.jpg

The first try dimensions are 100mm x 60mm x 13mm cutting board.
A revised board would be made longer, probably 120mm long.

The hole accommodates the locating knob that is attached to the engine part of the mount. It should have meant the cutting board would stay in place.
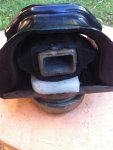
IMG_1948.jpg

OUTCOME:
This was okay as a temporary fix. It DID dampen the excessive vibration but not all of it. The nylon also split, showing up perhaps a design weakness in the temp fix, but also the significant forces that these mounts have to endure. A longer wider piece of nylon may last longer. It would get you out of trouble.

Removing the mount is a simple matter of jacking up the engine - it did it with the plastics still in place - to support it, then undoing the four female torx on the engine and the four male torx on the body. All are easily accessible.
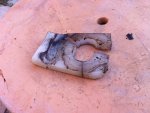
IMG_1950.jpg

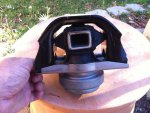
In the end, I bought a new mount from the local dealers who had them on the shelf. A$273 for part 1839H5. Dealer said there are several different mounts for this engine, so matching with the VIN is important.
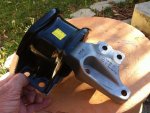
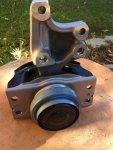
IMG_1941.jpgIMG_1942.jpgIMG_1940.jpg

With the factory mount, the vehicle is back to being smooth to drive.
Oh, and it has a new clutch too...... :-\

I hope this is useful.
 
Just reviving an old thread as I am about to embark on replacing this top engine mount this weekend with a spare I sourced from eBay.

My question is, what tools do I need to remove the hex head bolts from the engine bay? There are 8 bolts, 4 of each type. I would attempt to use a 12mm socket on the ones that secure the mount to the body, however the ones that secure the mount to the engine look like they would accept a very large Torx type bit which I don't have handy...

So, will I destroy the body mount bolts by using a 12mm socket, and what should I use/buy to remove the engine bolts?

Cheers,
AB.
 
You will need torx bits for the ones that look like pointy Allen keys. You will need "e torx" (basically look like backwards torx bits you could, put a torx bits inside) for the ones you were going to use the 12mm socket on. You may have success with the 12mm socket but will more likely round off the heads or even destroy the socket.
 
You can buy e-torx sets from Repco although as with all those sets you'll only ever use the one size out of the set.

I placed a special order for a single e-torx in a size 16, and for an impact version it cost me $19 - available next day for pickup.

Smaller sizes will of course be cheaper. Using the correct tools will lead to less problems down the line.....

Cheers

Justin
Superb, thanks Justin and cav!

Will head off to Repco/Bursons/auto barn today to obtain the tools.

This weekend I'm replacing this engine mount plus 2 tie rod ends, just to satisfy rego. Pain in the backside, but probably necessary...

Cheers again for the advice. Might even start by asking my local euro mechanic if he has these tools handy for loan...

AB.

Sent from my HTC 2PS6200 using Tapatalk
 
Re-reviving an old thread.

A few questions. Whilst I am waiting for stock of the new mount to arrive in the country, am I doing any damage by driving the car with that broken engine mount?

Secondly, for you who have done the job of replacing the engine mount yourselves, approximately how much time did the whole thing take?

It looks like a straightforward job, but are there any traps that I should be aware of before I begin?

Thanks, as always.
Andrew
 
It’s a 10 minute job with a good floor jack


Garage C5 X7 3008 XTE
Gone but not forgotten 206 GTI 180 306 XR SED 405 MI16 x2 xzara VTS 406 SV 206 XT Berlingo 2011 (best car ever) 306 HDI 307 XSE HDI touring
Fix it right the first time
 
The C5 took 15mins 2 weeks ago see my post of the broken one. Wife had been driving with it broken for a looooog time
Presumably driving like that isn't recommended, but I don't know. How similar is the setup of a C5 to that of a 307? Certainly the mount itself is very different.

And did you have a good floor jack? I didn't notice any mention of one in the thread.

It’s a 10 minute job with a good floor jack
What about with no floor jack?

I don't have one. And I don't think that I know anyone who has one, either.
 
You should have a jack in the car you can use. All you need to do is take the weight of the engine and keep it level while you remove the old mount and attach the new one. A piece of wood between the sump and the jack would be friendly to the sump as well to spread the load / weight a little.

Don't knowingly drive with a broken mount. You're not only stressing the other mounts excessively, but all the connections as well such as air-con plumbing, gear selector, exhaust system etc.

If you need an E-torx fitting - make sure you buy one and use it correctly. Don't try and butcher a socket or anything else.

Cheers

Justin
 
Don't knowingly drive with a broken mount. You're not only stressing the other mounts excessively, but all the connections as well such as air-con plumbing, gear selector, exhaust system etc.

If you need an E-torx fitting - make sure you buy one and use it correctly. Don't try and butcher a socket or anything else.
Thanks, Justin.

It was the stress on other things that I was wondering about.

And I'm not experienced enough to try and butcher other things to make do. I'd much rather have the right tool for the job. And if I can't have that, I'd prefer to pay the mechanic to do the complete job for me. I probably end up paying for things that I should be able to do, but if I don't have the correct tool(s), I won't attempt the job.

I appreciate your advice.

Cheers,
Andrew
 
Yep but using a scissor jack you lift up the motor in the broken position then need to move it forward to line it up not hard but just annoying guys at work use the hoist and a stand and struggle while I’m done and parked.


Garage C5 X7 3008 XTE
Gone but not forgotten 206 GTI 180 306 XR SED 405 MI16 x2 xzara VTS 406 SV 206 XT Berlingo 2011 (best car ever) 306 HDI 307 XSE HDI touring
Fix it right the first time
 
Sorry 505604. I should have posted an update on how my install went. Where are my manners!
As mentioned above, the install was a cinch. I took the advice and popped down to Super Cheap where I found the correct set of Torx and e-Torx bits for not much more than $50 all told. A flood jack makes the job infinitely easier, and as expected, all 8 bolts came out and the bit was swapped in a matter of minutes.

Unfortunately, the replacement mount, sourced from eBay, came from the Czech Republic. Looked and fit correctly, but after 24 months, it failed unspectacularly and the original factory part went back in. I was lucky in that there was no fluid loss from either part, just that it had dropped and the rubber had begun shredding in the lower part.

Best of luck with the install. :)
AB.
 
Thanks for the update, borosa.

My replacement part arrived on Friday. Sasic brand. Are they the original equipment?

I did find that one of my friends has a floor jack (in fact, he has two of them) so I should be ready to go this week. As soon as he gets the jack to me.

Thanks all!
Andrew


Sent from my iPhone using aussiefrogs
 
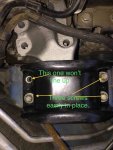
To all of you who have managed to get this engine mount installed, congratulations.

I’m totally stuck trying to align the four bolts with the E-Torx heads.

IMG_1550911252.569088.jpg

I have been through a process of loosening all of the bolts and trying to tighten them each one turn at a time.
I had originally laid out the bolts so that I knew where each one was going to go back to. I’m therefore confident that they have to go back in, but what am I doing wrong?

Thanks for any information about what I’m doing wrong.
Andrew


Sent from my iPhone using aussiefrogs
 
I always fit the engine side on first then pull the engine over to fit those I assume your not using a trolley jack , does the bolt go into that hole without the mount in place the thread is easily damaged


Garage C5 X7 3008 XTE
Gone but not forgotten 206 GTI 180 306 XR SED 405 MI16 x2 xzara VTS 406 SV 206 XT Berlingo 2011 (best car ever) 306 HDI 307 XSE HDI touring
Fix it right the first time
 
I always fit the engine side on first then pull the engine over to fit those I assume your not using a trolley jack , does the bolt go into that hole without the mount in place the thread is easily damaged.
Thanks for that, DMC. I can see why you would fit the engine side first, but I honestly didn’t think about doing it that way.

I did manage to get a loan of a trolley jack, so, yes, I am using one.

After I posted last, I had a few thoughts about what was going wrong and so I went and pulled off the mount and then tried all of the bolts into all of those holes in all combinations. Every bolt fits into every hole except into that one hole. That leads me to believe that the thread is damaged. Correct?

Cheers,
Andrew


Sent from my iPhone using aussiefrogs
 
Yep you can try running a tread chaser in it if not might just need to live with three bolts captive bolts are very hard to repair


Garage C5 X7 3008 XTE
Gone but not forgotten 206 GTI 180 306 XR SED 405 MI16 x2 xzara VTS 406 SV 206 XT Berlingo 2011 (best car ever) 306 HDI 307 XSE HDI touring
Fix it right the first time
 
Top