1972 Citroën D Special- "Celia"

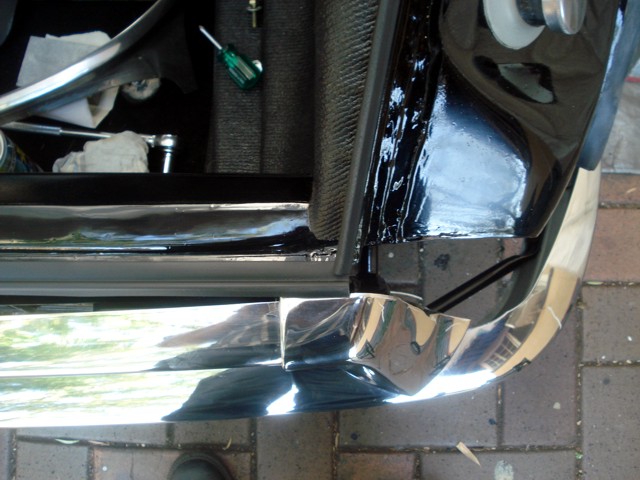
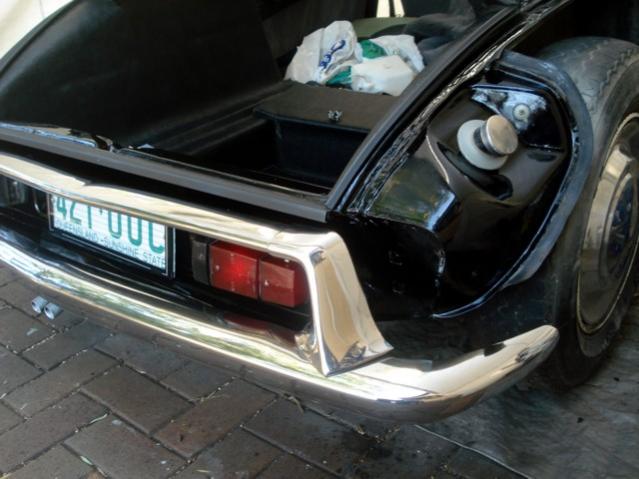
Use plenty of adhesive on both the boot and the lining, I made sure the fit was good at the boot opening and then man handled the rest into position :)

attachment.php


attachment.php


Cheers
Chris

Chris, what adhesive did you use for the hardura please?

Thanks.
 
Chris, what adhesive did you use for the hardura please?

Thanks.

I bought a litre of adhesive from a local trimmer, it looked and smelled like Kwik Grip contact adhesive.

(Sorry for the hijack Toby) :rolleyes:

Cheers
Chris
 
I bought a litre of adhesive from a local trimmer, it looked and smelled like Kwik Grip contact adhesive.

(Sorry for the hijack Toby) :rolleyes:

Cheers
Chris

Thanks, Chris, I was wondering about the 3Mspray adhesive. I've just ripped heaps of kwik-grip like stuff out of Gills and it's awful to lift.... and seems to have rusted worse underneath this than anything else.

Chris
 
Thanks, Chris, I was wondering about the 3Mspray adhesive. I've just ripped heaps of kwik-grip like stuff out of Gills and it's awful to lift.... and seems to have rusted worse underneath this than anything else.

Chris

Chris,
If you go back through my thread you will see that I completely stripped the inside of the boot back to metal, made rust repairs, deoxodine, primed with 2K and top coated with 2K before fitting the lining.

The adhesive supplied by my local trimmer may have some rust inhibiting properties that Kwik Grip may not :confused:

Wurth do an automotive spray trim adhesive that would possibly be easier to use/apply, sprays a web of adhesive rather than just wetting. I'l be using this on my roof lining.

Cheers
Chris

Excellent, will look at the Wurth too. Everything I hear about their other stuff seems top notch so this'll probably be good too!

Thanks again!
 
kwik grip vertical is super bonding, but you need to put on the material exact first go or you are screwed, I used it on heat proofing aluminium sheets, brush on both sides, plus the vinyl map pocket on the cabin firewall. Sikaflex contact adhesive on all other interior vinyl, works pretty good and not as full on an experience as kwikgrip, that stuff isn' very manageable. Make sure you do several dry runs on fitting as you'll want to have a good feel for how you're going to handle it when the glue is introduced. It can be a bit intense if you're not an auto upholsterer!
 
kwik grip vertical is super bonding, but you need to put on the material exact first go or you are screwed, I used it on heat proofing aluminium sheets, brush on both sides, plus the vinyl map pocket on the cabin firewall. Sikaflex contact adhesive on all other interior vinyl, works pretty good and not as full on an experience as kwikgrip, that stuff isn' very manageable. Make sure you do several dry runs on fitting as you'll want to have a good feel for how you're going to handle it when the glue is introduced. It can be a bit intense if you're not an auto upholsterer!


Ha ha, Yeh, I've used good ole kwik before, and have the prep prep prep lesson firmly embedded.. I've just taken the firewall section off that has been repaired before with kwik grip, but it's not happy, it's promoted rust.... But that's all been removed and converted with first coat on so another copule then Resomat.

Thanks again
 
Not a problem! These threads exist to promote discussion and the sharing of ideas!

Ironically, that's the next job I've got planned for the next few months anyhow, so it's a particularly relevant discussion anyhow!

So, it's hard to believe it's been another year, but Celia's rego is due in a few days, so I booked an inspection and went along today. For the first time, all I had to do was give her a thorough clean prior to the test.. A pleasant change from the normal hours of work needed before presenting her for a thorough checkup. I really must be getting somewhere!

She passed with flying colours, having travelled a hugely enjoyable 6,430km in the last 12 months. This year I'm hoping for a few more road trips to bring that count up a little.

Tomorrow will involve an oil & filter change along with an adjustment of the valve clearances, as she's been a little 'tappety' during the warm up stage.

Until tomorrow! Drive tastefully..
image.jpgimage.jpg
 
Well done Toby, Celia is looking stunning - nice temptation for some tyre squealing in that location :nownow: :clown:

You've probably got the filter change sussed by now, but still might find this video interesting (you can change the subtitles to English for even more fun). . .

http://youtu.be/UYjz80wZuHM

Cheers
Chris

Haaa!

Soon be the peacock ring.....

Where we be must soon over watch the robbery!
 
Fantastic video Chris! Thanks for posting.. The assembly makes sense now! Much easier to see why it is the way it is when it's all out of the engine!
 
So, oil change and valve clearance adjustment complete!

I followed the process described in the video linked above to change the two o-rings in the filter housing.. I'd changed them when I did my first oil change (3 years ago!).. Remarkable how hard they'd become already!

image.jpg

I I also cleaned the filter screen in the housing which had actually trapped some gunk.. Still remnants of gasket sealant from someone else's repairs of old floating around. Yet another reason I don't use it!

Anyhow, she's back together and good for another 6 months or 5000km until the next one. There's a challenge..!
 
Well!

Celia and I have had a great couple of months- a few nice trips out, like this one down the Southern Highlands:

GOPR0032.jpg

Maintenance wise?

Well, I did say Celia was a 'rolling restoration', so I've tried to stay true to that mantra.

I flushed and replaced the LHM with Ferodo LHM+ last week- the LHM I removed was fairly dirty, and hadn't been replaced in the three years I've owned her, so it was due! I cleaned the LHM filter and she's purring like new. I've ordered some rebuild kits for the height corrector too, so that'll be next on my list- anyone made up a special disassembly tool they'd be willing to lend me?

I adjusted the valve clearances too, as they were a tad noisy; I'd set them overly conservative last time so I tightened them up and did it warm this time around and things are much quieter. I also replaced the small rubber link pipe at the tank breather/fuel filler intersection as this was cracked and leaking. Repco had the right size on the shelf which made things nice and simple.

I decided to tackle a refinish of the sills too; the dirty and flaking stone chip coating was starting to annoy me and I really wanted to remove everything to confirm there was no rust. Well- a pleasant surprise, because other than some surface rust where the original coating had been damaged, things looked good! Sorry, I was so bust with the angle grinder and wire brush on the drill, I forgot to take any photos!

I've only finished one side, it was a solid 2 days work to do properly and strip everything back prior to refinishing. I used the same finishing technique I've used for my other structural repairs- Acid rust remover initially just to 'etch' the surface and take care of any rust not completely brushed off, before a 2 coats of rust guard epoxy enamel, some spray on body deadener to get the 'rippled' factory finish:

sill1.jpgstone guard.jpg

And then a coat of matte black enamel over the top of the stone guard (as they say to do) to seal it all in. I'm very happy with the result.. Next will be the other side, and then the entire floor pan when I've got a week or so and access to a hoist.. I've had enough of using the angle grinder in awkward positions spraying dirt into my face!

I removed the sill covers obviously.. And wanted to refinish them as the galvanised coating had degraded in parts and allowed some surface rust to take hold. I wire brushed them back.. rust converted them.. Etch primed.. And used rust guard enamel to seal it all in.

The foam seal wasn't reusable, so I went to clark rubber and bought some rubber 'U' profile to replace it with..

sillcover1.jpgsillcover2.jpg

Excuse the cat's back in second photo!

So now, when time permits, I'll reassemble everything and take some pictures before starting the next side!

Cheers,

Toby
 
Love your updates Toby - always so positive :wink2:

Cheers
Chris
 
Yesterday, my rebuilt hydraulic pump I'd ordered arrived. My old one.. Which was the original (Bless that comprehensive service history!) had started leaking from the main shaft seal.

I had a good look at Pottsy's thread on rebuilding the pump.. But my lack of press or quality workspace meant I decided to get an exchange rebuilt pump instead.

Wow- what a difference. Fitting was quick, but cleaning the LHM off everything after the old pump started leaking was a little more time consuming. I can't believe how noisy the old pump was by comparison- I can hardly detect the pump cutting in and out now.

Must have been a reasonable internal leak within the old pump too as Celia stays up much, much longer after shutdown now too.

I also took the opportunity to remove, clean, replace the seals and refit the rear height corrector. Thanks to Richo's excellent pictures and the 814 manual guide (http://citroen.cappyfabrics.com/Citroen/Rebuild_HC.pdf), I disassembled the damper and cleaned it all out.

View attachment 72131
View attachment 72132
ImageUploadedByTapatalk1437442886.379104.jpg

While I was at it, I replaced all the hydraulic pipe seals for the rear height corrector. In case anyone is interested, I obtained a handful of height correctors with a view to finding the least worn and rebuilding that. Interestingly, there are 2 types.. And the hydraulic pipe threads are different sizes! Front and rear maybe? I haven't pulled my front corrector out as yet, but I'll post my results.

Everything went back together a treat.. The pump cycle time has tripled (I remember reading a post by Citroenfan saying the pump can be a major cause!) and, perhaps most interestingly, the rear brakes work MILES better. The car no longer 'dives' under braking and now squats down nicely.. Chalk and cheese. Makes sense given the relationship between the rear suspension and the rear brakes, but surprising just how great the difference was.

Good fun getting stuck into the workings of the hydraulic system- what an amazing car.

And to think.. Reading through my posts, a couple of years back I was scared to change the spheres! Thanks to everyone that's helped along the way!


Sent from my iPhone using Tapatalk
 
Nothing more than some gratuitous pictures, more for my records than anything else.

The other nice discovery was the distinct lack of any rust hiding along with the rear height corrector!

corrector1.jpgcorrector2.jpgpump.jpg
 
nice work Toby. I am where you were a couple of years ago, apprehensive about of removing my spheres. But I will do it, I will. Take the bull by the balls so to speak.
cheers tony
 
Well- please excuse me for the lack of recent updates. I thought I’d best wait until I had some success to share!

This has been by far the largest piece of work I’ve undertaken on Celia to date.. And probably, with the exception of the retrimming, the most satisfying in terms of the finished result!

Some of you may remember my complaining regarding the shuddering under brakes I’ve been enduring with Celia since purchase- and which has been present for many years before I took custody of her: http://www.aussiefrogs.com/forum/citro%EBn-forum/89201-citroen-ds-divertrain-knocks-rumbles.html

So- you may recall I replaced both triaxe housings with brand new ones, which improved the problem, but didn’t completely solve it. A worn outer hooke joint on the drivers side driveshaft necessitated replacement of the entire shaft, which fixed the issues under acceleration/turning, but the brake shudder still existed.

Next port of call was the brake discs. I figured I’d be best rebuilding the calipers, changing the pads and handbrake pads and replacing the caliper mounting rubbers at the same time as the labour involved in replacing the discs is prohibitive- so I ordered my parts and started disassembly.

I’ve also had an issue with short pump cycle times and heavy steering, so I knew a rack rebuild was on the cards.

Shortly after I started taking everything apart, I realized this would be the sensible time to remove and rebuild the rack.. And, with split rack boots, the leaks were meaning LHM dripped straight down onto the brakes- something I couldn’t have persisting once my new parts were fitted. So I set about removing that and sent it to Denton at European Autocare for overhaul.

everythingapart.jpg removed.jpg

Taking everything apart was time consuming, although reasonably straightforward. I removed the calipers and cleaned them thoroughly, replacing the seal and felt ring before refitting with new LHM pipe seals. I changed the diabolo rubbers in the calipers using a wipe of LHM to help them slide in. I also removed, cleaned, re-lubricated and refitted the handbrake calipers while I had everything apart to replace the handbrake pads and fitted new cotter pins to hold it all together.

handbrakecalipers.jpgHandbrake1.jpgcalipers.jpghandbrakepads.jpgcaliperkit.jpg

The discs finally freed, I referred to the 814-00 manual to ensure I didn’t make any mistakes- after 10 hours in disassembly, the last thing I wanted to do was fit something incorrectly and have to take it all apart again. The only real catch was the disc fitment- the runout MUST be measured even on brand new discs, as the output shafts are seldom flat and even new discs can have a greater than acceptable ‘wobble’ if not fitted correctly. As it turned out, my drivers side output shaft had the yellow paint mark the 814-00 manual said is used to identify the high point of the differential output shaft.. And the first way I fitted the disc left me with .017mm runout- well in excess of the .010mm maximum permissible. I followed the 814-00 recommendation and rotated the disc 1/3 of a turn clockwise and re measured. Perfect- runout was now .005mm; almost perfect.

discs.jpgpads.jpg

The passenger side was perfect first time- so the moral of the story? Make sure you check the runout before refitting the discs; I would have put everything back together and had the same problem!

I then refitted the handbrake calipers using cable ties to compress the springs on the handbrake cable and slid everything into place. Accessibility isn’t ideal- I had to fit the pads to the calipers prior to putting the calipers back in- I can’t see how you could possibly change the pads in-situ and manage to ensure the anti-rattle clips remained in place!

I adjusted the handbrake pads using the 814-00 method of inserting a plate between the adjustment screw and the pads and setting the gap between the disc and pad- perfect! My handbrake was loose before- so this was worthwhile in itself!

From here, I started putting everything back together- the calipers bolted on loosely and new pads fitted. The 814-00 states not to tighten the mounting bolts until you can apply brake pressure to ensure the calipers are straight- so before I could do this, the rack had to be refitted.

I picked the rack up with much excitement and fitted it back into place, changing the return line and all hydraulic seals. I had borrowed the rack alignment tool from Denton and set the racks lateral position with the measurements provided in the 814-00; as distinct from my marks prior to removal, this allowed me to discover the rack was actually misaligned by some 30mm! I set the angle using the alignment tool and bolted everything back together.

rack.jpgrackin.jpgrackrebuilt.jpg

I pressurized the hydraulic system and placed an oil bottle on the brake pedal to hold pressure on the calipers before tightening the mounting bolts. I checked for leaks- the only one I could see was a slight leak from the caliper bleed nipple on the drivers side- before shutting the car down and refitting the remainder of the parts. Sounds quick- but I’d say I was up to 25 hours by this point! I took my time though- pays to do things once but properly!

I bled the brakes and went for a test run- wow! The brakes were smooth as silk, so I followed the recommended bedding-in procedure. The steering? Amazing! I can’t believe how much better the car feels!!

So- after 10 years, the shuddering under braking is rectified.. And the power steering is working as it should! Pump cycle times are now in excess of 40 seconds, which I’m very happy with.

So- a huge amount of work, but a very satisfying outcome and a great learning experience!
 
Had to read your posts again Toby - always great to see someone else's work and progress. Provides inspiration and ideas on what to do and not to do as well. I am only at the start of the journey of a " rolling resto", with the main frustration that I spend too long hours at work during the week, so that leaves only two days out of seven to progress... But hey: no rush!

Looking forward to the next updates. Sven
 
Top