Hi all,
Just working on electrics in my 1964 Heidelberg second nose ID19. It has the 2 speed wiper motor. My dash wiring is not even fit for a dog's breakfast and so I am working from first principles to sort things out. When I got the car there was no Citroen wiper switch, most of the switches were either absent or like the clock, just not connected (not that it works anyway). Some sample pictures show what it was like, almost all the black rubber tube insulation either failed or missing, many bare connectors. Many things on the car including all the rear harness (rear lights, internior light etc) simply didn't work. Hence taking the dash off and going back to basics.


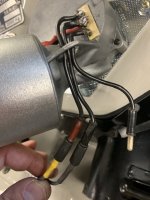
I have a question on the wiper motor, even though the series of four posts about the same sort of motor on Sven's amazing Blue Danube Safari work (starting at post Blue Danube Wiper motor posts ) has been very helpful (so thanks Sven, Buttercup Bob and Budge). On my car's 2 speed wiper motor, there is a small thin wire with white insulation that has come adrift, I believe from the leftmost / topmost power terminal - see photo. Does anyone know what this wire does (is it something to do with the "home position" feature)? I assume I have to re-solder it onto the contact , can anyone confirm that? It seems obvious but it's good to be sure!


Also one thing I found when tracing the wiring on the dash / fuse side, the "always on" power feed for the wipers (the black connector to the wiper motor that doesn't pass through the dash switch) mentioned by Bob in his post about the 2 speed wiper motor connections, is wired behind the dash to the "Accessory" point in the middle of the dash (itself a nice feature I just discovered) - this is clearly the original wiring from Heidelberg. Took me a little while to twig where the feed was coming from, so I have labelled it for posterity.

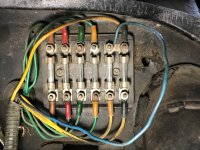
Also by the way, and thanks again to Sven's thread and Hotrodelectric this time, none of the English wiring diagrams in the 56-61 and 62-65 manuals match what is clearly the original loom wiring on this Heidelberg car. However, the french DR472 manuals on BK23.Free.FR that Bob's posts pointed me to are the closest by quite a way so finding them for the first time has been very valuable. It seems the Heidelberg loom was mostly based the French manual's detail - with the addition at least of the "Chauffage -5 degrees" extra loom items - BUT - while Heidelberg clearly stuck to "standard" or close enough for critical items like ignition and lights, they deviated quite a lot for other wiring and accessories (which wires use certain fuses and even which fuses are in use). As an example, none of the manuals show any use of Fuse 6 (leftmost) but the original loom on this car clearly does. Has anyone ever produced an "as-built" wiring diagram for the second-nose Heidelberg cars? I would love to see one. See below (ignore the bodgy blue wire, that is a later hack). The mauve connector / green wires on the lefthand fuse (which Fuse 6, Fuse 1 is the rightmost one) are not even supposed to be there! I'd be interested if other Heidelberg second nose cars are wired the same.
Thanks for your interest and any help on the wiper motor wiring is appreciated.
Cheers Leconte
Just working on electrics in my 1964 Heidelberg second nose ID19. It has the 2 speed wiper motor. My dash wiring is not even fit for a dog's breakfast and so I am working from first principles to sort things out. When I got the car there was no Citroen wiper switch, most of the switches were either absent or like the clock, just not connected (not that it works anyway). Some sample pictures show what it was like, almost all the black rubber tube insulation either failed or missing, many bare connectors. Many things on the car including all the rear harness (rear lights, internior light etc) simply didn't work. Hence taking the dash off and going back to basics.
I have a question on the wiper motor, even though the series of four posts about the same sort of motor on Sven's amazing Blue Danube Safari work (starting at post Blue Danube Wiper motor posts ) has been very helpful (so thanks Sven, Buttercup Bob and Budge). On my car's 2 speed wiper motor, there is a small thin wire with white insulation that has come adrift, I believe from the leftmost / topmost power terminal - see photo. Does anyone know what this wire does (is it something to do with the "home position" feature)? I assume I have to re-solder it onto the contact , can anyone confirm that? It seems obvious but it's good to be sure!
Also one thing I found when tracing the wiring on the dash / fuse side, the "always on" power feed for the wipers (the black connector to the wiper motor that doesn't pass through the dash switch) mentioned by Bob in his post about the 2 speed wiper motor connections, is wired behind the dash to the "Accessory" point in the middle of the dash (itself a nice feature I just discovered) - this is clearly the original wiring from Heidelberg. Took me a little while to twig where the feed was coming from, so I have labelled it for posterity.
Also by the way, and thanks again to Sven's thread and Hotrodelectric this time, none of the English wiring diagrams in the 56-61 and 62-65 manuals match what is clearly the original loom wiring on this Heidelberg car. However, the french DR472 manuals on BK23.Free.FR that Bob's posts pointed me to are the closest by quite a way so finding them for the first time has been very valuable. It seems the Heidelberg loom was mostly based the French manual's detail - with the addition at least of the "Chauffage -5 degrees" extra loom items - BUT - while Heidelberg clearly stuck to "standard" or close enough for critical items like ignition and lights, they deviated quite a lot for other wiring and accessories (which wires use certain fuses and even which fuses are in use). As an example, none of the manuals show any use of Fuse 6 (leftmost) but the original loom on this car clearly does. Has anyone ever produced an "as-built" wiring diagram for the second-nose Heidelberg cars? I would love to see one. See below (ignore the bodgy blue wire, that is a later hack). The mauve connector / green wires on the lefthand fuse (which Fuse 6, Fuse 1 is the rightmost one) are not even supposed to be there! I'd be interested if other Heidelberg second nose cars are wired the same.
Thanks for your interest and any help on the wiper motor wiring is appreciated.
Cheers Leconte