Currently several club members are putting Dauphine brakes and new front suspension bushes on it for him. So as to be ready for the 50th birthday bash.Never thought about that offset!! Live and learn eh. Pity about the rego and what goes behind that..... I drove Bruce's car once and it was really nice with the 330 box.

You are using an out of date browser. It may not display this or other websites correctly.
You should upgrade or use an alternative browser.
You should upgrade or use an alternative browser.
1959 4cv Restoration in North Carolina USA
- Thread starter Stan W
- Start date
That's just great. He'll be overjoyed, I can imagine. Good people.Currently several club members are putting Dauphine brakes and new front suspension bushes on it for him. So as to be ready for the 50th birthday bash.
Dauphine brakes are just great on a 4CV. Same size as FJ Holden I think!!! I love mine.
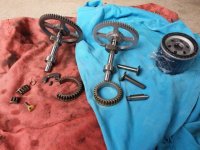
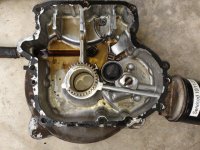
It's not likely that I would install a 330 gearbox, but my first inclination would be to modify the 4cv crossmember. I am MUCH more likely to install a 314 gearbox from a Dauphine. I have been working on the rusted thin spots on the lower part of the front left wing. There are all sorts of compound curves, so I made my patches in several pieces. I can form small pieces with the hammer and dolly, but not complex compound curves. It works well to make the patches in several pieces, but it takes time. Work on the wing was delayed by a lawnmower problem. The balance assembly, camshaft and governor were all destroyed - not sure which failed first. It is a poor design (briggs and stratton), but amazingly, repairable without spending a lot of $$. I solved the problem by purchasing a similar but older and better mower. I will fix the newer one properly and sell it. Both are swedish riders - articulated mowers.


I can vouch for the 314 being an improvement! Mine was built with the 7x33 diff ratio to suit my early car. Briggs and Stratton powers our rotary lawn mower (small lawn but a bit of grass is good) and it's some 20+ years old now. Just goes and goes. It's junky in its way I agree. I change the oil every year or two. You'd need more than metallic epoxy for yours by the look of it!
Nice panel work - way beyond my skill set!
Nice panel work - way beyond my skill set!
Hi Stan ")
Nice work !! I wish I had your patience
Those syncro balance B&S motors had a habit of failing like that after a long life usually. The syncro weight bearings on the crank eccentrics wear and sieze eventually and the slim weight side castings let go. Thus the carnage ! I guess by now there is a repair kit as the rest of the engine is just normally worn. You could put a non syncro balanced engine crank and parts in.
Jaahn
Hi Stan, my 4CV front wings need the same treatment. The metal was so thin on these little cars, it's no wonder it doesn't take much for them to rust away in the right environment.
I had to do a job on my brother's Husqvarna ride-on (I think you call them lawn tractors) when the B&S came to an abrupt halt too. The decompression device on the back of the cam gear comes adrift causing havoc. The parts to fix were as cheap as the quality of the originals! Common problem, it would seem.
I had to do a job on my brother's Husqvarna ride-on (I think you call them lawn tractors) when the B&S came to an abrupt halt too. The decompression device on the back of the cam gear comes adrift causing havoc. The parts to fix were as cheap as the quality of the originals! Common problem, it would seem.
Attachments

Last edited:
B & S can make good engines. My John Deere ride on (lawn tractor) has a B & S specially made for JD. About 15 years and quite a lot of work no faults and spasmodic servicing on my part. But I had a number of other ride on mowers over the years with B & S that were pretty much junk. Two were replaced under warranty. Not my favourite brand of motor. But have also had two bad Honda's so there you go.
I FINALLY finished the bodywork on the front left wing. It seemed as though it would never get done. The week spent working on lawn mowers didn't help. I put the Briggs engine back together - everything looked ok - except for evidence that things had been hitting parts of the block very hard. The engine ran fine for almost an hour. Then it started getting loud, probably the balance assembly, it did not sound like a rod. The oil had metal in it again. I think the crank or balance weight may have been bent from all the banging around of heavy parts. I put new bearings in the deck of my "new" mower and sold the one with the bad engine. The "new" one looks like the one I sold, but there is no comparison in the quality and durability between the mowers. I think the next panel to get bodywork is the boot lid. I don't know if I will do the doors after that or do the roof and paint the main body shell. The 4cv reached a major milestone this week - 100 miles!


I started and finished work on the boot lid. It only took four days compared with three weeks for the front left wing. I worked out the few dents and did not need to use the shrinking disc. This is the first panel where the metal finishing was good enough that no bondo was needed! The panel had not been worked over by apes with hammers. The lid is blue on the underside because it came off another car. I removed the black paint on the underside. This is the only panel on the car that has been replaced. My guess is that it was done early in the car's life the first time it had a bump up - long before the other damage and the red paint.. There is a hole on the right side of the car near the front windscreen for a radio antenna. I am thinking of welding it closed - any thoughts? Notice the racing strap on the boot lid - not sure how many Hp it is good for, but probably almost as much as stickers.


i had to replace my bonnet when it was blown up in a storm, late at night, whilst crossing the Sydney Harbour bridge, the bonnet catch let go ,i had to quickly wind the window down ,stick my head out in pouring rain , so i could see my way to north Sydney [ stopping was not an option] were i closed it ,a change of underwear and off home ,unusual that your bonnet was the only panel replaced something may have landed on it ,PUGS
Last edited:
Keep the boot lid locked! The spring catch isn't quite strong enough and that alone might be the reason for a replacement in the past! I'd observe that these cars go much faster with two symmetrical straps than one diagonal strap!.I started and finished work on the boot lid. It only took four days compared with three weeks for the front left wing. I worked out the few dents and did not need to use the shrinking disc. This is the first panel where the metal finishing was good enough that no bondo was needed! The panel had not been worked over by apes with hammers. The lid is blue on the underside because it came off another car. I removed the black paint on the underside. This is the only panel on the car that has been replaced. My guess is that it was done early in the car's life the first time it had a bump up - long before the other damage and the red paint.. There is a hole on the right side of the car near the front windscreen for a radio antenna. I am thinking of welding it closed - any thoughts? Notice the racing strap on the boot lid - not sure how many Hp it is good for, but probably almost as much as stickers.
View attachment 134001View attachment 134002
Nice panel work by the way. I like your front flashers - US standard fare I presume?
Hii had to replace my bonnet when it was blown up in a storm whilst crossing the Sydney Harbour bridge, the bonnet catch let go ,i had to quickly wind the window down ,stick my head out in pouring rain , so i could see my way to north Sydney [ stopping was not an option] were i closed it ,a change of underwear and off home ,unusual that your bonnet was the only panel replaced something may have landed on it ,PUGS
Back in the day of my several R750s I had the bonnet blow open while passing a school bus !! Much to the amusement of the kids !! Actually you are left with a small triangle to see out of in the corner
When i discussed this with other owners the answer was to keep the catch locked at all times as the other catch was not reliable, as JohnW also said.Jaahn
Sounds like most of us have been there. There's a microsecond of horror as you realise it is happening, then it does.....Hi
Back in the day of my several R750s I had the bonnet blow open while passing a school bus !! Much to the amusement of the kids !! Actually you are left with a small triangle to see out of in the corner
Jaahn
Thanks for the advice about symmetrical straps and keeping the bonnet locked! I think the bonnet was replaced due to collision damage in the front. The front wings appear to have been repainted black at the same time. Usually, the bonnets are a little bent from unexpected openings - this one is not. Unexpected bonnet opening was also a problem with the Nash Metropolitan. The safety catch wasn't strong enough and would just break off if the bonnet came open when the car was moving fast enough.
Unexpected bonnet opening was also a problem with the Nash Metropolitan. The safety catch wasn't strong enough and would just break off if the bonnet came open when the car was moving fast enough.I have been working on the roof and am making good progress. It is obvious that the roof was caved in (probably from someone sitting on it) and pushed back out. It is now very close to the correct shape. I will need to shrink the metal in a number of spots. My goal is to get it straight enough that filler is not needed. I might not achieve that, but will get close.

Just use one of those door security chains as a safety catch you can buy in hardware stores on the inside.Thanks for the advice about symmetrical straps and keeping the bonnet locked! I think the bonnet was replaced due to collision damage in the front. The front wings appear to have been repainted black at the same time. Usually, the bonnets are a little bent from unexpected openings - this one is not.
I have got the roof really close to the correct shape. Almost good enough for no filler. One of my sources for good technique for anything car related is the Jalopyjournal.com site. A quote on metal finishing without filler:
"If you own a shop, and you have customers with enough scratch to afford metal finishing, good on you.
If you are metal finishing at home, on your own ride, that is going to get immediately painted, you may either have an out sized sense of pride, don't value your time, or are of dubious mental soundness."
I don't value bragging rights that much, so small parts of the roof have a very thin coat of filler.
Just a clear-coat over the top?I have got the roof really close to the correct shape. Almost good enough for no filler. One of my sources for good technique for anything car related is the Jalopyjournal.com site. A quote on metal finishing without filler:
"If you own a shop, and you have customers with enough scratch to afford metal finishing, good on you.
If you are metal finishing at home, on your own ride, that is going to get immediately painted, you may either have an out sized sense of pride, don't value your time, or are of dubious mental soundness."
I don't value bragging rights that much, so small parts of the roof have a very thin coat of filler.
View attachment 134133
Nice work, shame to hide it......I think it looks like it has the mange.Just a clear-coat over the top?
I filled in the radio antenna hole and put a coat of primer on the roof. That has been sanded and another coat will go on tomorrow.


Here is the 4cv at the midpoint of the golf course. I call this picture "at the oasis"
Some younger golfers said I was "the best golfer ever" because of my ultra cool golf cart! They had to have their picture taken with the car. Good to know that the 4cv makes up for having no talent at golf.
Wonderful. You must be delighted, and deservedly.I think it looks like it has the mange.
View attachment 134223View attachment 134221View attachment 134222View attachment 134224
Here is the 4cv at the midpoint of the golf course. I call this picture "at the oasis"
View attachment 134225