1959 4cv Restoration in North Carolina USA

Ha. No. Imagine a ring (like a wedding band or similar). If you heat it, does the hole get larger or smaller? High school experiment.

What you have experienced is the result of local heating of a large body with a small hole. That is why they heat the whole head.
 
John wouldn't heating the head make the holes smaller as the head expands into the holes?? I have been trying to drill a large deep hole through cast steel and when about half way through the metal heats up and expands into the hole and jambs the drill until it has cooled down again.
I'd have thought so too. There must be, I suppose, a transition dimension from a tube that expands when heated to a hole with enough metal around it for the reverse to happen. I've often wondered if there's a way to calculate that - there must be I reckon but I don't know how. I vaguely recall a high school physics experiment that showed a hole in a steel plate getting smaller.
Then again, Mr Schlitzaugen might be right? I will now have to drive up the road tomorrow to my local and wonderful engine shop and ask them. I'll report back in a couple of days!
 
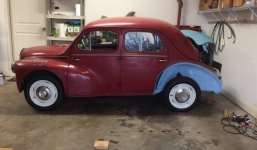
A big step forward today - I have brakes and the wheels and tires are on the car! Even the brake lights work. I also have lights even though I don't have a proper light switch yet. The machine shop told me today that I will need 0.5mm oversize bearings. I will be ordering all the parts that I don't already have in the next week. Found someone in the eastern US that has a number of the parts I need, including rear fender aluminum stone guards and new door trim. It's good to reduce the number of parts that require international shipping.

IMG_2584Copys.JPGIMG_2585Copys.JPG
 
A big step forward today - I have brakes and the wheels and tires are on the car! Even the brake lights work. I also have lights even though I don't have a proper light switch yet. The machine shop told me today that I will need 0.5mm oversize bearings. I will be ordering all the parts that I don't already have in the next week. Found someone in the eastern US that has a number of the parts I need, including rear fender aluminum stone guards and new door trim. It's good to reduce the number of parts that require international shipping.

View attachment 129752View attachment 129753
Wow. That is great progress. Have you come across "The Renault Guy" in Florida? He seems to have plenty of things.
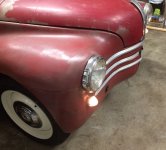
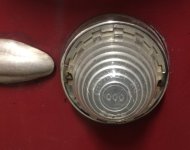
Out of interest, are those the front flashing indicators that came on the US cars?
 
I think I know who you are referring to. If I bought my parts there, this would be a $150,000 restoration. The lights on the front are both "parking lights" (US terminology) and directional flashers. The US spec 4cvs stopped using the C pillar mounted flashers in 1958.
 
I think I know who you are referring to. If I bought my parts there, this would be a $150,000 restoration. The lights on the front are both "parking lights" (US terminology) and directional flashers. The US spec 4cvs stopped using the C pillar mounted flashers in 1958.
:) I wondered whether you'd say that.

I'm quite interested in getting a pair of those lamps
13 March 2017 sml.jpg
as eventual replacements for the non-genuine ones I fitted in 1967.
 
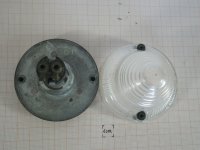
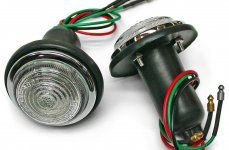
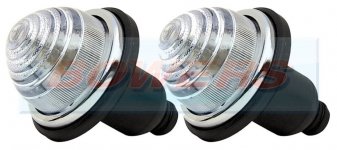
I have never seen a set with the chrome rings for sale. You can get the ones that did not have the chrome trim. I think the best alternative is one of the reproduction Lucas lamps. My lamps still need work, the plastic needs sanding and clear coat, the metal base needs some JB weld where it is cracked, and the plastic part needs to be sealed on the back. If I ever replace then, I would get the clear beehive shaped Lucas reproductions.
The diameter of both Lucas lamps pictured is about the same as the 4cv lights I have.

4cv dauphine parking turn light front.jpglucas lights1.jpglucas lights2.jpgImg_2589 - Copy.jpg
 
Last edited:
Thanks Stan.
I have never seen a set with the chrome rings for sale. You can get the ones that did not have the chrome trim. I think the best alternative is one of the reproduction Lucas lamps. My lamps still need work, the plastic needs sanding and clear coat, the metal base needs some JB weld where it is cracked, and the plastic part needs to be sealed on the back. If I ever replace then, I would get the clear beehive shaped Lucas reproductions.
The diameter of both Lucas lamps pictured is about the same as the 4cv lights I have.

View attachment 129778View attachment 129779View attachment 129780View attachment 129781
Thanks Stan
 
A big step forward today - I have brakes and the wheels and tires are on the car! Even the brake lights work. I also have lights even though I don't have a proper light switch yet. The machine shop told me today that I will need 0.5mm oversize bearings. I will be ordering all the parts that I don't already have in the next week. Found someone in the eastern US that has a number of the parts I need, including rear fender aluminum stone guards and new door trim. It's good to reduce the number of parts that require international shipping.
Hi Stan :)
Just to be pedantic and question the statement above, you will need 0.5mm undersize bearings I would say ! I guess the machine shop said they will grind your crank under size 0,5mm. Or is your block being line bored ?
I only make the point as it is a common mistake and causes confusion ordering parts. It depends on whether the part fits a shaft(or solid item) that will be reduced in size or it is a bore(or hole) that is increased in size. I only say this to inform people, not to be just a smart arse. 🥴
Jaahn
PS 0.5 mm oversize bearings could be specified if you had line bored your block and wanted bearings that are bigger on the outside ! Possibly also smaller on the inside as well !!!! :rolleyes:
 
Last edited:
Thanks, I know what you mean about the bearings, I just wrote it wrong. My mind was thinking about the bearings being thicker and not the crank being smaller.
I will be glad when the parts ordering is mostly finished. I have spent many hours on various parts lists and buying as many parts as possible here in the US. When I say "as many parts as possible" what I mean is "as many parts as possible that are priced at or below the French suppliers". It takes time, but is saving me lots of $$. If I see someone in the US selling Renault parts at a reasonable cost, I ask them if they have any 4cv parts. When you ask enough people, you get results! I have decided not to bother with finding French suppliers who speak English. I took French in high school and college. I still remember a good bit of it, and online translators help a lot. Besides, the French appreciate the effort. Now I just need an American - Australian translator so I don't confuse people. :)
 
I am confused about which bushings to order for my front anti-sway bar. The ones mounted to the body come in 10mm and 12mm ID. The bar is just a little over 11 mm. The bushings on the body are not a tight fit on the bar, but if they are 12 mm, then it won't be tight. I'm not sure which bushings to order for the links either. What I mean by "links" are the two small bars that go from the anti-sway bar to the front suspension. These bushings come in 21 mm and 26 mm OD.
 
I am confused about which bushings to order for my front anti-sway bar. The ones mounted to the body come in 10mm and 12mm ID. The bar is just a little over 11 mm. The bushings on the body are not a tight fit on the bar, but if they are 12 mm, then it won't be tight. I'm not sure which bushings to order for the links either. What I mean by "links" are the two small bars that go from the anti-sway bar to the front suspension. These bushings come in 21 mm and 26 mm OD.
I've just been under the car. My anti-sway bar is 12.5 mm - don't remember measuring it before. I recall the last time I bought the big rubber bushes they slid on firmly with some rubber grease, so perhaps were 12 mm. Sounds as if the 10 mm ID is the go, doesn't it. My car is December 1950 - sounds as if they changed the anti-sway bar with the later "rubber bush" suspension and maybe different spring rates.

The Silentbloc bushes for my links are 21 mm OD, 9 mm ID and 21 mm long. The outer sleeve is shorter at 17.5 mm. These are measurements of the spare new ones I've had in stock for years. Perhaps you'd better get the bushes out of the links and measure them up to be sure, but I don't know that they changed their size.
 
I took a bushing out the link bar and it was 21mm OD. The front suspension seems to be in good shape. I don't want to replace all the rubber bushings at this point. However, since I am ordering parts, I may replace some. Do the bushings on the kingpin assembly wear out faster than the ones on the A arms?
 
Sorry, no idea. They are lightly loaded given their size I reckon. the key thing on assembly is not to tighten the main pivot bolts until the car is on the ground and loaded appropriately, so that they twist equally either way and aren't overstrained. I got this wrong on the R8 a few years ago and the inner Silentblocs chewed out in about 50,000 miles. The originals, set up properly, lasted more like 150,000 miles. This may not be a huge issue for golf course mileages.... :)
 
Thanks for the information! Only the anti-roll bar bushings are worn, so I will leave it at that for now. I know what you mean about not tightening the bolts until it is loaded properly! I forgot when I learned that, but fortunately it was before I needed to know. While I will be driving the 4cv around the neighborhood and on the cart paths, I'm still building it as if I were going to drive it anywhere. I wouldn't feel that I had done a good job if I didn't.
 
Thanks for the information! Only the anti-roll bar bushings are worn, so I will leave it at that for now. I know what you mean about not tightening the bolts until it is loaded properly! I forgot when I learned that, but fortunately it was before I needed to know. While I will be driving the 4cv around the neighborhood and on the cart paths, I'm still building it as if I were going to drive it anywhere. I wouldn't feel that I had done a good job if I didn't.
Great to hear - although it's been obvious for a while now that you weren't just cobbling it together!
 
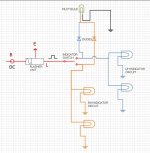
While waiting for various parts, I made a small modification to the flasher circuit in order to use an inexpensive ($4 USD) electronic flasher. I don't have the electronic flasher yet, but the circuit works with thermal flashers also. The modification is only to account for the lack of an indicator light terminal on the electronic flasher unit. I don't remember where I found this, some smart person figured it out. My 6v thermal flasher works a tiny bit better (on 12v) this way due to the indicator bulb load being added to the actual turn signal electrical load. Now I can see the flasher indicator in the gauge cluster working. Big excitement on a cold, wet day!

Flasher circuit with electronics.jpg
 
I got the flasher today in the mail. It is installed and working perfectly. It has an adjustable rate, works with any combination of bulbs and even makes a nice clicking noise similar to the original thermal flasher.
 
I got the flasher today in the mail. It is installed and working perfectly. It has an adjustable rate, works with any combination of bulbs and even makes a nice clicking noise similar to the original thermal flasher.
Sounds great. Be interesting to see details - brand and model please? I don't remember seeing an adjustable one.
 
Top