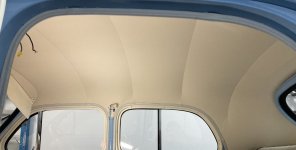
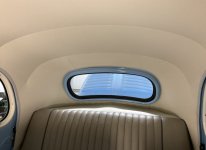
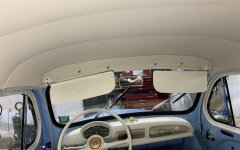
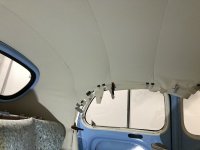
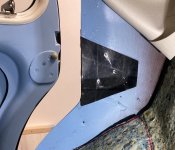
If you are still sane at the end, this would be a very welcome subject for an article for 4CV owners. I'd definitely circulate it to our 130-odd members in Australia, and there are 30 more in South Africa. I'd send it to England and ROCNA too with your permission. It is going to look really good Stan!Here are pictures of the headliner in the car. The piece above the front windscreen is holding tension on the headliner. The tension may need to be increased as I go. I am starting to understand the method of making plates on either side of the rear parcel shelf to hold tension on the headliner. It is not practical to try to glue the material to the "wings" on the back piece around the window. The slow iterative process of getting out the wrinkles starts now.
View attachment 200262View attachment 200263

You are using an out of date browser. It may not display this or other websites correctly.
You should upgrade or use an alternative browser.
You should upgrade or use an alternative browser.
1959 4cv Restoration in North Carolina USA
- Thread starter Stan W
- Start date
This is undoubtedly going to be the most luxurious golf cart in existence. You could make money hiring it out with driver, of course.
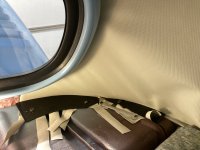
I would be glad to write an article, hopefully it would lessen the pain and suffering for someone else. I made plates to hold the fabric down on the sides of the parcel shelf. I think this is similar to what JP Delaunoy did on his car. I have his instructions, just no pictures. I used four plates, all made of ABS plastic. Vinyl requires a LOT of tension - probably a lot more than the original cloth. It also does not shrink, but can be stretched a little. I may not get the whole headliner "drum tight", but it will be passable. Fitting it is a long process, pull, clamp, pull, clamp, go do something else while it stretches out. The process needs to be repeated several hundred time (at least is seems that way). At the end, I have to glue it all around the doors. Still a few more days of pulling, stretching and clamping to go.If you are still sane at the end, this would be a very welcome subject for an article for 4CV owners. I'd definitely circulate it to our 130-odd members in Australia, and there are 30 more in South Africa. I'd send it to England and ROCNA too with your permission. It is going to look really good Stan!
Thanks Stan. The later cars have a vinyl-faced fabric. I imagine the ambient temperature has a lot to do with successful vinyl stretching?I would be glad to write an article, hopefully it would lessen the pain and suffering for someone else. I made plates to hold the fabric down on the sides of the parcel shelf. I think this is similar to what JP Delaunoy did on his car. I have his instructions, just no pictures. I used four plates, all made of ABS plastic. Vinyl requires a LOT of tension - probably a lot more than the original cloth. It also does not shrink, but can be stretched a little. I may not get the whole headliner "drum tight", but it will be passable. Fitting it is a long process, pull, clamp, pull, clamp, go do something else while it stretches out. The process needs to be repeated several hundred time (at least is seems that way). At the end, I have to glue it all around the doors. Still a few more days of pulling, stretching and clamping to go.
View attachment 200337
Yes, higher temperature helps the vinyl stretch, so I put an electric space heater in the car today while I was working on it. I got it up to 31 degees C.
That's the sort of temperature I had in mind.Yes, higher temperature helps the vinyl stretch, so I put an electric space heater in the car today while I was working on it. I got it up to 31 degees C.
Vinyl is harder than cloth. I knew this when I started. What I now know is that I should have tapered all the pieces a little at the ends. I have too much fabric at the sides where the headliner attaches around the door openings. I could take it back out and sew in some darts, but I may be able to stretch it out by folding the fabric under the area where the sun visors attach. One article I found suggested making a prototype out of cheap material before constructing the final product - a good idea, but lots of work. I am ready for this part of the project to be done.
Phew!! Good work Stan!Vinyl is harder than cloth. I knew this when I started. What I now know is that I should have tapered all the pieces a little at the ends. I have too much fabric at the sides where the headliner attaches around the door openings. I could take it back out and sew in some darts, but I may be able to stretch it out by folding the fabric under the area where the sun visors attach. One article I found suggested making a prototype out of cheap material before constructing the final product - a good idea, but lots of work. I am ready for this part of the project to be done.
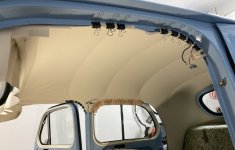
I am making progress. Bit by bit, I am getting the wrinkles out. I heated it up again after taking this picture, so it is a little better. The next step is to glue the edges around the rear door openings. When that is done, I go to the front. I installed the pieces that hold the lower rear part of the headliner at the door opening. The material is glued to the piece, then tucked around the edge at the door opening.


A midsummer job in ideal circumstances! It looks pretty good to me.I am making progress. Bit by bit, I am getting the wrinkles out. I heated it up again after taking this picture, so it is a little better. The next step is to glue the edges around the rear door openings. When that is done, I go to the front. I installed the pieces that hold the lower rear part of the headliner at the door opening. The material is glued to the piece, then tucked around the edge at the door opening.
View attachment 200470View attachment 200471
Great job Stan. Don't worry about the minor creased they'll disappear in about 4 years after the fabric tension equalizes. I've done two hood linings and they both came good after a while. Carry on.
A bit weak on my part, but I think I will just pay to have the hood lining done in my 4CV. I guess I am not that adventurous, and just too many half done projects. Well done on all your efforts Stan, throughout the restoration of your 4CV.
I did that Alan too. It was a funny story.A bit weak on my part, but I think I will just pay to have the hood lining done in my 4CV. I guess I am not that adventurous, and just too many half done projects. Well done on all your efforts Stan, throughout the restoration of your 4CV.
About 40 years ago I had the front seats recovered with a brown woven wool fabric. I had purchased plenty of it, so as to do the door trims and rear seats later. Well, 30 years later I removed the fitted vinyl rear seat covers and found as new original French woolen fabric that almost matched the recovered front seats! Later again I took it to the trimmers and had the door trims done with the rest of the woolen fabric, the seats being better left original. They said "We reckon there's enough to do the head lining too. Shall we?" The old head lining was fabric and dying, so I said yes. They ended up with about one square foot left over and did a superb job.
You wouldn't read about it!
I am making progress - close to the end! The tension on the fabric (front to back) is held by the board that the sun visors mount to. One of the visor mounting screws held the tension on each end (without the visor). As I got to the front, I realized that removing the screw to install the visor might mess up the tension. I was able to add an additional screw that will be underneath the visor mount. Now my tension will not be lost when installing the sun visors. I started cutting off the extra at the front and tucking the little bit remaining under the board.
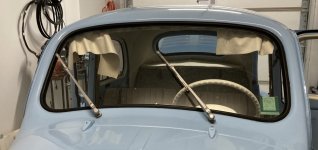


You can get bigger bottles. Great effort and thanks for sharing it.
That looks perfect to me. Great work.
DittoThat looks perfect to me. Great work.
Geez, Stan. I would have had the wine in the car. In fact that interior looks so pretty I would move in. At least until I would re-upholster the seats and become paranoid about staining them. Seriously that interior looks like such a nice place to be.
Wow Stan, your car is gorgeous.
Funny, I've never really been taken with the 4CV. It was always the Dauphine that caught my eye, and later Renaults, especially 12, 15, 16, 17, 18 and 20.
But there is something about your car's colour combination, it is perfect. I love it.
Funny, I've never really been taken with the 4CV. It was always the Dauphine that caught my eye, and later Renaults, especially 12, 15, 16, 17, 18 and 20.
But there is something about your car's colour combination, it is perfect. I love it.
