Another XM Top Suspension Mount Bites the Dust

JAJEA

Well-known member
VIP Paid Subscriber
Fellow Frogger
Joined
Apr 9, 2013
Messages
1,165
Location
Essendon
In the process of replacing the gaiters on my XM.

The RHS Macpherson strut did not feel right when I tried to remove the top nut as the whole top (inclusive of the sphere of course) rotated.

It is of the later design but as David and et al had eluded a number of times, whilst they will not not protrude through the bonnet, they are still prone to failure. This one certainly has.

Hence, in dire need of another one forthwith and wondering if there is one lurking around in somebody's garage or insitu in the back yard before going over seas.

Please advise, quite happy to remove if in Melbourne (or near by).


Regards,

John

PS: I have 2 others from a Xantia but are not with the 10mm inlet.

PPS: Does the bottom half of the mount that incorporates the mount to the body of the XM unscrew from the top relatively easy?

PPPS: Goes without saying - prepared to pay
 
Last edited:
Yes, I have a broken later type mount from a late 24 Valve XM. The bottom ring had completely detached from the top part, but didn't damage the bonnet. If you remove the 4 nuts around the mount in the top of the body tower, the mount comes out the bottom with the sphere and pipe removed.

The strut tops / mountings are not the same as Xantia. Look at the bolt pattern and angle of sphere mounting.

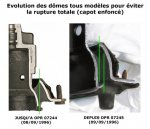
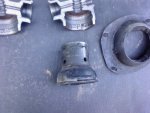
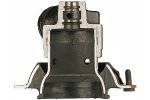
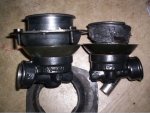
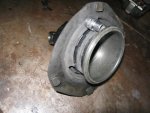
The following images should explain the difference between early and late mounts (lifted from the internet except for the final image comparing a new late and broken early type mounts, which is mine):
08.43.jpg2760267730_ac9cfd2e5f_o.jpgfbh-15.jpgXMStrutMounts_Old_New.jpg
In the final picture, which are left and right mounts, you see the increased depth of the later style mount. The lip at the bottom is steel, where the older type is a rubber lip. The gaiter, common to Xantia, is a slightly larger diameter to fit over the steel lip versus the older type fitting the rubber lip. You can *just* make the early gaiter fit a later mount with perserverence.

You also have to remember that early cars, like yours, had smaller diameter struts and most late cars have the same type of larger diameter strut. Some have been retrofitted with the later type. The quickest way to pick them is the top nut being 27mm AF. If it's 24mm, then it's an earlier / smaller diameter part. Centre holes for the piston taper are 20mm on top and 24mm on the underside.
(Edit - Some 27mm nuts have M16 thread for 22mm shaft - see http://www.aussiefrogs.com/forum/ci...-suspension-mount-bites-dust.html#post1583271)

If you find a 96... part number moulded into the rubber underside, it is the number of the bottom part used on both LH and RH mounts and then pressed into the cast sphere mount top, the angle of assembly being different to make either a LH or RH mount. It will not tell you if you have a LH or RH mount by itself.
 
Last edited:
Yes, I have a broken later type mount from a late 24 Valve XM. The bottom ring had completely detached from the top part, but didn't damage the bonnet. If you remove the 4 nuts around the mount in the top of the body tower, the mount comes out the bottom with the sphere and pipe removed.

The strut tops / mountings are not the same as Xantia. Look at the bolt pattern and angle of sphere mounting.

The following images should explain the difference between early and late mounts (lifted from the internet except for the final image comparing a new late and broken early type mounts, which is mine):
View attachment 108511View attachment 108512View attachment 108513View attachment 108514
In the final picture, which are left and right mounts, you see the increased depth of the later style mount. The lip at the bottom is steel, where the older type is a rubber lip. The gaiter, common to Xantia, is a slightly larger diameter to fit over the steel lip versus the older type fitting the rubber lip. You can *just* make the early gaiter fit a later mount with perserverence.

You also have to remember that early cars, like yours, had smaller diameter struts and most late cars have the same type of larger diameter strut. Some have been retrofitted with the later type. The quickest way to pick them is the top nut being 27mm AF. If it's 24mm, then it's an earlier / smaller diameter part. Centre holes for the piston taper are 20mm on top and 24mm on the underside.

If you find a 96... part number moulded into the rubber underside, it is the number of the bottom part used on both LH and RH mounts and then pressed into the cast sphere mount top, the angle of assembly being different to make either a LH or RH mount. It will not tell you if you have a LH or RH mount by itself.


Thanks David, you are spot on; I can not use my Xantia spares for the XM.

Nevertheless I do have the modified / later unit that will need to be refurbished in due course so the need for a replacement is there.
 
As mentioned in a pm, but for the benefit of others changing a cylinder, strut top or just a gaiter on an XM or Xantia ...

You should be able to safely refit a failed late type strut mount to move it about. Don't drive it far like that.

A hoist isn't needed to change the front strut tops, suspension cylinders or the gaiters. Just support the body under the subframe bolts with stands and a small piece of wood to spread the load and it's all fairly easy to work on. I use a jack under the ball joint to lower and raise the knuckle and cylinder. The orange urethane bump stops push up inside the top of the mount. They are NLA.

You shouldn't need a rattle gun to undo the top nuts, but even a half failed mount would likely hold together when using one. The rubber is really very robust. Remember it has to support the weight of the car. I just use a large socket and a breaker bar.

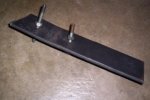
It's also easy to make up a splitter tool to break the taper and save the top of the shaft from damage. A piece of flat bar with two studs/bolts with nuts to pull the bar down and exert pressure on the shaft is all you need. Support the hub, load up the tool, which will probably bend the flat bar a bit, then a couple of sharp taps in the middle of the flat bar should usually see it let go. Mild steel bar is softer than the shaft, so it will be bruised before the shaft mushrooms and you are not making a tool to use daily.

So that you don't have LHM going everywhere when disconnecting the cylinder shaft from the mount, begin by removing the sphere and lifting the hub as far you can with a jack, catching the displaced fluid in a container. Otherwise, it can be a really messy and slippery job! You then want the hub at the lowest position to break the taper as the suspension geometry twists the rubber more at low height than at maximum height.

Pictures of my bodgy tool here:

XM_Strut_Tool1.JPGXM_Strut_Tool2.JPG
 
Wow.... I need some advice here guys.

I've recently acquired an early XM (90 model) that was last registered in 1998. The car only has 125k on it, but is in poor condition mechanically, from sitting around. I've been going through various things (head gaskets, cooling system, height correctors, flow dividers, blah blah blah..) but am now horrified about these strut tops. I also have a BX & know about a similar problem with the BX strut tops, but seeing your pictures, I realise they fail in a different position, & me, looking at the rubber mounts from underneath the wheel arch whilst the car is suspended, looking for cracks in the rubber is useless..

Soooooooo... What should I be doing?? I don't want to end up with a strut through the bonnet (like who does!!) & I don't really want to make some kind of "catcher" to catch it when it breaks.. Ideally, I'd like to be ahead of this & KNOW they are ok... Is this even possible? Can I pull them off & check them?.. Am I able to identify if they have have been changed to the later type (steel ring to hold the gator on as opposed to rubber??)

Your thoughts please sirs!

Jason.


Sent from my Pixel 2 XL using aussiefrogs mobile app
 
Jason, the mounts are very strong, but obviously don't last forever.

The quick check is to put the car to max height and look for cracks from below. Folds are OK. Even some loose strands of webbing is OK. Slight surface cracking should be OK too, but tells you the mount is ageing and will want replacing. Deeper cracks and tears are not OK. At the top, see if one mount has moved up more than the other as a guide. The so-called 'broomstick' test.

You then want to determine which type you have fitted and then their condition. At max height, pull the gaiters down and look at the bottom of the mount, comparing it to the pictures I posted above. If it has the steel lip, it is the later type that is designed not to go right through in the event of failure. If the bottom of the mount is all rubber and protrudes past the bottom of the mount by about 10mm, then it's the early type.

If you have the early type, you need to look at the bottom ring and see if it remains round at max height. If it does, the mount is probably OK for the moment. If it is oval in shape, then the sides are pulling in and it will be sagging. If it has become very distorted, you want to change that mount ASAP. If you have the late type, the bottom steel ring doesn't distort, so you can't use this check as a test.

Remember the rubber is loaded up more at low height than at max height due to the suspension geometry. This probably why these mounts seem to be reported as usually failing when parked.

It's also worth pointing out that the rubber has two gaps that allow for greater movement at the front and back (as car rises/falls) than at the sides. This is not a fault, but part of the design.
 
replacement ones can be obtained from Elastomer company in Lithuania, just google elastomer.eu
 
I'm about to send off an inquiry to Elastomer EU whilst trying to convince my wife that they are not heavy and that she should get over there to pick a couple up in Kaunas (she just happens to be in Lithuania and just 1 1/2 hours SW of there). Quite understandably, she cannot but I thought I'd try.

She did however searched the local Google and came up with this supplier. I copied and pasted and came up with this:

Suspension Strut Support Bearing Citroen XM - DBK Dimitrov - ????????? ? ?????????????? ??????? ??????? ??????? ? ????? ?? ????

I think it is in Russia; no idea how safe of a site as I always look for the "https" notation.

Anybody know of them or anybody installed their mounts?

Regards,

John
 
The Lithuanian guy is very good to deal with, unknown vs known...
 
In recent years the Poms have also got onto using the Lithuanian guy and I have heard no bad reports. You have two choices.

1/ Use him
2/ Redesign the suspension system of a car

I know what I'd do.
 
pity you can't con the missus into dragging the struts OS. You might be able to talk her into taking them, and then getting someone to post them. Ask Elastomer man ( sorry cannot remember Dimitri's name...) to post replacements to her there. Then back on the plane.

He did a set for me without getting rhe old ones back as I couldn't cope with coughing up for the postage there. He was very very helpful making sure he were on target with the pipe and thread dimensions, many back and foeth emails till in full agreement that I was getting rhe right ones. So thumbs up for them.

ps heard a funny one on tv comedy the other night, what are the two best things about being in a relationship?
Your partner will take you to the airport.
number 2. Your partner will pick you up from the airport. Just saying....
 
I used the Lithuanian mob a couple of years ago. Everything went OK and I am still gliding around in the XM :banana:
 
I used the Lithuanian mob a couple of years ago. Everything went OK and I am still gliding around in the XM :banana:


Good to hear SMM, just hope that they have what my XM needs already on the shelf and don't need to wait for mine to refurbish.
 
Trainspotter topic alert ...

Further on the strut top nuts as JAJEA's XM apparently has 27mm AF nuts and 22mm strut shafts, rather than a 25mm shaft as the larger nuts might suggest.

For XM2 there are two nuts listed in the parts diagrams - M16 and M18 threads. I hadn't noticed that before and I've not encountered the M16 version. The M18 nut (527143) is meant to be 12.4mm thick, while the M16 nut (527142) is 12mm - hard to pick that difference I guess, but M16 vs M18 thread would be easier. For XM2, the M16 thread is used on models with XU10J2, XU10J4R and XUD11A engines - none sold here, but maybe a few used imports.

For XM1, from RPO 5789 (14/9/92) the nut changed to the 27mm AF 527142 with M16 thread. The earlier nut would have been 24mm AF. So, the nut AF measurement alone is not a definitive check as JAJEA's case reveals, being a later XM1 example.

In case anyone is not aware, the RP number corresponds to the build date. For an XM, it should be marked on the LHF door pillar or maybe under the bonnet. Also, you can normally find the paint code stencilled on the top of the LHF chassis rail behind the headlight.
 
Update.

I have removed and checked out the LHS strut mount and whilst it appeared serviceable, it is not. One side of mount has disbonded, other side good as new. (I had used a vice to hold and stress the mount to determine how good it appeared to be.)
IMG_4864.jpg

As a result of the bond failure between rubber and metal I was wondering just how Elastomer Eu refurbishes the mounts and asked a few technical questions with no response. (Maybe worried that I was fishing for their expertise.)

SMM, Forumoreason, any idea if the elastomer is cast in-situ or bonded to the 2 metal components. And, what is the end result? Does it look the part under the bonnet? A photo would be appreciated.

By the by, for anybody tackling the removal and reinstatement of the Macpherson strut onto the mount {in any vehicle). Gee that shaft is slippery and I had difficulty in getting it "home" into the tapered housing on top of the mount..

However, where's a will there is a way. (Sorry photo's askew - it was not.)

IMG_4866.jpg

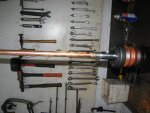
I used a 6mm allen key (cut short end off) to suit the corresponding 6mm provision in the shaft and increased the diameter by wrapping Gaffa Tape around it to suit the ID of a 1/2 inch copper water tube. Once the strut was under the mount, I dropped the allen key onto the shaft and the copper tube through the mount in order to guide the shaft as it was raised.

IMG_4867.jpg

PS: Gaiters cable tied in the interim to minimum size to keep out of harms way.

Look forward to some photos of Elastomer Eu's refurbished mounts.

John
 
They are back from Lithuania.

Total cost AU$ 612.70 delivered to my door all inclusive of all charges (which includes my AU Post of $135.21).

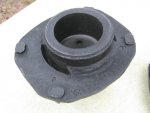
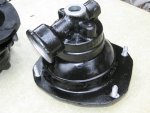
IMG_4891.jpgIMG_4892.jpg

By the by, prior to placing order, I had discussions with Irmantas Galinis of Elastomer EU re the failure of Citroen's OEM parts in that the failure with mine (in any case) was due to bond failure between rubber and metal and thus queried / requested that they incorporate in addition to reliance on bonding of the elastomer to the metal components some mechanical fixings and he assured us that they have modified the mount so that there is also a mechanical attachment between the two.

So, very happy with them notwithstanding that time will tell.

I reckon they'll see the XM out.

Regards,

John
 
Top