How do you adjust the limits to prevent the windows from rolling up too far? I tried sliding the tracks themselves down as far as I could, but the window still can be rolled up uncomfortably close to the roof rail

You are using an out of date browser. It may not display this or other websites correctly.
You should upgrade or use an alternative browser.
You should upgrade or use an alternative browser.
DS19 windows roll up too far
- Thread starter citroenthusiast
- Start date
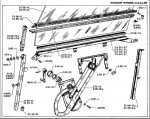
Upper limit is via the two small bolts on the glass bottom and moving the track. There's also a single Philips (not Posidriv for a change) screw holding a small wedge that stops the arm moving too low. It faces you when the regulator is in the door. Adjust that to set the lower limit.
Alternatively, lower the door?
Alternatively, lower the door?
Last edited:
How do you adjust the limits to prevent the windows from rolling up too far? I tried sliding the tracks themselves down as far as I could, but the window still can be rolled up uncomfortably close to the roof rail
Hi John,
There should be two M5 stop screws left and right. these come up against tabs on the window slides to stop the glass moving too far.


Cheers
Chris
BE REALLY CAREFUL ADJUSTING THEM.... GUESS HOW i KNOW YOU CAN SMASH A WINDOW IN THE BLINK OF AN EYE  you swing the door shut and it'll snag the roof or one of the pillars and "bang" ... you get a nice glass shower
seeya,
Shane L
you swing the door shut and it'll snag the roof or one of the pillars and "bang" ... you get a nice glass shower seeya,
Shane L
Hi Guys,
This is an interesting topic, and in all my time with Citroen, I have never seen any printed info from the factory on disassembly and reassembly of a DS door and window glass.
The adjustment on the two side rails is by different thickness washers, so If your starting from scratch to fit out doors during a restoration, some factory info as to where you start would be a good move.
While I've done my share of glass replacements etc, starting from scratch is a whole different ball game.
There must be a measurement between the two rails, as you need to remove the rails to add or remove the adjustment washers. And then the position of the two rail alters the location of the glass in the door?
Once you have the rails set up in relation to the position of the glass in the door opening, the rest is pretty straight forward.
The adjustment for the height of the glass is as David stated, by the metal wedge shaped bracket on the arm.
There are a few Phillips Head screws on the late DS, the attachment screws on some Pallas interior lights are Phillips.
Pozi Drives were a later development, and came in around the late'60s, and as the design for the window winder mechanism didn't change, the supplier stuck with the original Phillips screws?
While Citroen generally changed the thread pitch for 5MM screws around 1970 (?), there were some .75 pitch fittings that were fitted to the DS, and remained .75 for the rest of the production life of the car.
So, If anyone has has factory procedures for the fitting out of DS doors..........Yes Please!
Best regards,
Greg
My assorted notes on fitting out the bare doors from a couple of years ago in case it helps anyone ...
DS doors (Late handles)
Observations and the order of assembly seems to be:
* It's a two person job to make it easier. Door panel is fitted to car.
* Lock, then outer handle. Adjust the rod with the striker in the locked position!
* Window tracks fitted with some spacers for a trial fit of the glass. The top stud gets at least one thin 'shim' washer to fit inside and the 2mm thick plain washer as a starting point. Bottom stud uses large washers. You can change most of the spacers without removing the tracks if you move the glass up or down to free the top or bottom of the tracks from the door frame.
* The rear door tracks are paired, but not sided. You can use the same part at the front of the left rear door and the back of the right rear door, say.
* The tracks need to be fitted with the kink at the top so the glass will be pushed inwards against the door seal at the top of its travel.
* Front door tracks are longer than the rear tracks. It's worth noting that the front doors have one track with a cutout near the top to clear the lock. A track without the cutout can be fitted there in error, which would then foul the lock.
* The slots in the door frames for the track studs to slide in have an extended slot at the bottom and that's to correctly position the tracks to accept the glass during assembly. Obviously, that means
the tracks need to be slid down when removing the glass. At the top it moves the track sideways to accept the glass.
* If the glass will not enter, remove a spacer etc. until it fits. Moving it up and down without the regulator is not an entirely reliable check as the glass can tilt and seem loose fore and aft.
* Lube tracks and nylon glass guides. I used some dry lube and then Nulon Teflon assembly goo on the glass guides. Insert the glass, tie a rope or strong shoelace through each of the two holes in the glass holder frame and lower to the bottom of the door.
* Fit furry draught excluder strips, which can't fit when the glass is passing through the top of the door. The repro parts are thicker at the bottom than the originals it seems, so they will push the
glass towards the outside of the door more than the originals.
* Fit the clips (paint them black esp for non-Pallas) for the rubber waist sealing strip. Fit the rubber strip. I acquired a generic strip from Citroen Classics in the UK and they have to be cut to suit, but they are significantly less expensive than the repro parts. However, they are deficient compared to the original because the original has a thick rib at the bottom to hold the glass away from the retaining clips and a fine rib halfway down to engage with the retainer clips. So, the aftermarket part doesn't stay put as positively as the original and the thicker furry strip means the glass will rub on the clips. Fixed this by crimping up the clips a fraction and gluing felt rubbing strips to the inside of the strip between the clips.
* Lift the glass up and install the window regulator using the steering column tool to open the spring hoop.
* Fit the small bolt at either side of the glass holder frame with the glass down as these are the upper stops. The rear doors have cutouts in the frame for access to these at about 1/4 up.
* Set the bottom stop on the regulator arm. It's a quite clever wedge design retained by a screw. Note the screw is a Phillips head and NOT Posidriv like most of the other screws on the D.
* Adjust the glass position. Set the upper track nuts low and then progressively raise them as needed.
It's really quite straightforward once you figure out how it's meant to work. If I had to change a glass, I'd now remove the reg, drop the glass down, remove the rubber and furry strips at the top of the door and drop the tracks to their lowest position.
Pallas door trims require a strip to hold the top of the door card. The screws for this are not all the same length and each door has one short screw. The front door has it in the middle hole and the
rear door adjacent to the lock unit.
More ...
Door handles are interesting to refit and lack really positive fore/aft location as there is a slot in the door frame for the bolt fastened by the flat nut. A piece of old tube cut to make a washer and fitted under the shoulder of the special bolt so that it deformed into the smaller slot will hold it fast. If it moves, the adjustment of the rod to the lock will not remain constant.
In the absence of a better procedure, it seems a good method is to disconnect the long rod at the door lock and pull it out of the large hole for the handle by an inch or so. Then you can get at the
bend and fit the handle with the rubber rattle preventer that resembles a figure of 8. Once it's fitted and the nut/bolt tightened to retain the inside handle, the lock rod needs adjustment. Although the late front doors do not allow the handle to lock as the rear ones do, both front and rear doors can be lock from inside by pushing the lever forward inside. So the door handles need to be adjusted so the lever can both open and lock the door. With the catch of the lock rolled over to the locked position and the kiddie lock lever disabled at the back, set the handle's lever about half way and then do up the grub screw at the lock at the back of the door. Check the operation of the inside handle so it can both lock the door and open it from inside the car. If the handle moves back when the door is locked from inside, you may find it will not open from inside the next time you try it. Hence the extra bit of rubber to help locate the silly thing!
Edit: Having now done all 4 doors ... the door pull rods for the locks appear not to be sided. On the right side, the hook at the end points down and on the left doors, it points up. This means you have to turn the handle when fitting in opposite directions. At left, you turn it anti-clockwise, down from the top. At right you turn clockwise, up from the bottom.
Fitting the stainless trim at the top of the door trim can be a challenge. They are a pain to remove and a pain to refit. Removing the ribber weatherstrip improves the access. In the end, the rear doors I got lucky with and they snapped on fairly easily by hand. The driver's door went on with a few taps against a block of wood. The left front would not oblige and needed persuasion with adjustable-jaw pliers and a strip of steel on the inside edge. There's probably a tool for this, or should be at any rate. It seems to help to dress the edges of the stainless trim and the steel base before trying to fit it. There are inevitably dags from removal that would prevent it being refitted easily. Offer the strip to the door so the face is just before 12 and then push it down into the furry strip and it should slip under the steel mounting strip. It should then be securely engaged when the face is folded down to about it's normal position ready to be clipped over the inner edge.
Last edited:
Upper limit is via the two small bolts on the glass bottom and moving the track. There's also a single Philips (not Posidriv for a change) screw holding a small wedge that stops the arm moving too low. It faces you when the regulator is in the door. Adjust that to set the lower limit.
Alternatively, lower the door?
Thanks for the information. The M5 cap screws are there, but I will have to check if they are possibly not driven in far enough/too far. Is it the head of the M5 screw or the tail that hits the stop tab on the window guide channels? If it is the head, then possible a bushing around the screw would lower the stop point a bit more.
While Citroen generally changed the thread pitch for 5MM screws around 1970 (?), there were some .75 pitch fittings that were fitted to the DS, and remained .75 for the rest of the production life of the car.
Best regards,
Greg
Don't mean to hijack the thread but couldn't let this pass. What did the 5mm thread pitch change from and to please?
Sent from my iPhone using aussiefrogs
Don't mean to hijack the thread but couldn't let this pass. What did the 5mm thread pitch change from and to please?
Sent from my iPhone using aussiefrogs
Sent from my iPhone using aussiefrogs
Don't mean to hijack the thread but couldn't let this pass. What did the 5mm thread pitch change from and to please?
Sent from my iPhone using aussiefrogs
Early cars were M5 x 0.75 all over. Later cars used M5 x. 0.8 in many places, however, the M5 x 0.75 were retained in some places, including most annoyingly the four bolts that hold the cross member under the spare tire, which are easy to drop into the engine bay to be lost forever. These I usually convert to M5 x 0.8 by running a tap through.
Gee I'm glad John has raised this and great responses as I'm painitng my doors this week Allah willing, (bogging starts today!) and this info is a godsend. I knew it was going to be fiddly, worse than a Masterchef final I didn't anticipate when dismantling and whilst I boxed all door parts failed to detail exactly what spacers went where for reassembly!
Hi Guys,
Yes David is correct the wedge is the adjustment for the lower glass limit.........
But when it comes to the upper limit, this is entirely dependant on the location of the two side rails. They fit into vertical slots and the higher you position those rails, the higher the glass will go up. Obviously the both rails should be at the same height both sides.
If you don't have the rails set so that both stops align the following can happen:
The side rails also makes the windows move in towards the end of it's travel, to make the glass seal better. There is a dog leg at the top of the side rails to push the plastic runner in towards the car to enhance sealing. If the runners are worn, especially the two small anti rattle legs, then they don't push the slider over enough, and the inwards movement doesn't happen.
The other problem is, if you have the rear slider set lower than the front, the the window will come to it's upper limits, but at the front, the dogleg will be beyond the glass slider, and there will be no inward movement of the glass.
Both plastic slides should come to the very top of the side rails if the sliders are adjusted correctly. Rising the front slider will make matters worse, and to correct the problem the front slider needs to be lowered.
If the sliders are adjusted correctly, both sides of the glass should move in simultaneously.
Cars that have the glasses pop out at speed usually have the side rails badly adjusted and the sliders worn.
Finally, all this isn't going to do much if the doors are located and hung badly on the body to start with.
So, 12 month later, and you now have every thing aligned perfectly, Der Franzose has a small bottle of rubber lube. It has a sponge applicator, and does a great job of making the door rubber easy for the glass to slide on.
Hope this helps, it's certainly refreshed my memory?
Best regards,
Greg
Hi John,
There should be two M5 stop screws left and right. these come up against tabs on the window slides to stop the glass moving too far.
Cheers
Chris
Are we looking at the front or back side of the window channels here? i.e. do the stop tabs face the door skin or do they face toward the inside of the car?
Hello, this link has been on Aussiefrogs before, all about doors
https://www.youtube.com/watch?v=ZDdF-yvocrw
I did giggle when I saw the yellow clogs
https://www.youtube.com/watch?v=ZDdF-yvocrw
I did giggle when I saw the yellow clogs
Are we looking at the front or back side of the window channels here? i.e. do the stop tabs face the door skin or do they face toward the inside of the car?
The bent part is at the top and pushes the glass inwards at the top of the travel. So the stud locations (facing out) ensure the stop tabs will be closest the skin for that pair. If fitted, you'd be looking at them from through the skin in that picture.
Are we looking at the front or back side of the window channels here? i.e. do the stop tabs face the door skin or do they face toward the inside of the car?
Hi John,
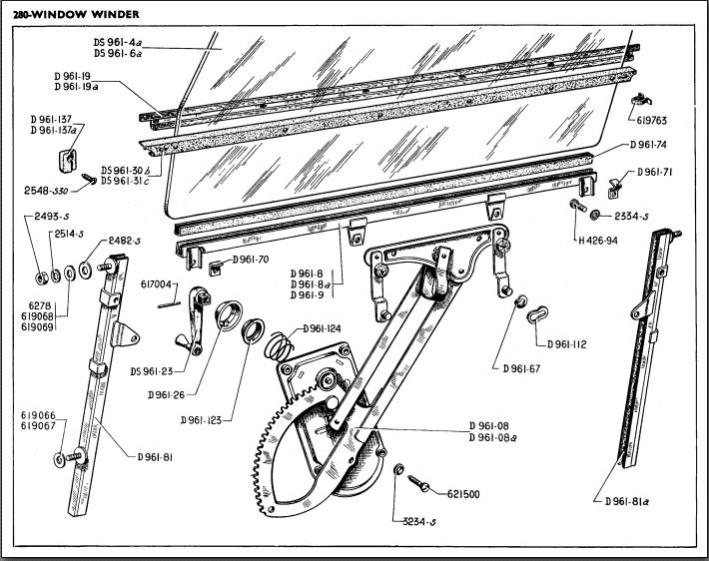
Looking at Manual #466 DS19 (page 294) there are 3 diagrams for the window mechanism. This one specifically relates to USA cars - may be of some assistance? In answer to your previous question, the stop screw with washer is tightened all the way home, these need to be removed to allow removal of the glass.
Quite different to what I presume is the earlier French version, note the slide appears to be straight i.e. no dogleg to cause the glass to tighten against the door rubber . . .
Cheers
Chris
Attachments

Hi David,
Thanks for the info supplied. Good to have something in writing to refer to. I've printed it out for future reference.
Best regards,
Greg
Thanks for the info supplied. Good to have something in writing to refer to. I've printed it out for future reference.
Best regards,
Greg
I haven't got round to my window setup as yet but this is all good information. I did know about the nylon parts DS 961-175n and was intending to model and print (in nylon) some new ones. Before I go to the trouble does anyone know if they are available as NOS and from where?Hi John,
Looking at Manual #466 DS19 (page 294) there are 3 diagrams for the window mechanism. This one specifically relates to USA cars - may be of some assistance? In answer to your previous question, the stop screw with washer is tightened all the way home, these need to be removed to allow removal of the glass.

Quite different to what I presume is the earlier French version, note the slide appears to be straight i.e. no dogleg to cause the glass to tighten against the door rubber . . .
Cheers
Chris
SF
Well, I figured out a simple solution. I cut a couple of pieces of 5/16 inch steel brake line about 1/4 inch long to make a pair of bushings. I fitted these over the stop screws, which I then threaded backwards into the window support channel D961-8 so that the stop tabs on the window guide channels now hit the bushings. This gave me just enough extra margin so the window now stops safely clear of the roof rail.