
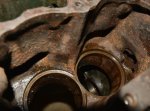
I'm currently in the middle of the rebuild of an early Citroen DS19 engine. While the interested audience for a blow by blow description of what is involved in this project is limited, I'm happy to document this if there is sufficient interest. Although it is specifically a DS19 engine, most is applicable to all the 3-bearing engines up to 1965.
Let me know your thoughts.
roger
Let me know your thoughts.
roger


 :wink2: