
Once we step away from the "classics" where parts are readily serviced at sane prices, there are such difficulties.
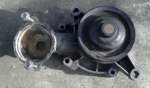
I have a leaky PRV water pump* (two, actually - one is a spare). Replacements are thin on the ground and upwards of $350. Many people list phantom stock; been there, bought that, got the refund and apology...
What I want to know is what's involved in a water pump rebuild when the shaft sealing ability is rooted? These pumps are a pretty old school type, bolt on and driven by a multirib belt - not the timing kit.
Input is appreciated; I promise not to argue with Robmac out of sheer cussedness. :wink2:
* Another casualty of the blocked cat problems. Overheating has blown out the seal - been like that since purchase and loses about 5ml/km.
 ) like a Valeo or QH swap the parts to it.
 ) it to use off the shelf seals and bearings because sure as hell the OEM parts will be like rocking horse poo to obtain.
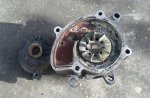

 jaahn.